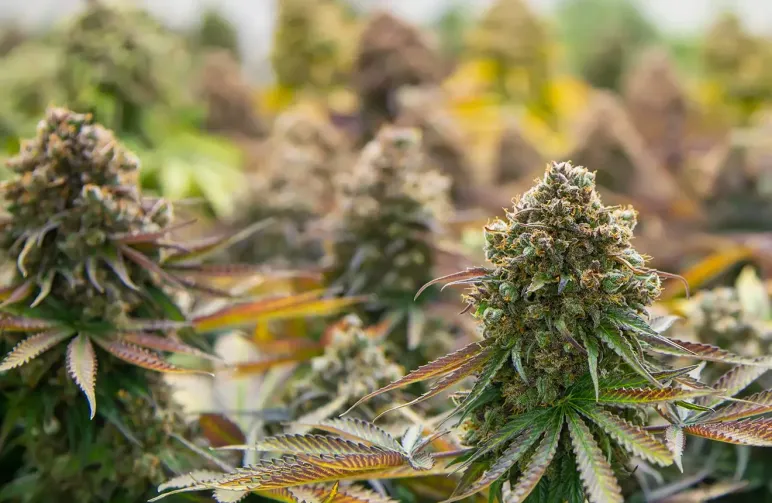
If you've ever stared at a jar of top-shelf flower and thought, "I want to grow that," you’re in the right place. This is your ultimate beginners guide to growing weed indoors.
Growing at home puts you in control of everything: light, air, temperature, and humidity so you can run clean, consistent harvests all year round.
With a smart plan and a little discipline, you can go from seed to sticky in about 3–4 months.
We've run countless tents, rooms, and experiments in our Amsterdam lab, and we'll walk you through the exact playbook we use for reliable, high-quality results.
We'll keep it friendly, practical, and real. You'll get the what, why, and how at every step, from picking seeds and dialing in your climate to nailing the dry and cure.
We will also flag the pitfalls that trip up first-timers. By the end, you'll have a confident blueprint and the itch to start your first run right away.
Why Grow Cannabis Indoors?
Before we dig in, a quick golden rule: Always know your local cultivation laws. Once that is sorted, indoor cultivation puts you in the driver's seat.
You have no weird weather swings, no pests blowing in from the neighbor's yard, and total privacy. We set the stage; the plants perform.
Once you've got the space and basics sorted, the process is straightforward:
- Germinate your seeds
- Grow a healthy vegetative canopy
- Flip to flower (for photoperiods)
- Harvest, dry, and cure
Most indoor grows land between 10–16 weeks total, depending on whether you choose fast-growing autoflowers or traditional photoperiod genetics.
Expert Tip: If you take nothing else away today, take this: Watch the plant, not the calendar. Numbers and schedules are just guide rails.
Your plants will tell you exactly what they need through leaf posture, color, vigor, and trichome development. We'll show you exactly what to look for at every stage.
Step 1: Planning Your Indoor Garden
Before you buy a single piece of gear, check your local laws regarding home cultivation. We'll never push you into a sketchy situation—compliance comes first, always.
Choosing the Right Grow Space
You don't need a whole basement. Plenty of us started in a closet, a standard grow tent, or even a spare bathroom. However, to get dense buds, your space needs five key traits:
- Light-Sealed: You need total darkness during the "night" cycle. Even a pinhole leak from a streetlamp can confuse photoperiod plants and cause them to herm (grow seeds).
- Reflective: Walls should be lined with Mylar or flat white paint to bounce stray photons back onto your leaves. Black or dark walls waste light.
- Spill-Safe: Overflows happen. Use a waterproof tray or floor liner. If you are growing on carpet, this is non-negotiable.
- Vent-Ready: You need a way to move air. Ideally, you want cool air entering low and hot air exhausting high (since heat rises).
- Power Accessibility: Ensure you have safe access to outlets. Safety Warning: Avoid daisy-chaining power strips. Use a high-quality surge protector and ensure your circuit can handle the load of lights + fans.
Tent Size & Plant Count Guide
One of the most common questions we get is, "How many plants can I fit?" Here is a quick breakdown for common beginner setups:
| Tent Size | Recommended Plant Count | Best For... |
|---|---|---|
| 2' x 2' | 1 Plant | First-time growers; small yield; minimal cost. |
| 2' x 4' | 2–3 Plants | The standard beginner setup. Fits in a closet. |
| 3' x 3' | 2–4 Plants | Square footprint; great for high-efficiency LED bars. |
| 4' x 4' | 4–6 Plants | High yield; requires more lights/fans; allows for training methods like ScrOG (Screen of Green). |
Note: You can grow more plants in these spaces if you keep them small (Sea of Green), but for beginners, fewer plants usually mean bigger, healthier buds.
Planning the Workflow
Don't just plan for the plants; plan for you.
- Access: Can you reach the back plants without performing yoga? You will be watering, defoliating, and inspecting for pests daily. If you can't reach it, you will neglect it.
- Water Handling: Keep a dedicated mixing bucket and a wet/dry vac nearby. Hauling water across the house is the #1 reason people quit growing.
- Sanitation: Start clean and stay clean. Wipe surfaces with isopropyl alcohol between cycles.
Don't invite spider mites to the party.
Pro Tip: Sketch your layout—pots, fans, carbon filter, and duct runs—before you unbox anything. We still do this on scratch paper before new builds to ensure we have enough cable length and ducting.
Step 2: Essential Equipment Checklist
Lighting and airflow are the heartbeat of an indoor grow. If you get these two right, you are 80% of the way to a top-shelf harvest. "Buy nice or buy twice" applies heavily here.
1. Grow Lights: Why LEDs are the 2026 Standard
While Old School growers used HPS (High-Pressure Sodium) bulbs, Full-Spectrum LEDs are the undisputed king for home growers today. They run cooler, use less electricity, and produce a spectrum that mimics natural sunlight.
How much light do you need?
While professionals measure light in PPFD (aiming for 600–900 µmol/m²/s in flower), most lights are sold by wattage. Use this quick guide to size your light:
| Tent Size | Recommended LED Wattage (True Watts) |
|---|---|
| 2' x 2' | 100W – 150W |
| 2' x 4' | 240W – 320W |
| 3' x 3' | 300W – 400W |
| 4' x 4' | 450W – 650W |
Crucial Feature: Ensure your light has a Dimmer. This allows you to turn the intensity down for seedlings (saving electricity) and crank it up for flowering.
2. Ventilation & Smell Control (The "Lungs")
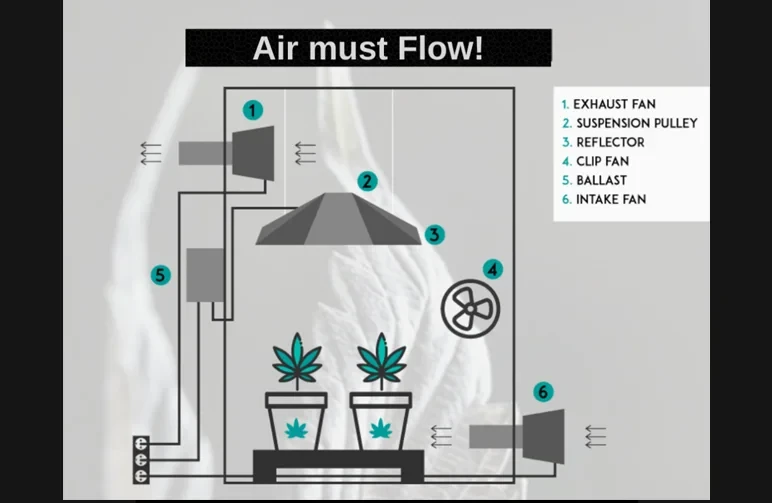
Proper airflow is non-negotiable, as your plants need fresh CO2 to grow; our ultimate guide to grow room ventilation and odor control covers this in-depth.
- Inline Fan: This is your exhaust. For a standard 4x4 tent, a 6-inch AC Infinity or similar fan is standard.
- Carbon Filter:Do not skip this. Even one plant can make your entire house smell like a skunk. The filter scrubs the odor before the air leaves the tent.
- Negative Pressure: Your exhaust fan should be strong enough to suck the walls of the tent inward slightly. This ensures that all smells are forced through the filter, not leaking out the zippers.
- Circulation Fans: Inside the tent, use 1-2 small oscillating fans. You want the leaves to gently "dance," not suffer from windburn. This prevents mold and strengthens stems.
3. The Grow Medium: Why Soil is Best for Beginners
For your first grow, skip the hydroponics and coco coir. High-quality soil is the most forgiving medium because it acts as a buffer for pH fluctuations.
However, not all dirt is created equal—check out our deep dive on the best soil for growing weed to find the right nutrient balance for your seedlings.
- The Soil: Look for "Super Soil" or pre-fertilized mixes like Fox Farm Ocean Forest or BioBizz All-Mix.
- The Pot: Use Fabric Pots (3 to 5 gallons). Unlike plastic, fabric pots let air reach the roots, which "air-prunes" them and prevents the plant from becoming root-bound.
4. Climate Control & Monitoring
Thermo-Hygrometer: You need a digital sensor to track Temperature and Humidity. Get one that records "Min/Max" so you can see if your tent got too cold at night.
Humidifier/Dehumidifier:
- Seedlings love humidity (60-70%).
- Flowering plants hate humidity (40-50%).
- Depending on your local climate, you will likely need one of these devices to keep the environment in the "Goldilocks Zone."
5. Water & Nutrients (The "Chemistry" Set)
- The pH Pen: This is the most important tool in your arsenal. Cannabis roots can only absorb nutrients if the water pH is between 6.0 and 7.0 (for soil). If you guess, you will fail.
- Nutrients: Keep it simple. A basic "3-Part" nutrient line (Grow, Micro, Bloom) is all you need. Ignore the expensive additives until you have a few harvests under your belt.
Safety First
Electrical Safety is non-negotiable. Water and electricity are neighbors in a grow tent.
- Always use GFCI outlets.
- Keep all plugs and power strips off the floor (mount them to the tent poles or wall).
- Check the amperage rating of your circuit breaker before plugging in high-wattage lights and heaters.
Step 3: Choosing the Right Seeds
Genetics set the ceiling for your grow. You can have the best lights and nutrients in the world, but you cannot grow top-shelf buds from mid-grade seeds.
1. Photoperiod vs. Autoflower: Which is Best for Beginners?
This is the first decision you need to make, and our complete autoflowers vs photoperiods guide will help you choose the right path for your goals.
- Photoperiods rely on the light cycle to flower. They stay in the vegetative stage as long as they get 18+ hours of light. You trigger flowering by switching to 12 hours of light and 12 hours of darkness.
- Autoflowers flower automatically based on age, regardless of light.
| Feature | Autoflowers | Photoperiods |
|---|---|---|
| Speed | Fast (Harvest in 9–12 weeks total) | Slower (Harvest in 12–20 weeks total) |
| Size | Compact (Great for closets/2x2 tents) | Large (Can fill a 4x4 with one plant) |
| Difficulty | Easy Setup, but unforgiving of mistakes. (The clock is always ticking). | Forgiving. If you make a mistake, you can extend the veg time to let the plant recover. |
| Yield | Lower per plant (1–4 oz avg) | Higher per plant (4–16 oz+ avg) |
Our Recommendation: If you want a quick harvest, go Auto. If you want to learn the art of growing and have room to make mistakes, go Photoperiod.
2. Indica, Sativa, and Hybrids
- Indica: Generally shorter, bushier plants. Known for the "couch-lock" body high. Great for small indoor spaces.
- Sativa: Tall, lanky plants that stretch rapidly. Known for an energetic "head high." These can be tricky indoors due to height.
- Hybrids: The best of both worlds. Most modern strains (like Blue Dream or Girl Scout Cookies) are hybrids, bred to grow easily like an Indica but hit like a Sativa.
3. Why You Must Buy "Feminized" Seeds
Unless you are planning to breed your own strains, always buy Feminized seeds.
- Regular Seeds: Produce a mix of Males and Females. You have to identify and kill the males before they pollinate your crop.
- Feminized Seeds: 99.9% guaranteed to be female (the ones that produce buds). This saves you time, space, and heartbreak.
At Weedseedsexpress, we hand-select and test stable genetics.
- For Beginners: We recommend starting with a durable Feminized Photoperiod like Northern Lights or a robust Autoflower like White Widow Auto.
- For Medical Use: Check out our High CBD Seeds for therapeutic relief without the intense psychoactive rush.
Pro Tip: Keep a grow journal. Record the strain, germination date, and how it smells. If you grow a Photoperiod plant that is an absolute "Unicorn" (perfect smell/high), you can take cuttings (clones) to preserve that exact genetic profile forever.
Note: You cannot clone Autoflowers effectively.
Step 4: The Germination Phase (Week 0-1)
We want warm, moist, and dark conditions to pop the shell, followed immediately by gentle light. While nature has been doing this for millions of years, seeds can be delicate.
For a step-by-step breakdown of every successful technique, read our guide on how to germinate weed seeds properly to ensure a 100% success rate.
Method 1: The Paper Towel Method (Classic)
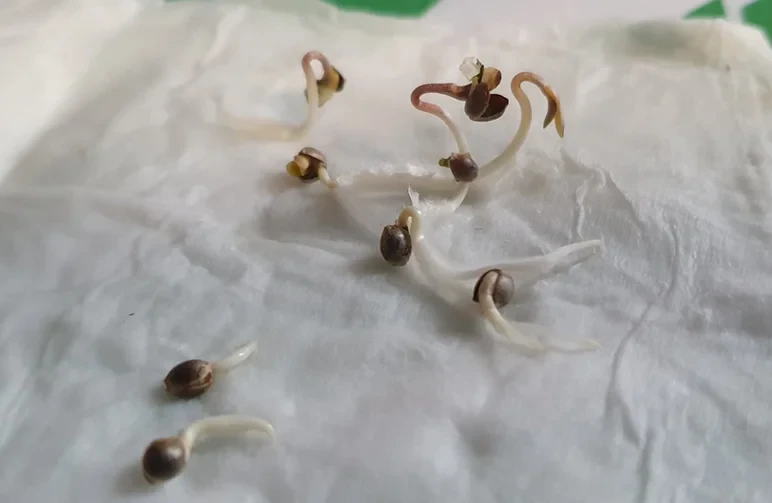
Most beginners prefer this method because you can actually see the root pop before planting.
- Soak: Drop seeds in a glass of room-temp water for 12–24 hours. They may sink; that’s good.
- Moisten: Wet two paper towels and wring them out so they are damp, not dripping.
- Cover: Place seeds on one towel, cover with the other, and place them on a plate.
- Hide: Put the plate in a dark, warm spot (70–80°F). A cupboard above the fridge works well.
- Check: In 2–5 days, a white "taproot" will emerge. Gently plant it root-down into your soil.
Method 2: Direct Sowing (The Natural Way)
Preferred for Autoflowers to avoid transplant shock.
- Prep: Poke a hole about 0.5 inches (knuckle deep) into your moist soil.
- Drop: Place the seed inside and lightly cover with dirt. Do not pack it down.
- Mist: Spray the topsoil with a spray bottle.
The "No-Transplant" Rule for Autoflowers
- Photoperiods: Start in a Solo cup or small nursery pot. It helps the roots build a dense ball before moving to a big pot.
- Autoflowers:Plant directly into their final 3–5 gallon pot. Autos grow so fast that the stress of transplanting can stunt them permanently.
Seedling Care: The First 7 Days
Once the seedling breaks the surface, the clock starts.
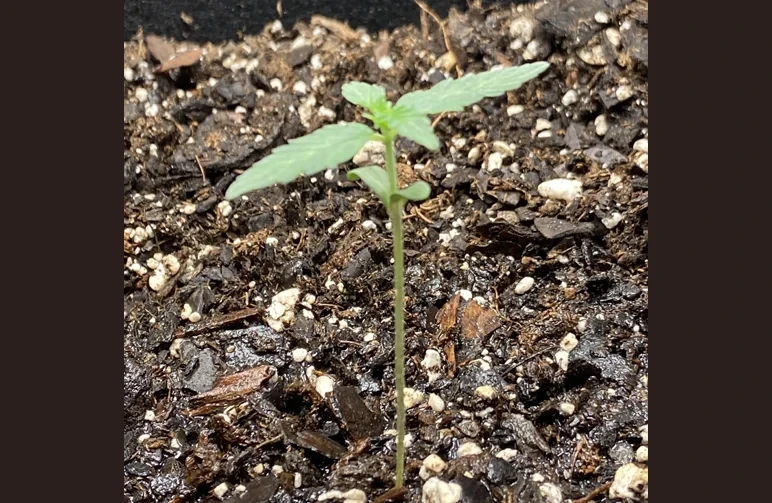
Light: Turn your grow light on immediately.
- Intensity: Dim to 25–40% power.
- Distance: Keep it 18–24 inches away. If the seedling gets tall and lanky (stretching), the light is too far away.
Humidity Dome: Seedlings absorb moisture through their leaves while roots develop. Place a clear plastic cup or cut water bottle over the seedling to trap humidity. Mist the inside of the cup daily.
Watering:Put the watering can away. Use a spray bottle to mist the soil surface.
- The Ring Trick: Pour a tiny amount of water in a ring around the seedling (not at the stem). This forces roots to stretch outward to find moisture.
Common Beginner Mistakes
Nutrients: Do not feed nutrients yet. The seed contains all the energy it needs for the first week. Adding fertilizer now will burn the plant.
Overwatering: This is the #1 killer. The soil should be moist, not muddy. If your pot feels heavy, don't water.
pH Check: Even for plain water, adjust your pH.
- Soil: 6.0 – 6.8
- Coco/Hydro: 5.5 – 6.0
Step 5: The Vegetative Stage (Weeks 2–8)
The "Veg" stage is where you build the engine. Your goal is to grow a strong root system and a flat, leafy canopy that will eventually support fat buds.
1. The Perfect Environment (VPD)
Plants "breathe" through their leaves. To keep them happy, you need to balance heat and humidity (this is called Vapor Pressure Deficit, or VPD).
Light Cycle:18/6 (18 hours on, 6 hours off). This gives plants a rest period, which many growers believe keeps them healthier than running 24/0.
Temperature:75°F – 82°F.
- Note: If using LEDs, aim for the higher end (80°F+). LEDs run cool, so your room needs to be warmer to keep the plant's metabolism up.
Humidity:60% – 70%. Plants love moisture during veg.
Airflow: Your oscillating fans should be on 24/7. You want a gentle breeze that rustles the leaves; this strengthens the stems.
2. Watering: The "Lift Test"
Overwatering is the #1 mistake beginners make. Roots need oxygen just as much as they need water. If the soil is constantly wet, the roots will rot.
The most common question we get is how often should I water my weed plant, and the answer is to react to the plant, not the calendar.
Here's how to know when it's time:
- The Knuckle Test: Stick your finger an inch into the soil. If it's dry, you're good.
- The Lift Test (Best Method): Pick up your pot when it is fully dry. Feel how light it is. Now pick it up after watering. Do not water again until the pot feels light again.
3. Feeding: The Nitrogen Craving
During the vegetative stage, your plant craves Nitrogen (N) to grow stems and leaves.
The Nutrient Ratio: Look for a "Grow" bottle with high N numbers (e.g., N-P-K of 5-1-1).
The 50% Rule: Most nutrient bottles suggest dosage that is too strong. Start at 50% of the recommended dose. It is much easier to add more later than to flush out a toxic buildup.
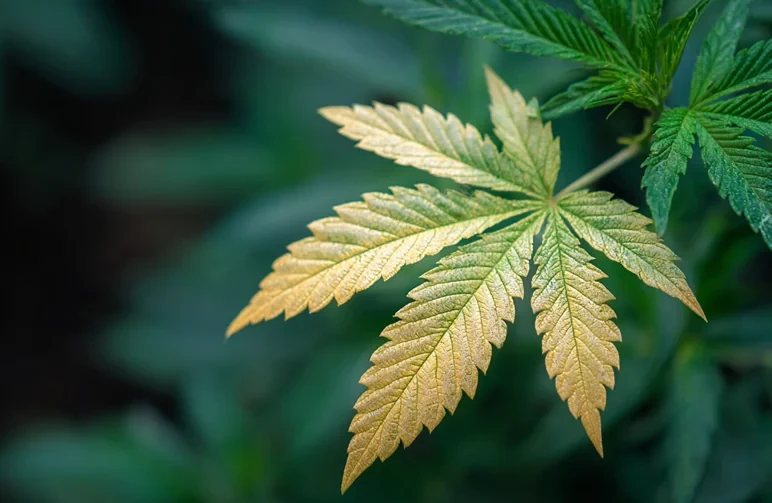
Reading the Leaves:
- Pale/Yellowing Leaves: Needs more food (Nitrogen).
- Dark Green/Clawing Leaves: Nitrogen Toxicity (Too much food).
- Burnt Tips: Nutrient Burn. Dial back the strength.
Being able to correctly identify these visual cues is key to fixing problems before they ruin a harvest, so it's wise to bookmark a complete guide to cannabis nutrient deficiencies for easy reference.
4. Training: How to Double Your Yield

If left alone, cannabis grows like a Christmas tree, but employing cannabis plant training flattens the canopy so every bud gets direct light.
A. Low-Stress Training (LST) – Essential
- What is it? Gently bending and tying stems outward using soft garden ties.
- Why do it? It exposes the center of the plant to light, turning lower branches into massive top colas.
- Risk: Zero.
B. Topping (High-Stress) – Optional
- What is it? Cutting off the very top tip of the main stem.
- Why do it? It breaks "apical dominance," forcing the plant to split into two main stems instead of one.
- When: Do this once the plant has 4–6 nodes (pairs of leaves).
- Warning:Be very careful topping Autoflowers. Only top an Auto if it is growing fast and healthy. If it’s struggling, LST only.
Timeline: When does Veg End?
- Photoperiods: You decide! Most indoor growers veg for 4–6 weeks (or until the plant is half the desired final height).
- Autoflowers: Nature decides. They usually stay in veg for 4–5 weeks before automatically throwing out white pistils (pre-flowers).
Step 6: The Flowering Stage (Weeks 8–16)
This is where the magic happens. You’ve built the structure; now it’s time to fill it with buds. This stage requires patience and discipline.
1. The Flip: Switching to 12/12
- Photoperiods: To trigger flowering, you must change your light timer to 12 hours ON and 12 hours OFF. This simulates the coming of winter.
- Autoflowers: No change needed. Keep them on 18/6 or 20/4.
CRITICAL WARNING: Light Leaks
During the 12 hours of darkness, your grow room must be pitch black.
- The Risk: Even a tiny light leak (like a glowing power strip light or a zipper gap) can confuse the plant, causing it to turn into a "Hermaphrodite" (growing pollen sacs on your buds) and filling your weed with seeds.
- The Test: Sit in your tent with the lights off. If you can see your hand in front of your face, it’s not dark enough. Tape up any leaks.
2. Early Flower (Weeks 1–3): The "Stretch" & Sexing
A. The Stretch
As soon as you flip the lights, your plants will grow rapidly, often doubling in height.
Action: Keep raising your lights to prevent burn. Keep tucking branches under your trellis net to manage the height.
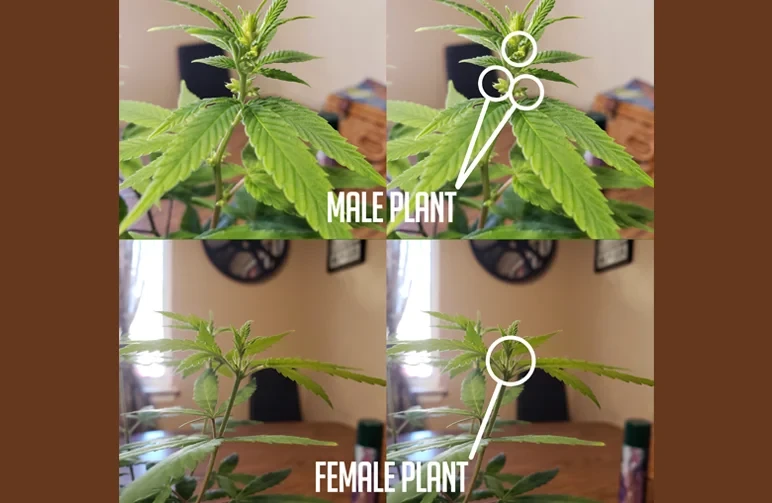
B. Sexing: Male vs. Female
If you used "Feminized" seeds, you are 99% safe, but it is still a mandatory skill to learn how to identify male and female weed plants just in case.
- Females (Keep): Look for white wispy hairs (pistils) appearing at the nodes (where the branch meets the stem).
- Males (Kill): Look for little "balls" or "bananas" growing in clusters. Remove these plants immediately before the sacs burst and pollinate your females.
3. Mid-Flower (Weeks 4–6): Fattening Up
The vertical growth stops, and the plant focuses on bud production.
Nutrients: Switch to "Bloom" Nutrients. The plant now needs less Nitrogen and more Phosphorus (P) and Potassium (K) to build flowers.
Environment:
- Drop Humidity: Lower RH to 45–50%. High humidity now leads to Bud Rot (Mold).
- Airflow: Ensure air is moving through the canopy. Stagnant air = Mold.
Defoliation: Carefully snip off large fan leaves that are blocking light from the lower bud sites. Don't strip it bare, but open it up.
4. Late Flower (Weeks 7–9+): The Ripening
The buds are huge, the smell is intense, and the pistils are turning orange.
The "Fade": You might see leaves turning yellow or purple. This is natural fall colors; the plant is using up its stored energy.
The Flush (Optional but Recommended): About 1–2 weeks before harvest, many growers stop feeding nutrients and give only plain, pH-balanced water.
- Why? It forces the plant to use up remaining nutrients, which many believe leads to smoother, white-ash smoke.
Timeline Breakdown
- Autoflowers: Usually finish flowering around Week 10–12 from seed.
- Photoperiods: Usually finish flowering 8–10 weeksafter the 12/12 flip. (Sativas can take longer, up to 12+ weeks).
Step 7: Harvesting, Drying, and Curing
This is the most critical stage, and mastering the art of drying and curing cannabis will have the biggest impact on the final quality of your buds.
1. When to Harvest: Reading the Trichomes
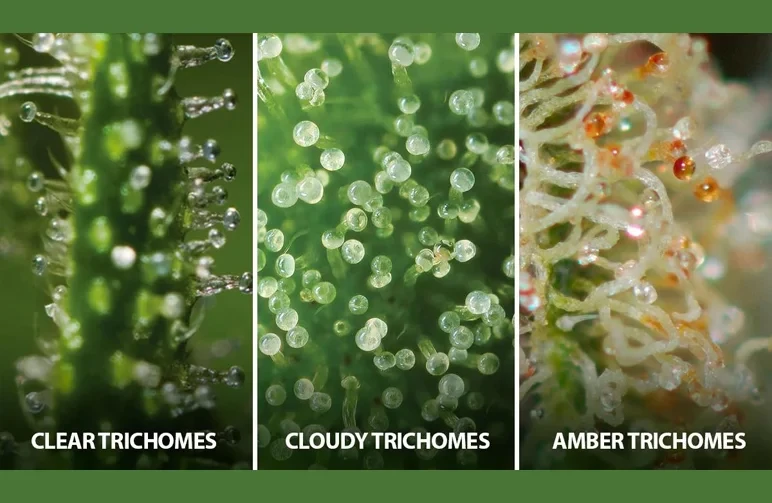
When it comes to when to harvest cannabis plants, forget what the seed packet says about "8 weeks". Your plant is ready when the trichomes (the glittery resin glands on the buds) say it is.
The Tool: You need a Jeweler's Loupe (30x-60x) or a USB Microscope. You cannot see this with the naked eye.
The Decoder:
- Clear (Glassy): Not Ready. Potency is low.
- Cloudy (Milky White):Peak THC. This is the standard harvest window for maximum potency.
- Amber (Orange/Brown): Over-ripe. THC is degrading into CBN, producing a heavier, "couch-lock" sleep effect.
Target: Aim for 90% Milky / 10% Amber for the best balance of potency and flavor.
2. Cutting: Wet Trim vs. Dry Trim
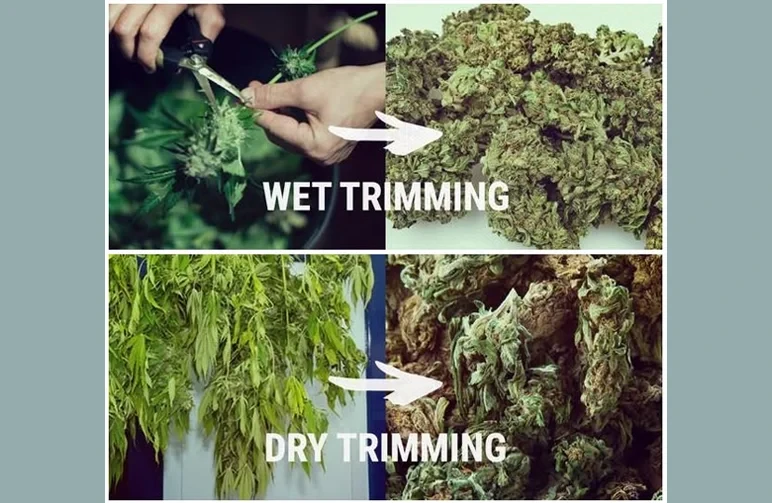
Should you trim the sugar leaves off before drying (Wet) or after (Dry)?
- Dry Trim (Recommended): Hang the whole plant upside down with leaves on. This slows down the drying process, preserving more terpenes (smell). Best for dry climates (under 50% RH).
- Wet Trim: Cut the leaves off immediately after chopping. This reduces the risk of mold in the drying room. Best for humid climates (over 60% RH).
3. The Drying Process (The "60/60 Rule")
Your goal is a slow, steady dry. Fast drying kills flavor.
The Environment: Aim for 60°F (15°C) and 60% Humidity.
The Setup: Hang branches upside down in your dark tent/closet. Keep a fan blowing for circulation, but never blow air directly on the buds.
The "Snap Test": After 7–14 days, bend a small stem.
- If it bends: Too wet. Wait.
- If it snaps audibly: Ready to cure.
4. Curing: The Secret to Flavor
Curing breaks down chlorophyll (the "hay" smell) and brings out the dank, fruity aromas.
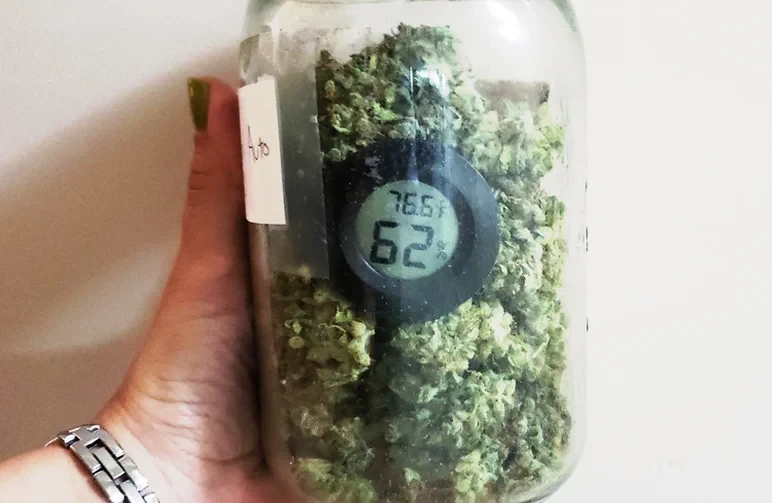
Method A: Glass Jars (Classic):
- Fill mason jars 75% full.
- Burping: Open the jars for 10 minutes daily for the first 2 weeks to let fresh air in.
- Humidity Packs: Drop in a 62% Boveda or Integra pack to maintain perfect moisture.
Method B: Grove Bags (Modern/Easier):
- These are special bags with "TerpLoc" technology that regulate humidity automatically. No burping required. Great for beginners who might forget a day.
Warning: If you open your jar and it smells like ammonia or wet laundry, the buds are too wet. Take them out immediately and let them dry for another 24 hours, or mold will destroy the harvest.
Common Beginner Mistakes to Avoid
We have made these mistakes so you don't have to. Growing is a learning process, but avoiding these "Big 5" sins will save your harvest.
1. The "Helicopter Parent" (Overwatering)
- The Mistake: Watering on a schedule (e.g., "Every Monday") regardless of whether the plant needs it.
- The Consequence:Root Rot. Roots need oxygen just as much as water. If the soil is always wet, the roots drown and the plant droops.
- The Fix: Use the Lift Test. If the pot feels heavy, do not water. If in doubt, wait a day.
2. Ignoring pH (The Invisible Block)
- The Mistake: Skipping the pH pen or failing to calibrate it monthly.
- The Consequence:Nutrient Lockout. You can feed your plant expensive nutrients, but if the pH is off (outside 6.0–6.8 for soil), the roots chemically cannot absorb them.
- The Fix: pH is not optional. Calibrate your pen every 30 days and never guess.
3. The "More is Better" Trap (Nutrient Burn)
- The Mistake: "Chasing bottles." Thinking that adding more boosters will make bigger buds.
- The Consequence:Nutrient Burn. Burnt, crispy leaf tips are the first sign you are overfeeding.
- The Fix: Master the fundamentals (Environment, pH, Water) before you buy expensive additives. Start all nutrients at 50% strength.
4. Light Leaks (The Crop Ruiner)
- The Mistake: Checking on plants during the dark cycle or leaving equipment lights (humidifier displays) glowing inside the tent.
- The Consequence:Herming. Light leaks confuse photoperiod plants, causing them to grow pollen sacs and seed your entire crop.
- The Fix: Sit inside your tent, zip it up, and look for light. Cover any glowing LEDs with electrical tape.
5. Weak Ventilation & Environment
- The Mistake: Stale air and ignoring humidity swings.
- The Consequence:Mold & Bud Rot. If the air isn't moving, moisture gets trapped inside dense buds, rotting them from the inside out.
- The Fix: Keep intake low and exhaust high. Your leaves should always be gently "dancing" in the breeze.
The Universal Fix: If you run into trouble, slow down. Flush the medium with pH-balanced water, check your environment, and observe. The plants will usually recover if you catch it early.
Frequently Asked Questions (FAQs)
How long does it take to grow cannabis indoors?
On average, it takes 3 to 4 months from seed to harvest.
- Autoflowers: The fastest route, usually finishing in 10–12 weeks.
- Photoperiods: Require more time, typically 12–16+ weeks (4–6 weeks for veg + 8–10 weeks for flower).
How much does it cost to start growing?
For a reliable beginner setup in 2026, expect to spend between $400 and $800. This budget covers a 2x4 tent, a high-quality LED light (approx. $150–$250), ventilation with a carbon filter, soil, pots, and nutrients.
While you can go cheaper, cutting corners on lights often reduces your yield.
How much weed can one plant yield?
In a standard indoor setup, a beginner can expect 2 to 4 ounces (56–112 grams) per plant. However, yield depends more on lighting than plant count. A good target for modern LEDs is 1 gram per watt.
A 300W light should theoretically produce ~300g of bud, whether you grow 2 plants or 4 plants under it.
What is the best growing medium for beginners?
High-quality organic potting soil. It is the most forgiving medium because it buffers pH fluctuations and provides a natural "safety net" for nutrients.
While Hydroponics and Coco Coir grow faster, they require strict daily management of pH and EC, which can be overwhelming for a first run.
Can I clone my plants?
Yes, but only Photoperiods. If you find a Photoperiod plant you love, you can take cuttings (clones) during the vegetative stage to preserve the genetics.
Autoflowers cannot be cloned effectively because they run on a set biological timer; a clone from an Auto will try to flower immediately and stay tiny.
Do I need CO2?
No, not as a beginner. Proper fresh-air exchange (ventilation) is far more important. CO2 supplementation only helps if you have a sealed room, very high-powered lights (high PPFD), and perfect temperature control.
Master the basics first.
Does growing weed indoors smell?
Yes, significantly. In the flowering stage, plants emit a powerful aroma. To grow discreetly, you must use a Carbon Filter attached to your exhaust fan. This "scrubs" the odor from the air before it leaves the tent.
What strains are best for a first grow?
Look for "Resilient" or "Beginner-Friendly" tags. You want strains that can handle minor temperature swings and nutrient mistakes.
- Classics:Northern Lights or White Widow (very stable).
- Modern:Blue Dream or Gorilla Glue (high yield/high vigor).
- Recommendation: Browse our Beginner Friendly Seedscollection for genetics that are hard to kill.
Where should I buy seeds?
Always buy from a trusted seed bank with a germination guarantee, like us at Weedseedsexpress (WSE).
We hand-select and test our genetics in Amsterdam before shipping them globally. If a seed doesn't pop with proper technique, we make it right.
Final Word
Start small, stay curious, and keep notes. You're building a craft, not just a commodity. When you're ready to roll, grab your genetics from WSE, and when that first harvest is cured, come back and tell us how it smokes.
We live for those messages.


