We love big buds and loud terps, but we don't love heat spikes, soggy RH, or your whole block catching a noseful of Week 7 funk.
Dialing in grow room ventilation & odor control isn't glamorous, but it is one of the most critical steps in learning how to grow weed indoors for professional-level results.
We've tested setups from micro-tents to sealed rooms, and the rules don't really change: move air with intent, keep negative pressure, scrub smells at the source, and automate what you can.
Let's get your space breathing like an athlete and smelling like… absolutely nothing outside the door.
Key Takeaways
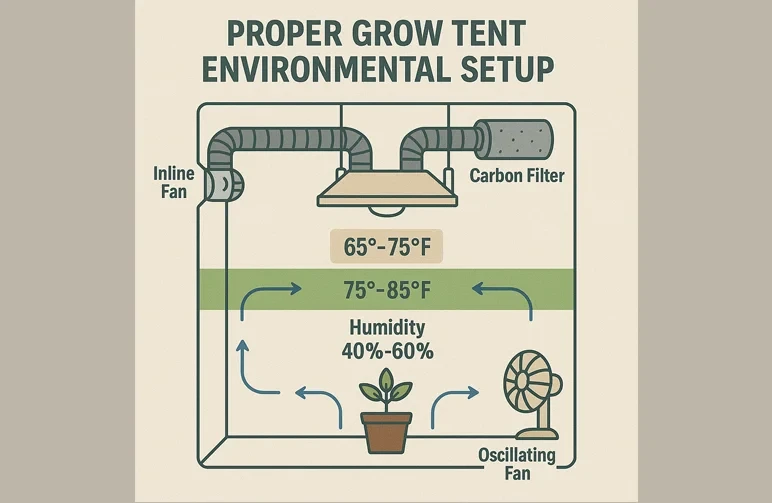
- Hit ideal indoor targets—72–80°F (80–85°F with CO2), 55–65% RH in veg, and 40–50% in flower—and exchange room air 1–2 times per minute to keep VPD and growth on point.
- Lock in odor control with a properly sized carbon filter, exhaust fan, and slight negative pressure (intake ≈80% of exhaust) so smells scrub at the source, not leak out.
- Calculate CFM from room volume, then add 20–50% for filter/duct losses, and oversize the fan to run at 50–70% for quiet, stable performance.
- Install for airflow logic: intake low and filtered, exhaust high, carbon filter before the fan, short straight insulated ducting, and oscillating fans for gentle canopy flutter.
- Automate and maintain for consistency—run fans 24/7 at modulated speeds, use temp/RH controllers, keep the space clean, and replace carbon filters every 12–24 months for reliable Grow Room Ventilation & Odor Control.
Why Your Grow Room is Crying Out for Proper Ventilation
The 3 Pillars of a Healthy Grow Environment: Temperature, Humidity, and CO2
Healthy plants are greedy for balance. Indoors, you control the big three: temp, RH, and CO2. Aim for 72–80°F in standard rooms; if you're enriching CO2, 80–85°F is the sweet spot.
Keep veg RH around 55–65% and flower at 40–50% to ward off mold without stressing . Air exchange replaces the CO2 your canopy devours while yanking out heat from lights and equipment.
When your exhaust, intake, and circulation work in concert, photosynthesis hums, your environment lands in the perfect zone, and plants simply grow happier, faster, and chunkier.
What is VPD and Why Does It Matter?
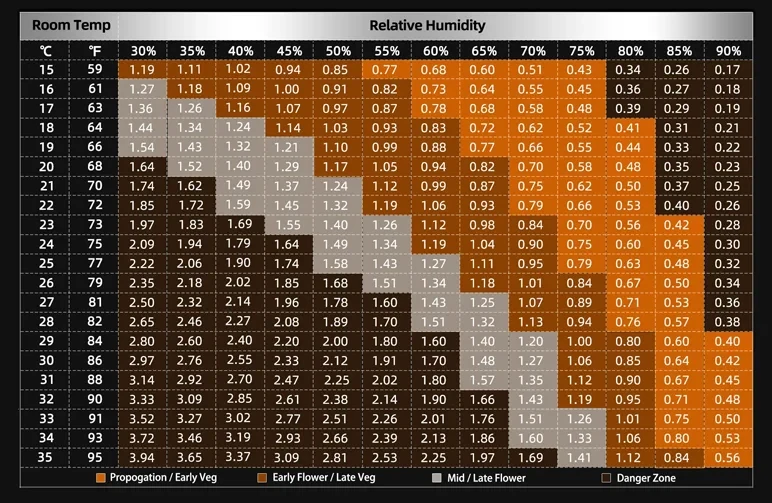
(Image credit: Spider-Farmer.com)
The relationship between temperature and relative humidity creates something called Vapor Pressure Deficit (VPD). Think of it as the force that pulls water from the leaves, driving transpiration.
- Too low (soggy): Plants can't "breathe" properly, inviting mold.
- Too high (dry): Plants close their stomata to conserve water, shutting down growth. This balance is especially delicate when you germinate cannabis seeds, where high humidity is a requirement for survival.
Your ventilation system is the #1 tool for controlling temperature and humidity to keep your VPD in the sweet spot for explosive growth.
Preventing Your Biggest Enemies: Mold, Mildew, and Pests
Stagnant air is a mold party.
A quality inline exhaust fan plus a steady internal breeze removes the boundary layer of humid air hugging the leaves, dries out microclimates in dense canopies, and ruins the day for powdery mildew, botrytis, and fungus gnats.
We watch for still corners, droopy leaves after lights off, and pots that stay wet too long, then fix it with airflow, not just sprays. Good ventilation is preventative medicine: it's cheaper than tossing a cola to rot.
Building Stronger Stems for Heavier Yields
A gentle, continuous breeze mimics the outdoor wind, signaling plants to thicken their stems to anchor future bud weight. You'll see shorter internodes, sturdier side branches, and fewer snapped tops.
We aim fans just above the canopy level so leaves gently shimmy—no hurricane blasting. Strong stems + a managed climate = bigger, denser flowers that actually finish without support drama.
The Importance of Discretion: Keeping Odors on Lockdown
We love loud terps. Neighbors don't. A properly sized carbon filter paired with an exhaust fan—and crucially, negative pressure—keeps all that glorious stink contained and scrubbed before it exits.
Duct your exhaust out of the immediate grow area, keep intakes passive or filtered, and you'll stay off the neighborhood's "mystery skunk" group chat. Discretion is respect, and it protects your grow.
The Science of Airflow: Mastering CFM, Air Exchange, and Negative Pressure
Understanding Air Exchange: Fresh In, Stale Out
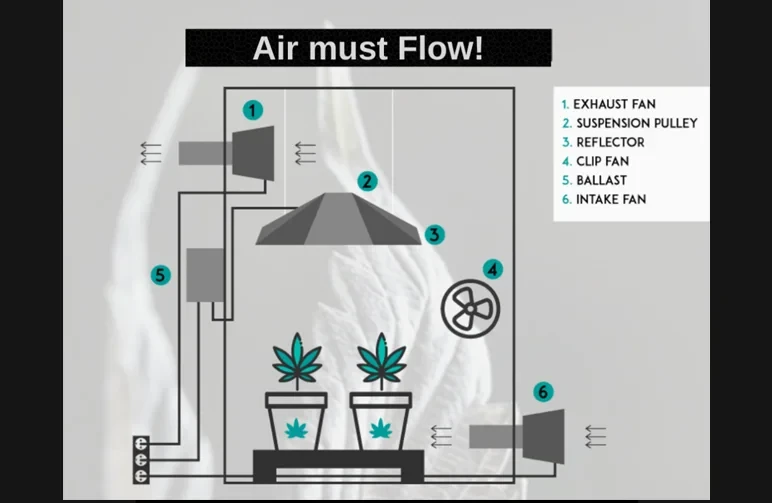
(Image credit: BigPlantScience.co.th)
Air exchange is simply the refresh rate of your room. The goal is simple: fresh, CO2-rich air comes in low, and warm, humid, CO2-depleted air exits high.
This constant swap carries away heat and humidity while replenishing what your plants need to thrive. Most tents and modest rooms want 1–2 full air exchanges per minute.
The Magic of Negative Pressure (and Why It's Your Best Friend)
Negative pressure means your exhaust system is moving slightly more air out than your intake is bringing in. Practically, this makes the tent's walls pull inward slightly—the telltale sign you've nailed it.
If your intake is around 80% of your exhaust airflow, all air (and odor) is forced to travel through your carbon filter instead of squeezing out of zipper cracks and pinholes. That pressure gradient is your stealth shield.
CFM Explained: What It Is and Why It Matters
CFM (Cubic Feet per Minute) is the volume of air your fan can move. You'll need enough CFM to replace your room's entire volume of air 1-2 times per minute, plus enough overhead to overcome real-world restrictions.
Things like carbon filters, long duct runs, sharp bends, and silencers can easily reduce a fan's effective power by 20–50%. Pick a fan for the job you actually have, not the brochure fantasy.
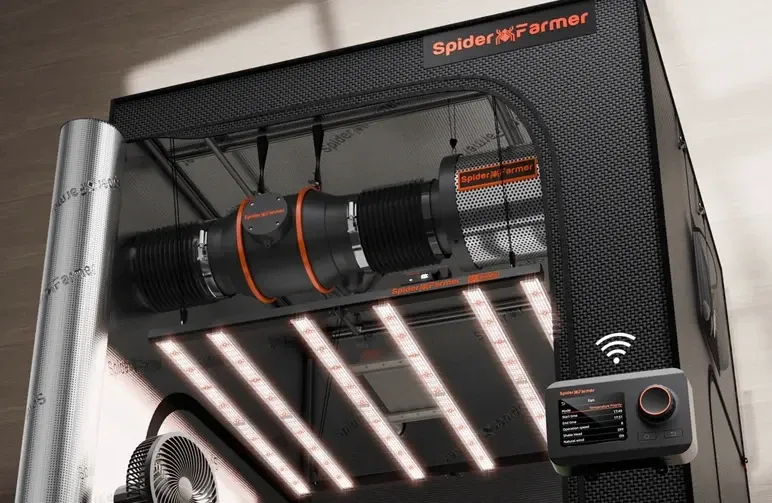
Your Ventilation & Odor Control Shopping List: Essential Equipment
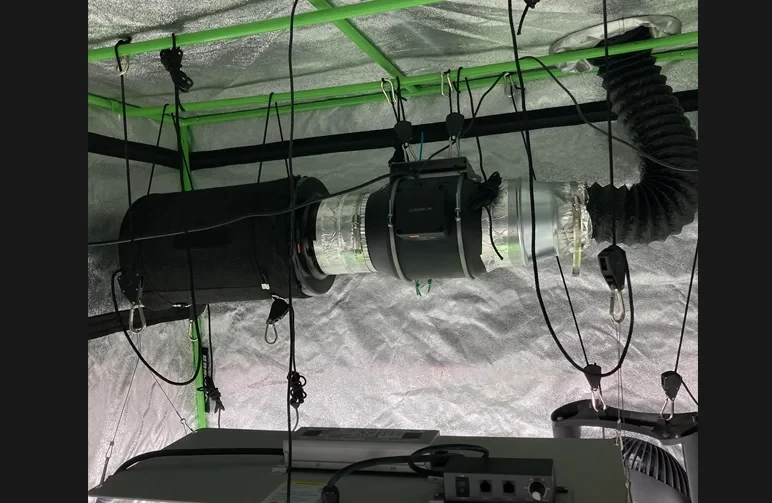
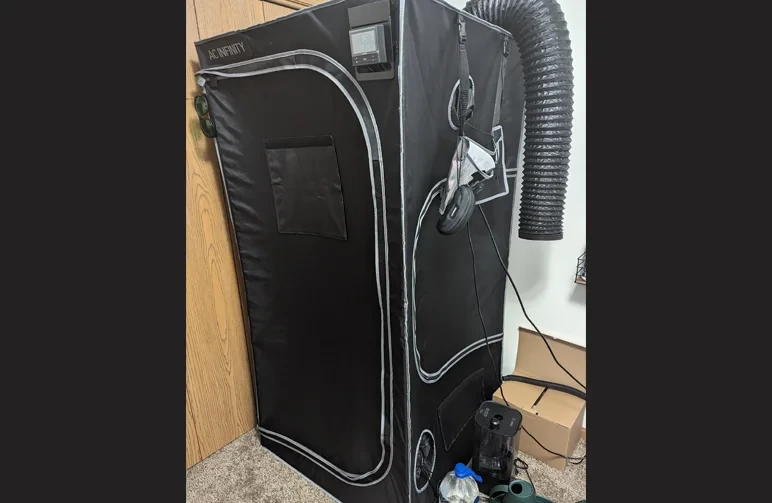
(Image credit: u/Easy-Ad-6793 via Reddit)
- Exhaust Fans: The engine of your system. Choose a reliable inline mixed-flow or EC fan. We like quiet models with variable speed control and strong static pressure performance.
Size it to your target CFM with at least 25–30% headroom. - Carbon Filters: Your smell eraser. Match the filter's flange size to your fan's, and choose a length/bed depth appropriate for your airflow. Always install the filter before the fan so air is pulled through it under suction.
- Circulation Fans: The internal breeze. Clip-on or oscillating pole fans keep air moving inside the canopy. Two is often better than one for crossflow. Aim for a gentle leaf flutter, not windburn.
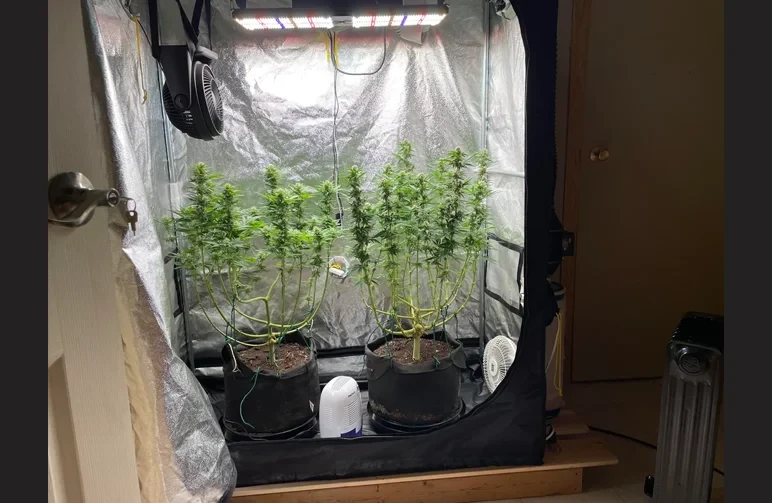
Total Canopy Coverage: This setup by Reddit user u/Ndunglinson420 demonstrates the "crossflow" technique. A larger fan at the top prevents heat from pooling under the LED, while a smaller fan at the base ensures no stagnant air sits near the pots. This multi-level approach is the best defense against powdery mildew and helps strengthen those heavy flowering stems.
(Image credit: u/Ndunglinson420 via Reddit) - Intake Vents: Bringing in the fresh air. Passive intakes (screened-off lower ports) are fine for many tents. For larger rooms or restrictive setups, a small active intake fan helps. Remember the rule: intake low, exhaust high.
- Ducting: Connecting it all. Use smooth-walled, insulated ducting where possible. Keep runs short and straight; every 90° bend is a tax on your CFM. Seal every joint with foil tape and clamp everything tight.
- Controllers: Automating your environment. A good controller is a game-changer. Basic fan speed controllers let you dial down noise.
Smart controllers use a temperature/humidity probe to automatically adjust fan speeds to maintain your target environment, reacting to changes before you even notice them.
Pro-Tip: If your exhaust ducting runs through a cold space (like an attic or basement), use insulated ducting. This prevents condensation from forming inside the duct and dripping back down onto your fan or filter.
How to Calculate Your Ventilation Needs in 3 Simple Steps
Step 1: Calculate Your Grow Room's Cubic Footage
Length × Width × Height = Cubic Feet.
- Example: A 4 ft × 4 ft × 7 ft tent = 112 ft³.
Step 2: Determine Your Required CFM (Cubic Feet per Minute)
Target 1–2 air exchanges per minute. Then, add for efficiency losses:
- Base CFM: Room Volume × 2 exchanges/minute = Base CFM (e.g., 112 ft³ × 2 = 224 CFM).
- Add for Filter: Base CFM × 1.25 (for carbon filter loss) = Adjusted CFM (e.g., 224 × 1.25 = 280 CFM).
- Add for Ducting/Heat: Add another 10-20% for long duct runs, sharp bends, or high-heat lights (like HPS). Your required CFM in this example is likely around 300-320 CFM.
Step 3: Choosing the Right Size Fan and Carbon Filter
Pick a fan that meets your adjusted CFM target. We typically oversize the fan slightly and run it at 50–70% speed. This gives you headroom to ramp it up on hot days and allows it to run much quieter.
Match this with a carbon filter rated for the same or slightly higher CFM with the same flange diameter.
Step-by-Step Installation: Setting Up Your System Like a Pro
How to Set Up Ventilation in a Grow Tent
- Hang Equipment: Hang the carbon filter high inside the tent with ratchet straps.
- Connect Fan: Connect a short, straight run of ducting from the filter flange to the inline fan's intake side (Filter → Fan). Seal both ends with clamps and tape.
- Run Exhaust Duct: Duct the fan's outlet out of a high tent port to your chosen exhaust point.
- Create Intake: Open one or two lower passive intake ports and make sure the bug screens are clean.
- Add Circulation: Add 1–2 oscillating fans inside, aimed above and below the canopy.
- Test: Fire it up, check for that slight wall suck (negative pressure), and adjust your fan controller to hit your target temp/RH.
How to Set Up Ventilation in a Grow Room
(Image credit: gorillagrowtent.com)
The principles are the same, but the scale is larger.
Mount the exhaust fan and filter near the ceiling where heat pools. Place an active intake fan low on the opposite side of the room to encourage cross-ventilation, pulling air from a clean, cool source.
Keep duct runs as short and straight as possible—hard 90° bends are CFM killers.
Beyond the Carbon Filter: Other Odor Control Methods
- Odor Absorbing Gels and Blocks: These are best used as a backup layer outside the grow space, like in the hallway or lung room. Don't put them inside the tent, as you don't want their volatile compounds settling on your buds.
They mask minor whiffs but will not replace a real carbon filter. - Ozone Generators: A Word of Extreme Caution: Ozone permanently destroys odor molecules but is harmful to the lungs of people, pets, and even plants.
We do not recommend them for use inside a grow space. If used at all, it should only be in a sealed, unoccupied exhaust chamber, far away from the grow itself. - The Importance of a Clean and Tidy Grow Space: A clean room smells less. Period. Wipe up spills, empty runoff trays daily, clean your pre-filters, and remove dead and decaying leaf matter.
The less gunk around, the less stink you have to fight.
Troubleshooting Common Ventilation & Odor Problems
(Image credit: u/QwaZz via Reddit)
"My grow room is too hot/humid!"
Solution: Increase exhaust fan speed. If it's already maxed out, you may need a larger fan. Ensure your carbon filter pre-filter is clean and not clogged.
Shorten duct runs and eliminate sharp bends. For persistent humidity, add a dedicated dehumidifier.
"I can still smell my plants outside the grow room!"
Solution: First, check for negative pressure (tent walls pulling in). If they aren't, your exhaust isn't powerful enough or your intake is too large. Seal every ducting connection with foil tape.
Check that your filter is properly connected before the fan. If the filter is over 12-18 months old, it's likely time for a replacement.
"My fan is too loud!"
Solution: The best fix is to use an oversized EC fan and run it at a lower speed. You can also mount the fan with vibration-isolating straps, use insulated ducting (which dampens sound), and add a fan silencer/muffler to the end of your duct run.
"My grow tent walls are sucking in too much."
Solution: A little suction is perfect, but a lot means your intake is too restricted for your exhaust power. Simply open another passive intake vent or slightly unzip a lower door.
You just need to balance it until the pressure is slight but consistent.
Frequently Asked Questions (FAQ)
How long should my exhaust fan run each day?
For the most stable environment, run it 24/7. Use a controller to modulate the speed based on conditions.
If you must cycle it, at least run it continuously during lights on and for 30 minutes after lights off to purge spikes in heat and humidity.
How often do I need to replace my carbon filter?
Typically every 12–24 months of continuous use. The lifespan depends on your environment's humidity and dust levels. You'll know it's time when odors start to escape even with good negative pressure.
Regularly washing the white pre-filter sleeve will extend the carbon's life.
Can I use a window for my exhaust?
Yes, but do it smartly. Use a window vent insert, a backdraft damper to prevent air from coming back in, and a screen. Make sure the exterior exit is discreet and not pointing directly at a neighbor's window.
Do I really need a circulation fan if I have a good exhaust fan?
Absolutely, yes. Your exhaust fan handles air exchange for the entire room. Circulation fans handle the microclimate around your plants, strengthening stems and preventing pockets of stagnant, humid air where mold loves to grow.
Conclusion
Dialing in your ventilation and odor control is the final step in becoming a master grower. It protects your harvest, your privacy, and unlocks your plants' true potential.
Once you've created that perfect, stable environment, the only thing left is to choose the right genetics to thrive in it.
We're growers first, seed folks second. If you're ready to pop something special, we hand-pick genetics that thrive indoors and out.
Explore and buy premium cannabis seeds with fast, discreet shipping from our team in Amsterdam at Weedseedsexpress. Keep it clean, keep it stealthy, and happy growing.


