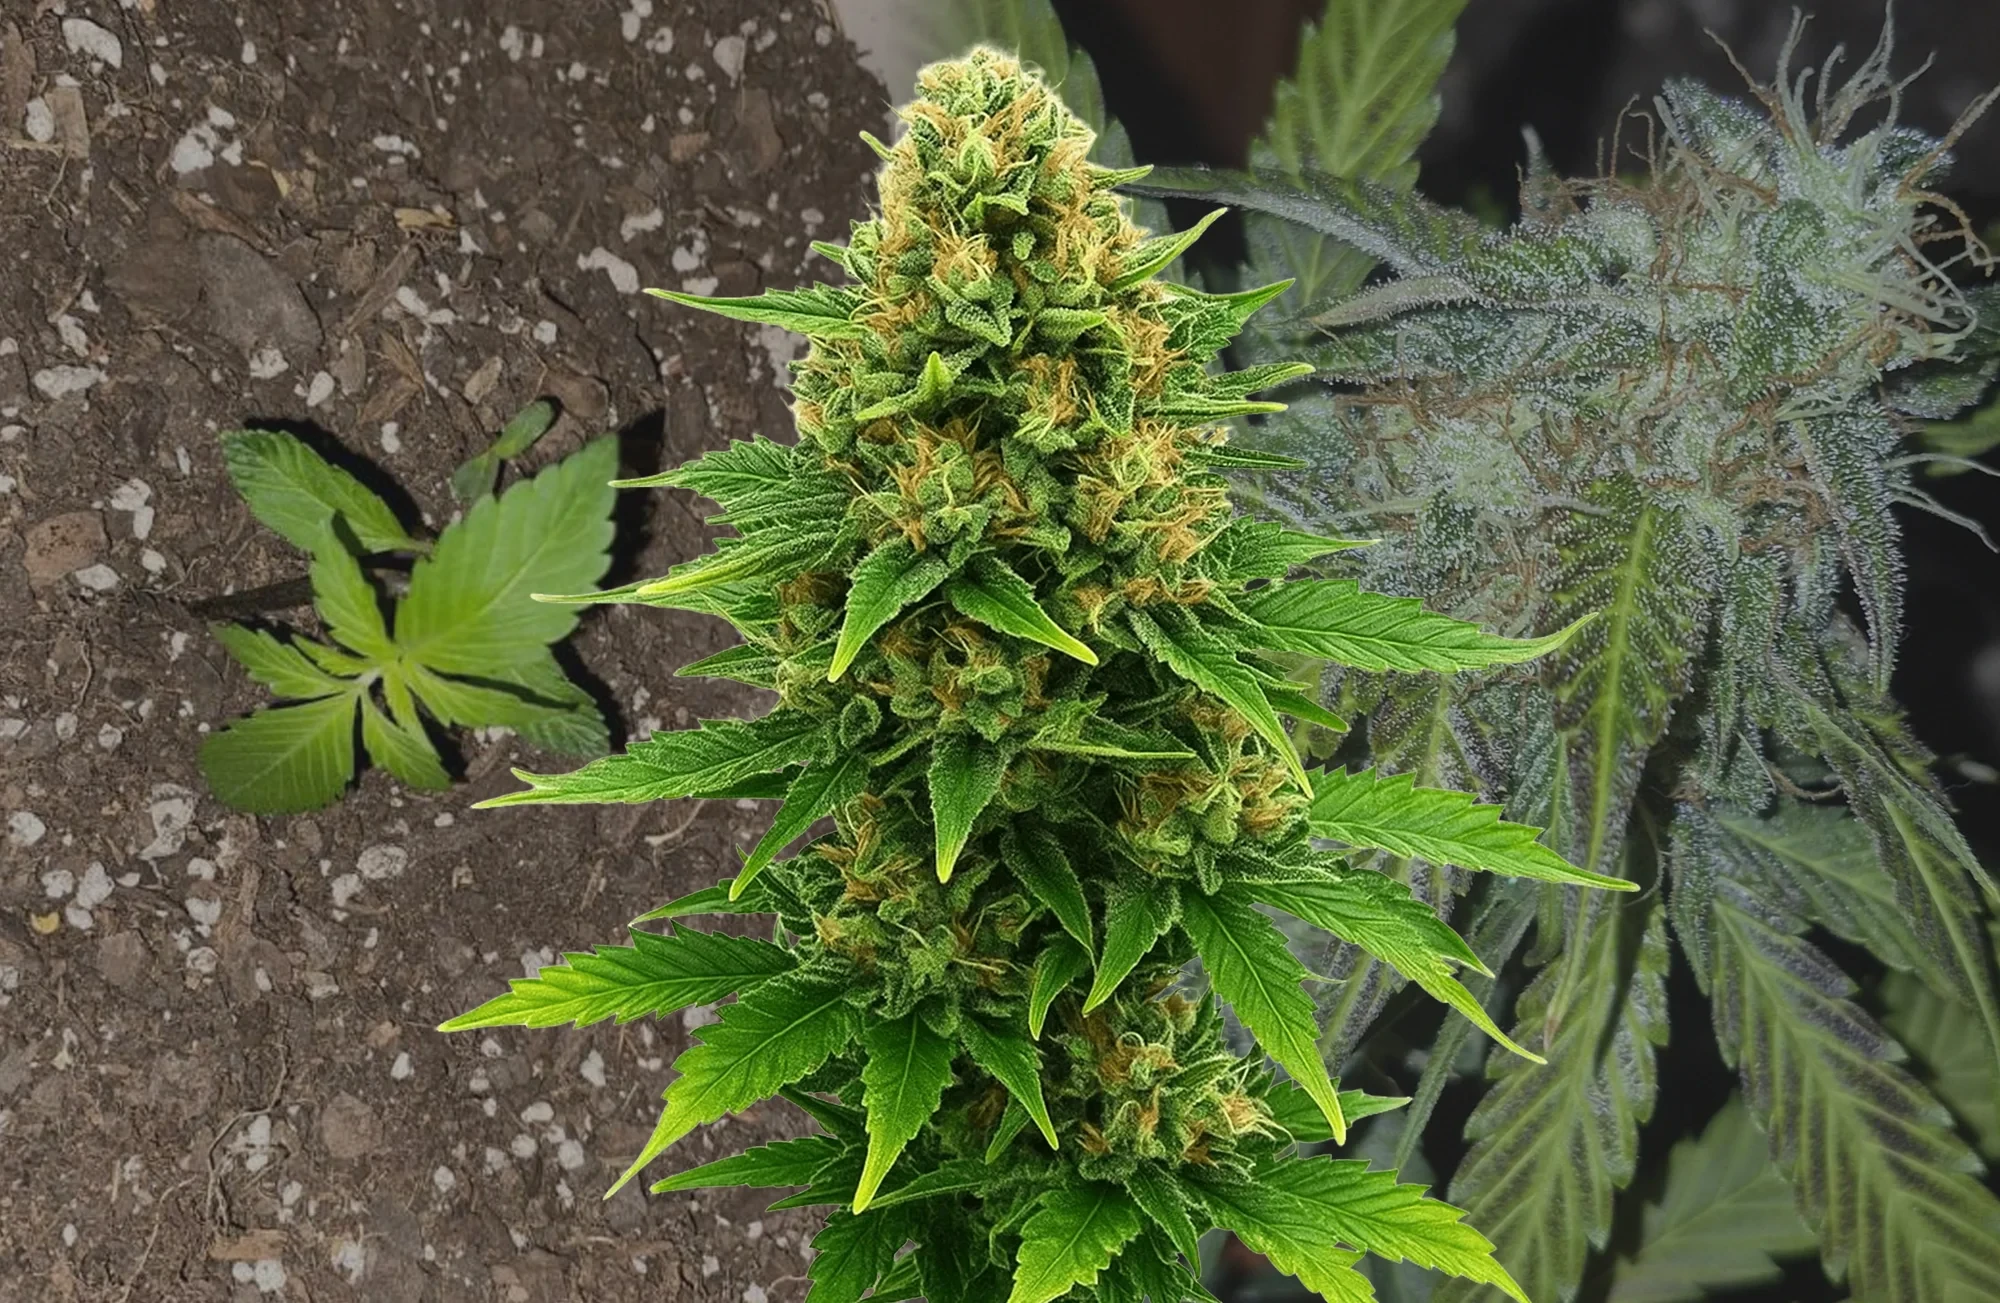
If you let a weed plant grow wild, it will look exactly like a Christmas tree. It will grow one massive bud right at the very top. The rest of the branches will just grow tiny, airy buds down at the bottom.
We do not want Christmas trees in our grow room. We want a perfectly flat table of massive, dense colas.
I have bent, topped, tucked, and trellised more plants than I can count in our Amsterdam grow lab. The verdict is incredibly simple. Smart plant training turns good genetics into absolute monster harvests.
In this guide, I am going to strip away all the myths. I will show you exactly how to shape a perfect canopy using the three best training methods in the game.
Key Takeaways
The main goal: Training breaks the natural shape of the plant. It creates a flat canopy so every single bud gets the exact same amount of light.
LST (Low Stress Training): This is the gentle method. You bend the main stem over and tie it down. It is perfect for beginners and autoflowers.
Topping (High Stress Training): This is the aggressive method. You cut the top of the plant off so it grows two new main branches instead of one.
ScrOG (Screen of Green): This is the ultimate yield booster. You weave your branches through a net to create a massive wall of buds.
Why Train Your Cannabis Plants? A Quick Primer
Left alone, cannabis plants focus all their energy on a single main branch. In the plant world, this is called apical dominance. The plant sends all its growth hormones to the highest point to survive in the wild.
That is great for nature, but it is terrible for indoor yields.
When you train a plant, you break that dominance. By bending the tallest branch down or cutting it off, you trick the plant. The hormones rush into the side branches.
Suddenly, those small side branches shoot up and become main colas.
Instead of one big spear, you get a table full of spears. Every bud gets blasted with prime light. We routinely see a 20 to 40 percent jump in yields when growers move from letting a plant run wild to using basic training.
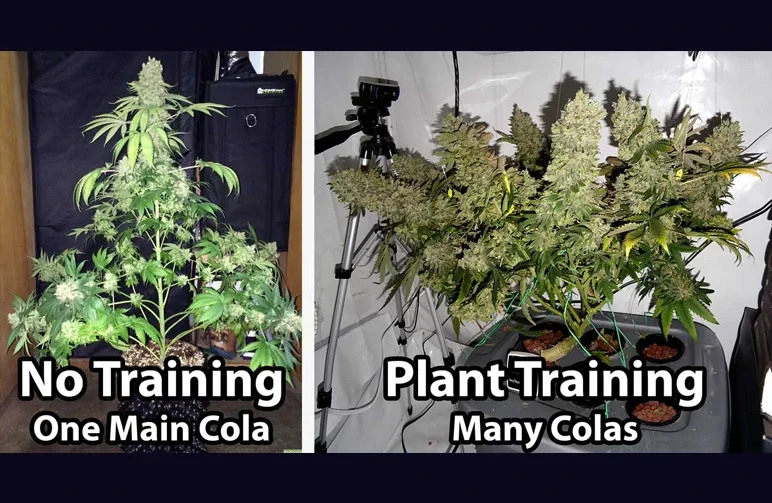
Left: A naturally grown cannabis plant exhibiting apical dominance with a single massive top cola. Right: A trained plant where the canopy has been flattened, resulting in multiple heavy main colas. Image courtesy of Nebula Haze / GrowWeedEasy.com.
Plus, a flat canopy gives you better airflow. Better airflow means fewer chances for mold to ruin your harvest.
Quick Look: Comparing Training Techniques
Here is a simple breakdown of the methods we use to build a perfect canopy.
Technique
Best For
Difficulty
Recovery Time
LST (Bending)
Beginners, Autoflowers, Stealth
Easy
12 to 24 hours
Topping (Cutting)
Photoperiods, Bushy Plants
Medium
3 to 5 days
ScrOG (Netting)
Indoor Tents, Maximum Yields
Medium
Ongoing
Low-Stress Training (LST): The Gentle Bending Method
LST is all about controlled bending. You do not cut anything. You just gently pull the main shoot down and tie it in place. It is incredibly forgiving.
This makes it the absolute best starting point for new growers.
Step-by-Step Guide to the LST Bending Method
Step 1: Wait until your plant is in the early vegetative stage. It should have three to five sets of leaves (nodes). The stem needs to be green and flexible. A hydrated plant bends easier, so water your plant before you start.
Step 2: Anchor the base. Tie a piece of soft wire around the bottom of the main stalk and anchor it to the opposite side of the pot. This stops you from ripping the roots out of the dirt when you pull the top over.
Step 3: Gently bend the very top of the plant down until it is horizontal. Think of a smooth arc, not a sharp kink.
Step 4: Use a soft plant tie to secure the top of the plant to the edge of your pot. Keep the tension light. Do not strangle the stem.
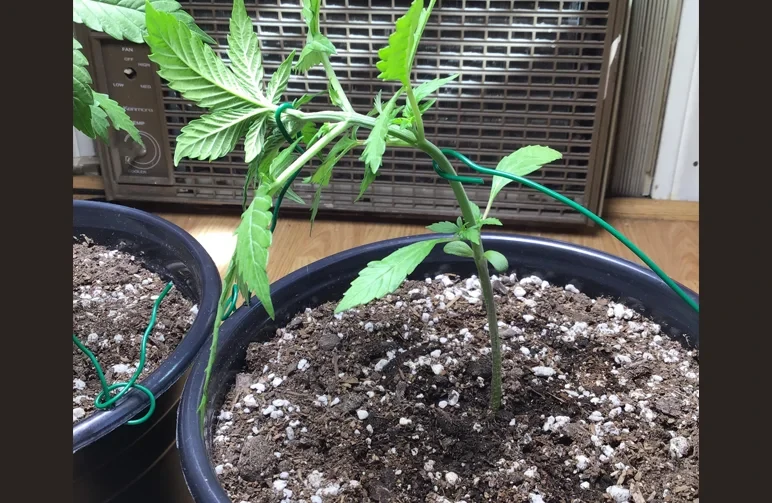
A great example of gentle counter-tension during early Low-Stress Training (LST). Notice how the wire on the right anchors the main stem, allowing the left wire to bend the top horizontally into a smooth arc without uprooting the plant. Image courtesy of Reddit user Mr_Johnnycat.
Step 5: Revisit the plant every few days. As the side branches grow up toward the light, tie them down too. Rotate the pot and keep the canopy completely flat.
A Pro Tip from the Lab
If a branch feels stiff, warm it up with your fingers first. Rub it gently and bend it a little bit at a time over two days. Do not be a hero. A snapped stem sets you back way more than just being patient.
Essential Tools for LST
Soft rubber coated plant ties or coated wire
Plant clips and bamboo stakes
Fabric pots (you can poke holes right through the fabric to tie your wires)
LST for Autoflowers
Autoflowers love LST. Because you do not cut the plant, it does not need days to recover. Start early around day 14 to 21. Keep your adjustments gentle.
The second you see the first white hairs appear, stop all heavy bending. You want the plant to focus on making buds, not healing stress.
High-Stress Training (HST): Bolder Methods for Bushier Plants
High stress training covers methods that intentionally wound or cut the plant to redirect its growth. You should only use these techniques during the vegetative stage when plants can bounce back fast.
The payoff is a massive multiplication of bud sites. The tradeoff is that the plant needs three to five days to recover.
Because of that recovery time, HST is strictly for photoperiod plants. If you are growing autoflowers, put the scissors down and stick to gentle LST.
Topping: The Classic Technique for a Bushier Plant
Topping is the backbone of indoor growing. You literally cut the top of the main stem off. This splits the apical dominance into two brand new main branches.
It is clean, predictable, and the absolute best way to start building a wide plant.
Step 1: Wait until your plant has three to five nodes. Usually, this is around week three of the vegetative stage. The plant must be healthy and actively growing.
Step 2: Sterilize your scissors or a razor blade with rubbing alcohol. Do not skip this. Dirty tools will infect your plant.
Step 3: Find the top of the main stem. You want to make your cut right above the third or fourth node.
Step 4: Make a single, clean snip. Do not tear or hack at the stem.
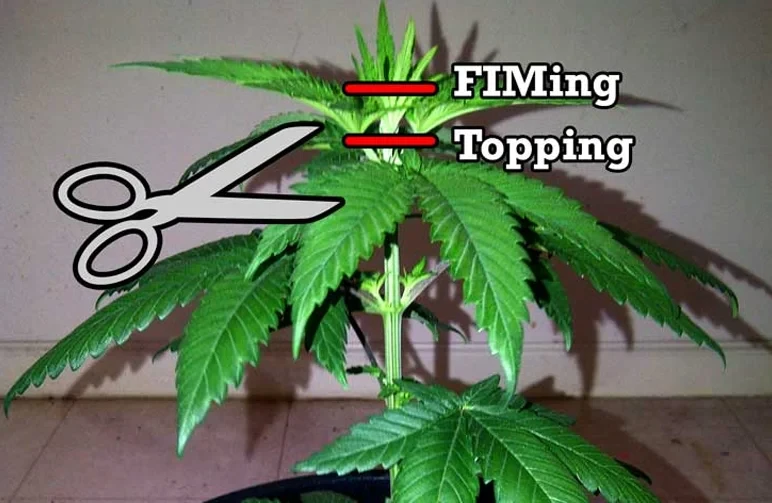
A clear visual guide showing exactly where to make your cut. A standard topping cut completely removes the new node, while FIMing only removes about 75% of the upper growth tip. Image courtesy of Nebula Haze / GrowWeedEasy.com.
Step 5: Support the recovery. Do not blast the plant with intense light or heavy nutrients for a couple of days.
Step 6: Once the two new tops start growing strong, use LST to gently pull them outward and open up the center of the plant.
FIMing: Topping's Ambitious Cousin
FIM stands for "F*ck, I Missed." Instead of cutting the whole node off, you only pinch or cut about 75 percent of the very top tip. Done right, it can produce up to six new shoots from the exact same spot.
It is a great trick, but the results can be a little unpredictable. We usually stick to standard topping for a perfectly even canopy.
Screen of Green (SCROG): Weaving Your Way to a Wall of Buds
ScrOG uses a horizontal net to spread your branches out perfectly. It allows you to fill a massive grow space with just one or two plants.
If you want to maximize your yield in a small indoor tent, this is exactly how you do it.
Setting Up Your SCROG Net
You want to set your net about 8 to 12 inches above the rim of your pots. You can use elastic trellis netting or a rigid plastic grid. Squares that are two to three inches wide are the absolute best for easy weaving.
Step-by-Step Guide to Weaving and Tucking
Step 1: Pre shape your plant using topping and LST so it grows wide before it even hits the net.
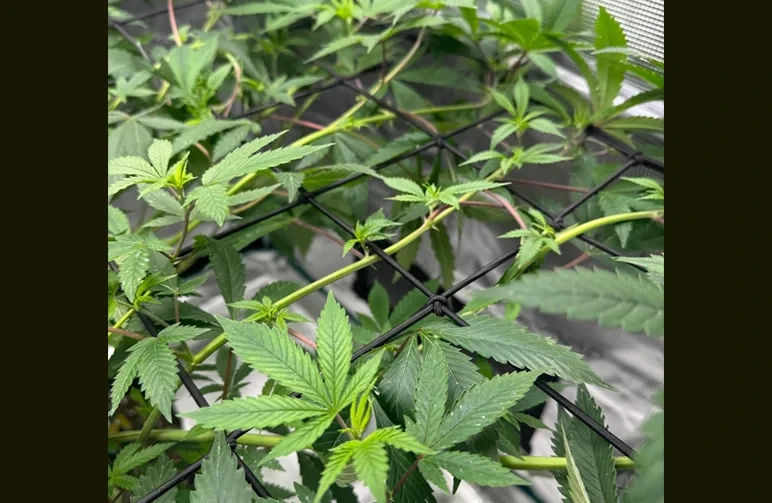
Step 2: As the shoots grow up and reach the net, do not let them grow straight through. Guide each tip under the net and tuck it into the next empty square.
A perfect close-up example of proper ScrOG tucking during the vegetative stage. Notice how the branches are woven horizontally beneath the net to push the canopy outward, rather than being allowed to grow straight up. Image courtesy of Reddit user via r/cultivation.
Step 3: Keep tucking every two to three days. You want the canopy to grow outward, not upward.
Step 4: Be patient. Aim to fill 70 to 80 percent of the entire net before you flip your lights to the flowering stage. If you flip too early, you will end up with an empty net and wasted space.
Step 5: In the first two weeks of flower, the plant will stretch. Continue doing very gentle tucks. Once the actual flowers set, stop touching the branches so you do not snap them.
The Power Combo
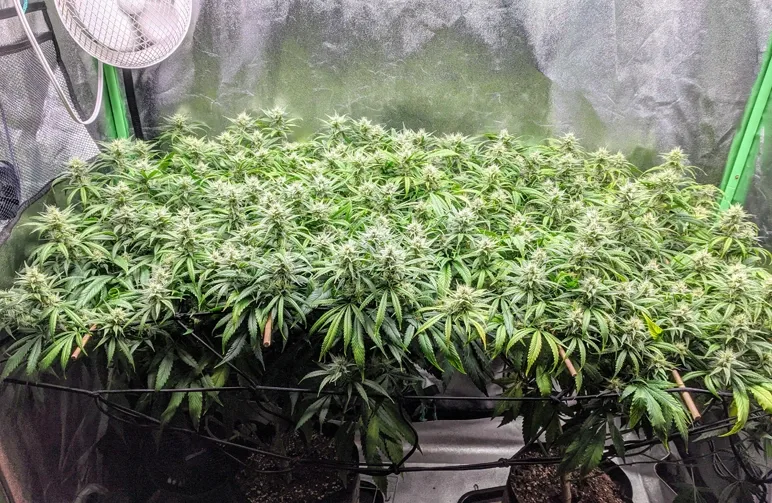
Combining topping with a ScrOG net is the ultimate indoor recipe. You top the plant early to build multiple main branches. Then, you use the ScrOG net to distribute those branches perfectly.
The end result is a perfectly flat wall of evenly lit colas and zero wasted space.
The ultimate reward of a perfectly executed Screen of Green (ScrOG). By combining topping with patient weaving, this grower created a completely flat canopy where dozens of uniform colas receive maximum, even light. Image courtesy of Reddit user battletuba.
Advanced Add-Ons: Lollipopping and Defoliation
Once your canopy is flat, you will notice a bunch of small leaves and tiny branches hidden underneath in the dark. These will never grow into real buds. They will just turn into fluffy, useless larf.
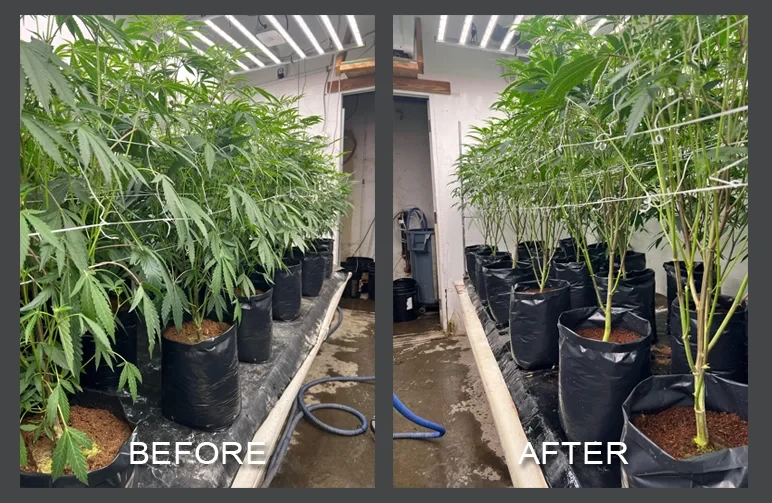
Right before you flip to the flowering stage, strip all of that lower growth off. We call this lollipopping. It forces the plant to send all of its energy up to the top canopy where the prime light is.
It also massively improves the airflow under your plants.
A striking before-and-after look at the lollipopping process. Stripping away the shaded lower third of the plant eliminates energy-wasting "larf" (small, fluffy buds) and drastically improves airflow beneath the canopy to prevent mold. Image courtesy of Reddit user h1gh3r420.
You can also do some light defoliation. This just means plucking off massive fan leaves that block light from hitting your lower buds. Do this sparingly.
If the plant prays to the light the next day, you did it right. If it droops hard, you pulled too many leaves.
Common Training Mistakes to Avoid
Breaking a Branch
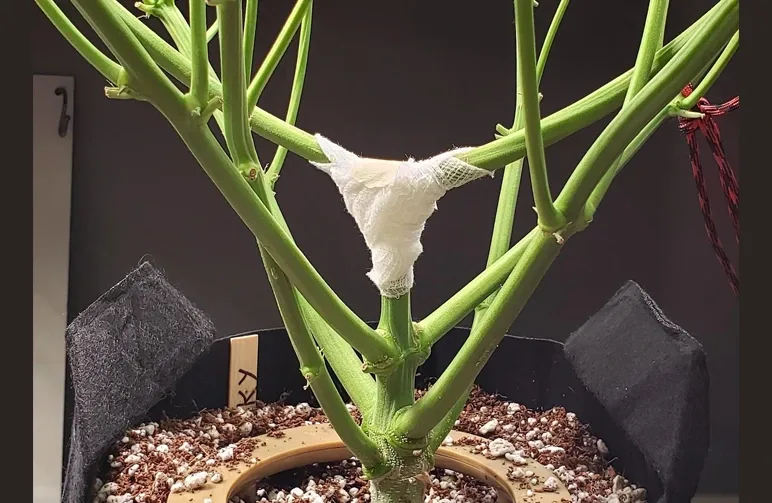
It happens to the best of us. If you bend a branch too far and it snaps, do not panic. If it is still partially attached, wrap a piece of duct tape or electrical tape tightly around the break. It acts like a cast.
The plant will heal itself in about a week and form a massive knuckle over the break. If the branch completely falls off, just throw it away and move on.
Do not panic if you accidentally snap a branch or split the main stem while training! As long as the fibers are still partially attached, bind the break tightly with tape to act as a cast. The plant is incredibly resilient and will heal the wound into a thick, woody knuckle. Image courtesy of Reddit user brewlord3.
Tying Stems Too Tight
Your ties need to be secure, but you cannot choke the stem. As the plant grows, the stems get incredibly thick. Thin wire or tight zip ties will slice right through the plant.
Always use soft, rubber coated plant ties and leave a little slack.
Training Too Late
You can only bend green, flexible stems. Once a plant enters the flowering stage, the stems turn hard and woody. If you try to bend a woody stem, it will snap in half instantly. Do all of your heavy training in the vegetative stage.
Flipping the Lights Too Early
Be patient with your ScrOG net. If you flip to the flowering stage when your net is only half full, you will end up with an empty tent and wasted potential. Always wait for 70 to 80 percent coverage before you flip.
Frequently Asked Questions
Can I combine multiple training techniques?
Yes, and you absolutely should. The ultimate indoor recipe is to top the plant early, use LST to spread the branches out, and then weave those branches through a ScrOG net.
Finish it off by lollipopping the bottom right before you flower.
How do I know if I am stressing my plant too much?
If your plant droops heavily for more than a day, or if the new growth completely stalls, you went too hard. Stop all training immediately.
Make sure your watering and pH are perfect, and let the plant rest until it starts praying to the light again.
What is the difference between SOG and ScrOG?
SOG stands for Sea of Green. You use dozens of small plants packed tightly together and flower them very early. ScrOG stands for Screen of Green.
You use just one or two plants vegged for a long time under a net to fill the exact same space.
Can I train outdoor weed plants?
Absolutely. LST is fantastic outdoors. It keeps your plants short for stealth, and it makes them incredibly strong against heavy winds.
The Wrap Up
Training your plants takes a little bit of patience, but the payoff is massive. When you break that apical dominance and flatten your canopy, you unlock the true yield potential of your genetics.
Start with gentle LST to learn how the stems bend. Once you get a feel for the plant, you can move on to topping and setting up your first ScrOG net.
If you are getting ready to set up your tent and plan out your first run, make sure to check out our complete guide on how to grow weed indoors to map out your exact next steps.
At Weedseedsexpress, we hand select and rigorously test every single cultivar we offer.
When you are ready to pair expert training with world class genetics, grab some premium seeds from our lineup and grow something you are proud of. Keep your canopy flat, and happy growing!
Ready to grow?
Put this guide into practice with our autoflower seeds.