Once you’ve got into the swing of growing autoflowering cannabis, you’ll find it a fun and therapeutic process that’s pretty simple to master.
It all starts with understanding the basics of your autoflowering cannabis plant’s lifecycle. If you’re new to growing and want to know what to expect, here we take a deep dive into each weekly stage of a typical autoflower’s growing cycle.
Advantages of the short autoflower life cycle
Autoflowering strains offer a quick and hassle-free growing experience, with a seed-to-harvest cycle of just 8 to 12 weeks.
Unlike other strains, they automatically transition from vegetative to flowering stages without complex light schedules, making them ideal for beginners and busy growers alike.
Thanks to their shorter life cycle, you can enjoy multiple harvests annually without needing to follow seasonal growth patterns.
These strains are also more compact, pest-resistant, and adaptable to varying climates, perfect for small spaces like apartments.
For those looking to maximize efficiency, explore our selection of the fastest autoflowering strains with even shorter life cycles.
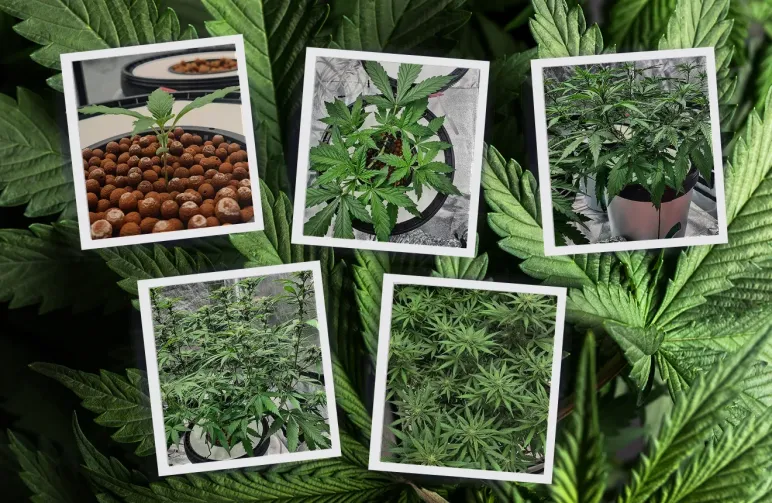
The life cycle of autoflower varieties – week-by-week pictures
Autoflower Week 1: Germination/Seedling

The germination stage lasts 1 to 3 days, during which the seed activates and begins sprouting roots and a shoot. Many growers prefer to germinate seeds on a wet paper towel in a plastic container, kept warm and moist, to ensure healthy growth.
Once sprouted, pot the seed in quality soil.
For optimal growth in the first week, provide good light, maintain higher humidity, and use organic nutrient soil with mycorrhiza for root absorption. Ideal temperatures range from 20 °C to 25 °C.
Autoflower Week 2: Seedling

By week 2, your plants enter the late seedling stage, forming leaves for photosynthesis. This is when you can start your vegetative lighting routine and increase soil nutrients for growth.
Autoflowers require fewer nutrients, so use half or a quarter of the recommended dose.
For indoor lighting, energy-efficient LEDs with a blue light setting are ideal. Maintain a 16-hour light/8-hour dark cycle to support growth, though some growers opt for 24-hour lighting.
A 16/8 routine can be kept consistent throughout the plant's lifecycle. Lower humidity slightly during this stage for optimal development.
Autoflower Week 3: Vegetation

By week 3, your autoflower enters full vegetative growth, reaching about 15 cm, though size can vary by strain. More leaves and off-shoots indicate healthy progress.
Maintain previous light settings for vertical growth, with humidity around 50% and temperatures at 20 °C.
Now’s a good time to start low-stress training (for SCROG or SOG) to optimize light exposure for future buds. Water daily with about 500 ml, avoiding excess to prevent high humidity and mold.
Autoflower Week 4: Vegetation

Now, your cannabis plant is in full swing with rich green leaves and steady growth. Training should be incorporated during this stage in full to avoid stressing your plant when it flowers.
You may begin to see signs pre-flowering of pre-flowering on the plant’s nodes. Your plant is still growing at this stage, however, so opt for growing fertilizer rather than flowering solutions.
Much of your regiment should stay exactly the same over this week – keep light levels consistent, humidity at 50% and water 500 ml per day.
As your plant grows, adjust the lighting so that it is not closer than 70 cm from your canopy.
Autoflower Week 5: Pre-flowering

By week 5, pre-flowering signs should appear at the stem nodes. Female plants develop pistils (fine hairs), while males produce pollen sacs. Remove male plants early if you want to avoid pollination.
Maintain the same feeding and light routine, with lights positioned 70 cm above the canopy. Keep an eye on early bloomers, as the next stage may need slight adjustments.
Autoflower Week 6: Flowering

Once flowering signs appear, switch to flowering-stage fertilizer, which is higher in potassium, magnesium, and calcium to support bud growth. Change lighting to red for optimal resin production.
Flowering plants need twice the water, so increase to 1 liter daily. Raise temperatures to 23 °C and monitor pH levels, aiming for 6 to 6.5.
Autoflower Week 7: Flowering

By week 7, flowering is in full swing, with buds forming and aroma intensifying. Lower humidity to 40% and increase watering to 1.5 liters daily.
Your plant should reach around 30 cm, so adjust the lights to 45 cm above the canopy. Follow your fertilizer’s feeding guidelines closely.
Inspect buds regularly for abnormalities, such as protrusions, to catch any hermaphrodite plants early and prevent self-pollination.
Autoflower Week 8: Flowering

Some autoflowers may finish flowering now, while others continue developing. Stay patient to ensure potent, high-quality buds.
Maintain conditions: 1.5 liters of water daily, 40% humidity, and 24 °C.
Regularly check leaves for signs of nutrient deficiency, like rusty-brown spots or dullness, and adjust potassium or pH if needed. Use a magnifying glass to monitor for pests.
Autoflower Week 9: Flowering

By week 9, continue the flowering regimen or prepare for pre-harvest, depending on the strain. Keep consistent light, humidity at 40%, temperature at 24 °C, and nutrients.
Stick to 1.5 liters of water daily, and watch for pests, mold, or unusual leaf color (browning/burning) that may indicate nutrient issues. Managing humidity is key to avoiding problems in late flowering.
Autoflower Week 10: Flowering

As flowering ends, buds will become dense, resinous, and heavy, with colorful pistils, while fan leaves turn yellow. Begin flushing nutrients from the soil to enhance flavor, but maintain feeding and lighting until full maturity.
If buds are still developing, continue with your earlier regimen. Some autoflowers, like Amnesia Haze, may take up to 12 weeks to mature fully. Consistency, patience, and regular inspection are essential.
Autoflower Week 11: Flushing / Defoliate

When buds look resinous and weighty with dark, curled pistils, it’s time to prepare for harvest. Use a magnifying glass to check trichomes—they should appear frosty white with a mushroom shape.
Begin flushing by stopping nutrient feeding and soaking the soil daily to clear residual nutrients, enhancing flavor. Continue this for a week, maintaining light, humidity, and temperature.
Defoliate by trimming smaller leaves to boost light exposure, but watch for mold risk. Flushing effects should show as leaves brown and fall off in the days leading to harvest.
Week 12: Harvest

Autoflowers are typically ready for harvest 8–12 weeks after planting, though timing varies by strain. Harvest when pistils turn brown-red, and trichomes are thick, milky white.
If some buds mature faster, especially at the top, due to more light, harvest those first to let lower buds continue developing.
Use sterilized scissors to snip buds, then begin drying and curing—a crucial step to enhance aroma and smoothness. Clean tools and surfaces are essential to prevent contamination.
Proper curing reduces harshness and chlorophyll taste, yielding a refined final product.
Grow your own autoflower!
The pictures above are from our Bruce Banner Auto strain. One of the greatest and most potent autoflowers around. However, you can choose from a great variety of autoflower seeds at WeedSeedsExpress.
Our premium seed bank offers well-known staples and new classic strains that are easy to grow and quick to harvest.
You’ll find a full breakdown of harvest times, too, so you’ll know just how long you can expect the cycle to take after planting.
Our autoflowering seeds provide excellent results in as little as 8 weeks – so get started today with these fun and versatile varieties.


