You open the tent and, damn, something smells off. A bud that was chunky yesterday looks… tired. Mushy, even. If you're thinking "bud rot," trust your gut and move fast.
We've battled Botrytis in humid greenhouses, seaside patios, and overpacked indoor canopies. The good news? You can catch it early, stop it from spreading, and still pull a solid harvest.
In this guide, we break down identifying and curing bud rot (Botrytis) with real-world cues, exact environmental targets, and step-by-step moves that protect your plants, your sanity, and your stash.
Key Takeaways
- Bud rot (Botrytis cinerea) thrives in high humidity and stagnant air, making dense cannabis buds vulnerable during late flowering.
- Early identification involves checking for soft spots, faint white fuzz inside buds, and a musty odor; prompt removal of affected material can save the rest of the crop.
- Maintaining 45–50% relative humidity, good air circulation, and stable temperatures between 70–78°F during flowering is the best prevention.
- Upon detection, isolate infected plants, carefully remove rot by cutting 1-2 inches into healthy tissue, and adjust environmental conditions to stop fungal spread.
- During drying and curing, a controlled environment (60°F and 60% RH) with gentle airflow is critical to prevent post-harvest mold.
Key Tools for the Fight
Before you dive in, let's gear up. Having the right tools on hand means you can act decisively when you spot trouble. Think of this as your surgical kit.
For Diagnosis & Removal:
- Magnifying Glass or Jeweler's Loupe
- Nitrile Gloves
- N95/KN95 Face Mask
- Sharp, Sterile Scissors or Pruning Shears
- 70% Isopropyl Alcohol (for sterilization)
- Sealable Plastic Bags (for immediate disposal)
What is Bud Rot (Botrytis Cinerea)?
Understanding Gray Mold: A Common and Destructive Fungus
Bud rot is a fungal infection caused by Botrytis cinerea, the infamous gray mold that feasts on dense flowers when humidity and stagnation line up just right.
According to agricultural experts at institutions like the University of California, this pathogen is widespread and can infect a vast range of plants.
It usually sneaks in during late flower (weeks 6–8 for many photoperiod strains), starting as faint white fuzz before turning gray-brown and devouring buds from the inside out. Left unchecked, it collapses entire colas.
We've seen it ride in on spores from the garden, neighbors' ornamentals, even a damp trim room. Spores are everywhere; the environment decides whether they germinate.
High RH, cool temps, low airflow? That's Botrytis' dream loft.
Why Cannabis and Other Dense-Flowered Plants Are So Susceptible
Cannabis stacks calyx on calyx, creating thick, moisture-trapping nooks with limited airflow.
Big, resin-soaked tops (the ones we all love) hold microclimates that stay wetter longer, especially after foliar sprays, light rain, or a humid night followed by a slow morning dry-out.
Those damp interiors give spores time to germinate and rot tissue from within. Roses, tomatoes, grapes—same story. Dense flowers + moisture + stagnant air = an open invitation for gray mold.
How to Identify Bud Rot: Early and Advanced Stages
Telltale Signs: Spotting Bud Rot Before It Spreads
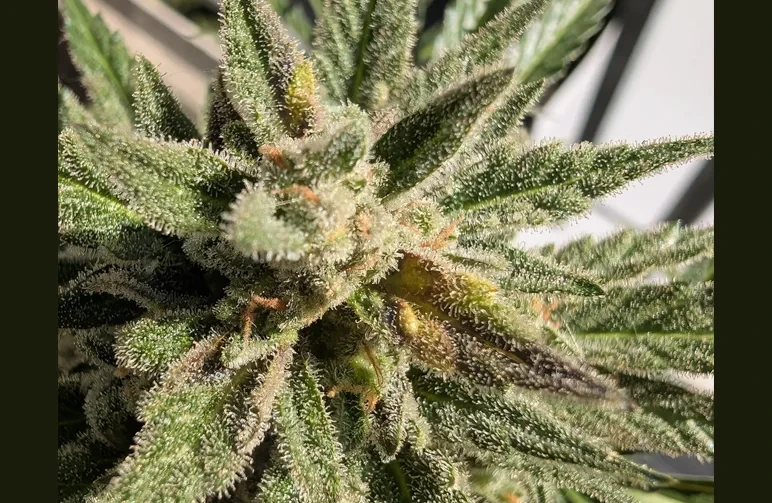
With bud rot, time is everything. We do a daily "pinch-and-peek" in late flower: gently squeeze fat colas to feel for soft spots, spread bracts to look for hidden fuzz, and sniff for musty or wet-cardboard notes.
If something feels mushy or smells wrong, assume it's Botrytis until proven innocent.
If you're not sure what you're dealing with, our complete cannabis troubleshooting guide can help you diagnose everything from pests to nutrient deficiencies.
Early-Stage Symptoms of Bud Rot
- Small discolored patches (gray, white, or brown) on buds or nearby sugar leaves.
- Outer leaves on a single cola suddenly wilt or die back for no obvious reason.
- Buds feel soft or slightly waterlogged instead of springy.
- A faint musty, "wet socks" odor.
- Wispy white tufts hiding between bracts (often only visible when you dissect the flower).

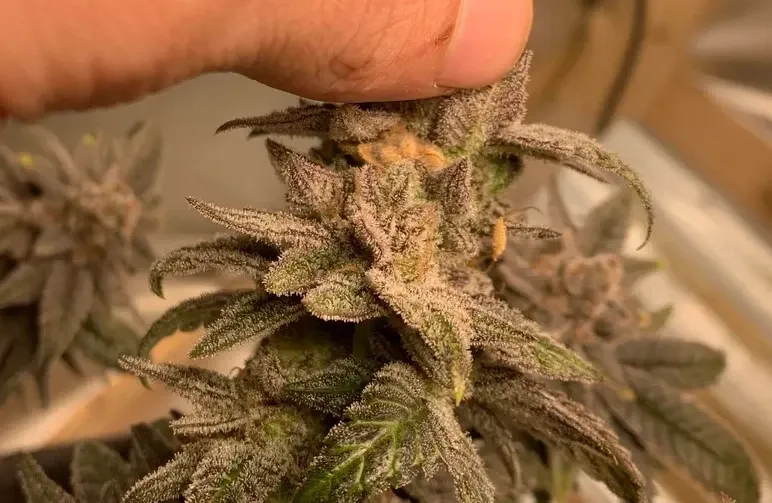
The Stem-Level View: Bud rot often takes hold at the nodes—the junction where the leaf stem meets the main branch. In this macro shot, you can see the telltale brown, necrotic tissue beginning to spread from the core. This is why "parting the buds" to inspect the inner stem is a vital daily habit in late flower. (Photo credit: kruroisoi via 420magazine.com)
Early is when you can still surgically save the day. Don't wait for obvious fuzz on the outside.
Advanced-Stage Symptoms of Bud Rot
- Greyish-white fuzz clearly visible within the cola.
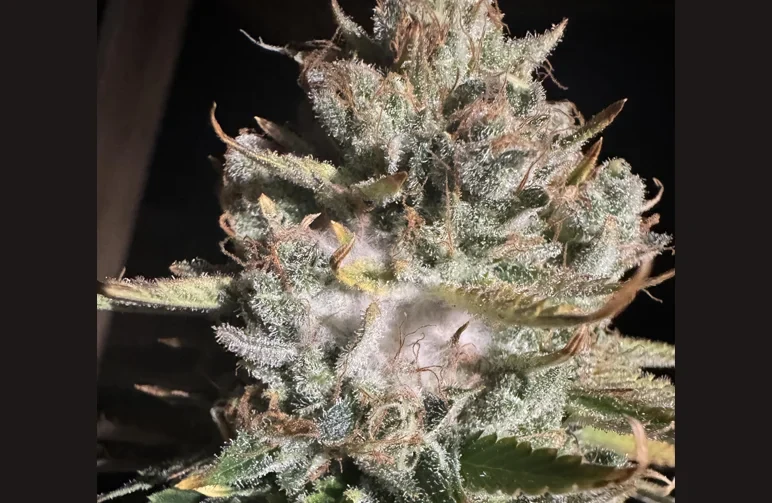
The Spore Factory: At this stage, the Botrytis has matured into a visible "fuzzy" mycelium. This white-to-gray blanket is currently preparing to release a cloud of microscopic spores. If you see this, turn off all fans immediately before you touch the plant to prevent the infection from blowing across your entire garden. (Photo credit: u/633Jeff via Reddit) - Big sections turning dark brown to black: tissue gets slimy, then dries to a crumbly dust.
- Buds break apart at the base with a dusty spore explosion (that gray dust is trouble).
- Strong, unpleasant odor that overpowers the strain's terpenes.
- Entire tops collapsing or rotting away.
At this stage, you're in triage: remove everything infected and protect the rest.
Differentiating Bud Rot from Other Issues Like Light Burn

Bud rot: Fuzzy gray-white mycelium, soft or slimy tissue that browns/blackens, musty odor, usually starts inside dense areas. Often accompanied by random leaf wilt around a single cola.
Light burn: Bleached tops (white/pale yellow), dry and crispy texture, no fuzz, no musty smell, clearly worst at the points closest to the light. Lower buds look fine.
When in doubt, dissect a suspect bud. If the interior is gray-brown and dusty, it's Botrytis. If it's just pale and dry at the tip with healthy green inside, think light stress.
What Causes Bud Rot? Key Environmental Factors
High Humidity: The #1 Cause of Bud Rot
High RH is the main driver. Mastering the ideal humidity for growing weed is crucial at every stage, but especially in flower.
Aim for 45–50% RH in mid-to-late flower (we like the 48% sweet spot). If your nights spike over 60% RH, especially with dense canopies, you're in the risk zone.
Dewpoint creep, when temps drop and moisture condenses inside buds, is the sneaky killer.
Poor Air Circulation and Stagnant Air
Stagnant pockets let moisture linger. Without consistent air exchange through and around flowers, tiny wet zones become germination stations for spores.
Oscillating fans, proper intake/exhaust, and a gentle, constant "leaf flutter" keep microclimates from forming.
Cool and Damp Conditions
Botrytis thrives when temps dip to 60–68°F (16 °C–20 °C) with high RH. Nighttime cool-downs after warm, humid days are classic triggers, especially outdoors after rain or indoors when lights-off drops temps too far.
Plant Injury and Entry Points for Spores
Openings are invitations: caterpillar bites, wind snap, rough defoliation, or even bruising from handling. Keep tools sanitized, go easy during late flower, and scout for pests—their damage often precedes rot.
How to Prevent Bud Rot: Proactive Strategies for a Healthy Harvest
This is where you win the war before the first battle. An ounce of prevention is worth a pound of cure—and a pound of top-shelf flower.
| Environmental Factor | Target Range (Flowering) | Key Action |
|---|---|---|
| Relative Humidity (RH) | 45-50% | Use a properly sized dehumidifier. |
| Temperature | 70-78°F (21 °C-26 °C) | Keep lights-off temps within 5-8°F of lights-on. |
| Air Circulation | Gentle, constant leaf flutter | Use multiple oscillating fans; ensure good exhaust. |
| Plant Spacing | 6-12 inches between colas | Prune and use training techniques (ScrOG). |
Mastering Your Grow Room Environment
Controlling Humidity and Temperature
- Target 45–50% RH in late flower; 52–58% in early flower. Avoid night spikes above 60%.
- Keep lights-off temps within ~5–8°F of lights-on to reduce condensation (e.g., 78°F on, 70–72°F off).
- Use a dehumidifier sized to your room's cubic footage; drain it continuously so it actually runs.
- Monitor with reliable hygrometers at canopy height. Data > vibes.
Optimizing Air Circulation with Fans
Two layers of airflow: oscillating fans for leaf flutter + exhaust/intake for full air exchange.
Angle fans to push air across and through colas, not just against the tent wall.
Clean fan blades and filters monthly; dust chokes airflow.
Prevention Techniques for Indoor Growers
Proper Plant Spacing and Canopy Management
- Don't cram the tent. Leave 6–12 inches between main colas for air to move.
- Use ScrOG or stakes to spread tops horizontally; flat canopies dry more evenly.
Defoliation and Pruning for Better Airflow
- Early flower: selective leaf removal to expose interior sites. Think windows, not walls.
- Mid-to-late flower: minimal defoliation. Focus on lollipopping lower fluff that traps moisture.
- Always use clean, sharp scissors; sanitize with 70% isopropyl alcohol between plants.
Prevention Techniques for Outdoor Growers
Protecting Plants from Rain and Dew
- Shake morning dew off colas; a gentle "barista tap" does wonders.
- Use breathable plant umbrellas or a temporary cover before storms.
- Water at dawn so foliage dries fast.
Choosing a Growing Location with Good Airflow
- Favor open, breezy spots. Avoid tight courtyard corners.
- Cage or trellis early to spread branches and prevent them from clumping together.
- If your climate is foggy or coastal, consider genetics with an airier flower structure.
Small plug from the seed nerds: choosing the right genetics is your first line of defense. Airy-spear phenos and our hand-picked mold-resistant strains are naturally less prone to rot than rock-hard, late-running monsters.
If you need strain suggestions, our team at Weedseedsexpress can point you to resilient options across feminized and autoflower seeds.
How to Cure Bud Rot: A Step-by-Step Treatment Guide
Immediate Steps to Take When You Discover Bud Rot
Isolating Affected Plants to Prevent Spreading
- Kill the fans for a minute to avoid spore clouds. Put on your gloves and mask. If possible, move the infected plant to a separate area.
- Work from the top of the plant down so spores don't fall onto clean buds below.
Safely Removing and Disposing of Infected Material
- Sterilize scissors with 70% iso. Cut 1–2 inches into visibly healthy tissue beyond the rot. If the stem inside looks gray-brown, cut deeper.
- Bag the waste immediately in a zip-top bag, seal it, and trash it. Do not compost.
- Re-sanitize your tools after every single cut.
Treating the Remaining Healthy Plant Tissue
Improving Environmental Conditions to Stop Further Growth
- Drop RH to 40–45% for a few days and bump lights-on temps 1–2°F to dry out microclimates.
- Increase gentle, distributed airflow.
- Stagger irrigations to ensure pots aren't steaming up the room.
Organic vs. Chemical Fungicide Options
- The safest "treatment" after surgical removal is environmental correction.
- Some growers use a diluted 3% hydrogen peroxide solution for spot-treating nearby areas, but we avoid spraying it broadly on late-stage flowers. It's a band-aid, not a cure.
- Systemic chemical fungicides are a hard no for any consumable flower.
When rot appears deep in bloom, your best move is surgical removal plus environmental correction. Watch the plant, not the calendar—you may need an early harvest for threatened tops.
Post-Harvest Care to Prevent Bud Rot
Proper Drying Environment to Avoid Mold Growth
The fight against mold doesn't end at harvest. Perfecting how to dry and cure your cannabis is essential to protect your final product.
We target the classic 60/60: 60°F (16 °C) and 60% RH, in darkness, for a slow 8–12 day dry.
- Use gentle air movement below the hanging buds, not directly on them.
- Space branches so nothing touches.
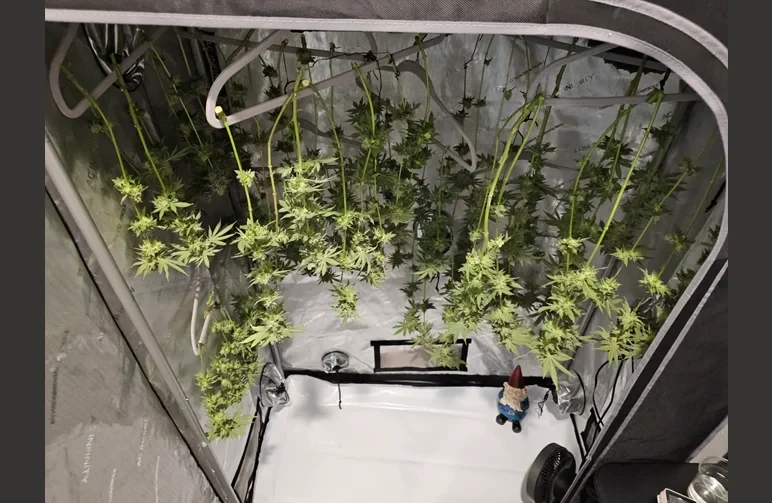
The Ideal Drying Setup: Spacing is your best defense against post-harvest mold. This setup uses simple clothes hangers to ensure that no branches are touching, allowing for total air exchange around every bud. Notice the fan at the bottom providing indirect circulation. Aim for "60/60" (60°F and 60% RH) in a dark space like this for the safest results. (Photo credit: u/JabbawookiezDaBoss via Reddit) - If you battled any Botrytis, be extra vigilant: add a small HEPA purifier and inspect daily.
Curing Techniques to Preserve Your Harvest
Once stems snap, jar the buds with mini hygrometers. Aim for 58–62% RH inside the jar. Burp daily for the first week, then taper off. If a jar smells swampy or reads >68% RH, pull the buds out, spread them on a tray for 12 hours, and try again.
Frequently Asked Questions (FAQ) About Bud Rot
How do you know if you have bud rot?
Look for soft, mushy spots on your densest colas. Part the bud and check inside for white or gray fuzz. Other key signs are a musty, damp smell and single leaves on a cola suddenly wilting and dying.
What is the main cause of bud rot?
The number one cause is high humidity (above 60%) combined with stagnant, poor airflow. These conditions create a damp microclimate inside dense flowers, which allows Botrytis spores to germinate and thrive.
Can a plant recover from bud rot?
A plant can be saved, but the infected parts cannot recover and must be removed.
The goal is to surgically cut away all the rot and then correct the environmental conditions (lower humidity, increase airflow) to stop the fungus from spreading to healthy parts of the plant.
Is it safe to smoke bud that had rot on it?
No. We strongly advise against it. Even if you cut away the visible mold, invisible spores and microbial byproducts can remain. Inhaling mold spores is a health risk. It's better to be safe and discard any affected material.
Can bud rot spread to other plants?
Absolutely. Botrytis produces thousands of airborne spores that can easily travel to neighboring plants.
This is why it's critical to kill your fans, work carefully when removing infected material, and sanitize your tools and grow space afterward.
Are some cannabis strains more resistant to bud rot?
Yes. Strains with an airier, looser flower structure (often found in Sativa-dominant genetics) are naturally more resistant than those with ultra-dense, rock-hard buds.
Quicker finishing times also help, as the plant spends less time in the vulnerable late-flower stage during humid autumn weather.


