You've grabbed your first pack of autoflower seeds and now you're staring at them like,
"Okay… now what?"
We've been there.
Autoflowers are hands-down the easiest way to grow your own smoke at home, but they're also unforgiving if you wing it.
You don't get a long veg you can fix mistakes in. You get 8–12 weeks, start to finish. That's it. Every day counts.
In this guide we're walking through how to grow autoflowers week by week, from that first taproot all the way to nicely cured, smooth-burning buds.
We'll keep it beginner-friendly, but we won't treat you like you're clueless.
We'll cover:
- The exact gear you actually need (and what you can skip)
- How we germinate autoflower seeds so they pop fast and strong
- What to do each stage: weeks 1–4 (veg), weeks 5–10 (flower), and harvest
- How to dry and cure so your weed doesn't taste like hay
- Gentle training (LST) that boosts yield without wrecking your plant
- The 5 classic beginner screwups, and how to dodge them
We'll talk specifics: temps, humidity, pH, light distance, nutrient strength… all the boring-but-critical stuff that separates "meh" buds from outright fire.
Of course, every great harvest begins with great genetics. If you're ready to choose the perfect strain for your first run, explore our full collection of autoflower seeds to get started.
Let's build your first grow the right way.
Essential Equipment & Setup Checklist for Your First Grow
Before we talk weeks and stages, we need a basic, reliable setup.
Autoflowers are tough little machines, but if the environment's trash, the results will be too.
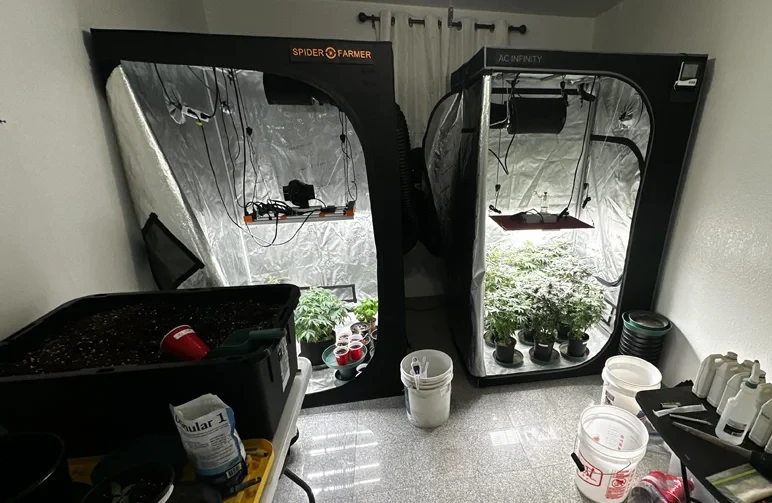
Choosing Your Grow Tent or Space
You don't need a full-blown laboratory to get started. For 1-4 autoflowers, a solid 2x2, 2x4, or 3x3 foot grow tent is the perfect, self-contained environment.
If you're wondering exactly how many autoflowers in a tent you can fit, that guide will give you a clear breakdown.
When choosing one, prioritize quality over cheaping out. A good tent should be completely lightproof when zipped, feature sturdy zippers and seams (the first failure point on cheap models), and have well-placed ports for your ventilation fans and cables.
For height, 5-6 feet is generally sufficient for autoflowers in 2-5 gallon pots.
If you're considering a DIY space like a closet or cabinet, your goal is to replicate these same conditions. You'll need to ensure you can make the space perfectly light-tight during the dark period, establish a method to control airflow in and out, and find a way to keep your temperature and humidity stable.
For these reasons, we still strongly recommend a quality tent. It’s simply the cleanest, easiest, and most reliable way to dial in a perfect growing environment from day one.
Selecting the Right Grow Light (LEDs Recommended)
If there's one thing not to cheap out on, it's the light.
For beginners, we strongly recommend a full-spectrum LED. They just make more sense: they run cooler than old-school HPS/MH lights, they're way more efficient on your power bill, and you're not messing around with changing bulbs.
When it comes to sizing, ignore the "equivalent" marketing nonsense and look at the actual power draw from the wall. For a 2x2 ft tent, you want a quality LED pulling around 100–150W. A 2x4 ft tent needs about 200–300W, and for a 3x3 ft tent, look for something in the 250–350W range.
When you're shopping, make sure it has a dimmable driver—this is huge for not torching your seedlings. It's also a good sign if they provide a real PPFD map so you know you're getting even coverage, not just a single hot spot.
Just know: your light is running for 18, maybe 20 hours a day.
That efficiency isn't just a buzzword; it pays for itself on your power bill.
The Best Growing Medium: Soil vs. Coco Coir
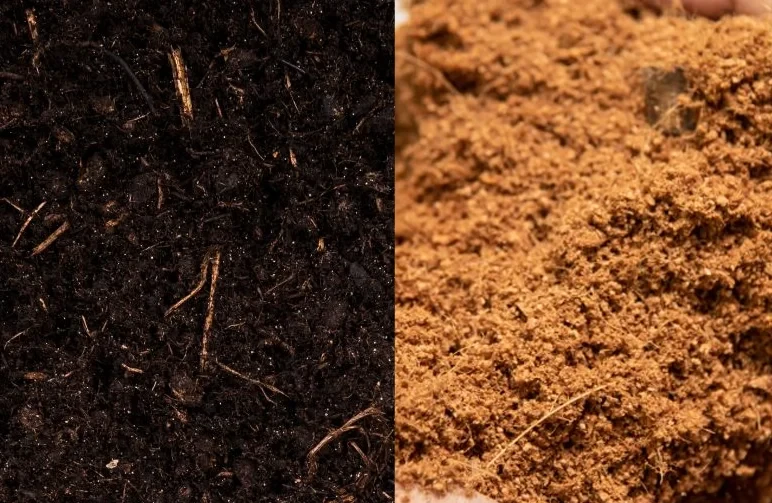
While we grow in all sorts of media, for a first-time autoflower run, we're pointing you straight towards soil.
Look for a lightly fertilized, airy mix designed for cannabis or even tomatoes.
The beauty of soil is that it acts as a buffer; you often won't need to add any liquid nutrients for the first 2-3 weeks, which simplifies things immensely.
Just focus on keeping your water's pH between 6.0 and 7.0.
The high-performance alternative is coco coir. Because it provides so much oxygen to the roots, you can get some truly explosive growth. But it's a much more hands-on medium. It contains zero nutrients, so you'll be feeding with almost every watering, and the pH target is tighter and more critical, sitting at 5.8-6.2.
Why Fabric Pots Are Ideal for Autoflowers
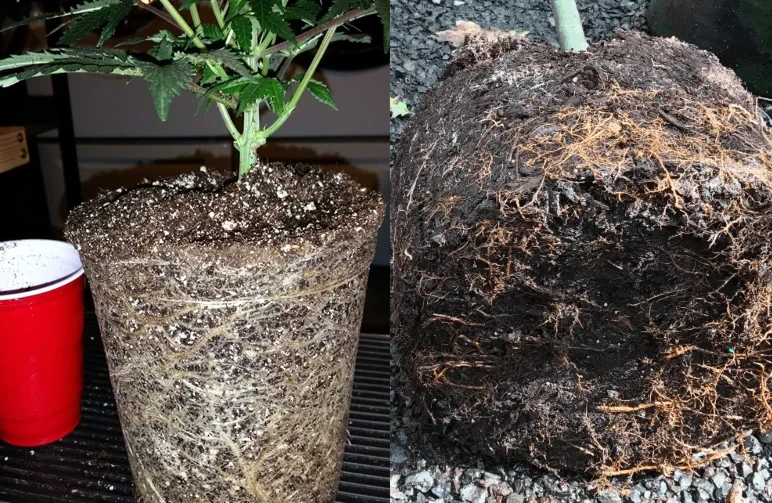
Autos hate stress. They don't have time to recover from root problems or being transplanted, which is why we start and finish them in the same 2–5 gallon fabric pot.
Fabric pots are a game-changer for autoflowers because they solve a ton of common beginner problems. They offer far better drainage, making it much harder to overwater and drown the roots. More importantly, when roots reach the fabric sides, they are naturally "air-pruned" instead of circling into a root-bound mess.
This encourages a dense, healthy rootball. That extra oxygen exchange through the pot walls also means fewer nasty anaerobic issues.
For most of our autoflower grows, we run 3-gallon fabrics. If you're growing a strain known to be a big stretcher or just want to give it maximum root space, 5 gallons is a great choice.
For a complete breakdown, our guide to the best autoflower pot size will help you pick the perfect one for your space and strain.
Essential Nutrients and a pH Pen
You don't need a 12-bottle advanced nutrient line to get great results.
For your first few grows, keep it simple. All you really need are base nutrients—one bottle for veg (grow) and one for bloom.
For a deeper dive into feeding schedules, check out our complete guide to autoflower nutrients.
The only other thing you might want is some Cal-Mag, which is especially helpful if you're growing in coco or using very soft water.
The two most important rules of feeding are to start at ¼ strength of whatever the bottle recommends, and to only increase the dose if the plant is asking for more—don't just follow the schedule blindly. If the plant looks happy, don't change a thing.
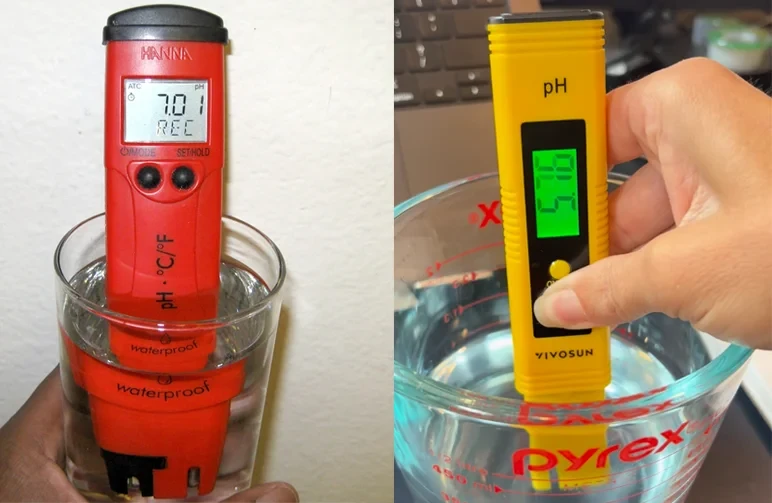
And yes, you absolutely need a decent pH pen. An out-of-range pH will lock out nutrients, meaning your plant can starve even when you're feeding it correctly.
If you ever see weird deficiencies on a plant you think is well-fed, it's almost always a pH issue. Aim for 6.0–7.0 for soil watering and a tighter 5.8–6.2 for coco.
Ventilation: Intake Fans, Exhaust Fans, and Carbon Filters
Fresh air in, stale air out. It sounds basic, but this is where a lot of beginners cheap out and then wonder why their plants look sad. Your ideal setup is an inline exhaust fan placed at the top of the tent to pull hot air out, with a carbon filter attached to it if smell is a concern (and it usually is). Fresh air can then be brought in through a passive intake (just an open lower vent) or a small intake fan.
Getting this right is critical because it's what keeps your temps in the 71–82°F range, helps you maintain a healthy RH, and prevents the stale air that leads to mold, pests, and slow growth.
Get these basics in place, and you've already set yourself up for a way smoother first run than most people manage.
Step 1: Germination – Bringing Your Autoflower Seed to Life
Germination is where the magic starts. Good news: it's easy, and autos don't need anything special at this step, just a gentle touch.
The Paper Towel Method: A Step-by-Step Guide
Here's how we pop our autoflower seeds from WeedSeedsExpress on the regular:
- Prepare Your Workspace: Get a clean plate, two plain paper towels, and some room-temperature water. If you want to be extra cautious, you can add a drop of mild hydrogen peroxide to the water to prevent mold.
- Moisten the Towels: Wet the towels, then gently wring them out. The goal is damp, not dripping wet.
- Place the Seeds: Lay one damp towel on the plate, place your seeds on it with some space between them, and then cover them with the second damp towel.
- Cover and Store: Create a dark, humid dome by putting another plate upside down on top, or by sliding the whole setup into a plastic bag (don't seal it completely). Keep it in a warm, dark place, ideally between 72–80°F.
- Check Daily (and Be Patient): Resist the urge to peel the towels back every few hours. Just check on them once a day to make sure they haven't dried out.
Once you see that taproot, it's go-time for the "final pot" method.
How Long Does Germination Take?
Most healthy autoflower seeds will crack open within 24 to 72 hours, showing a small white taproot during that window.
If it's been 4-5 days with no change, don't give up hope just yet, but know that success rates start to drop. After 7 days, the odds of the seed popping are low.
Identifying a Healthy Sprouted Taproot
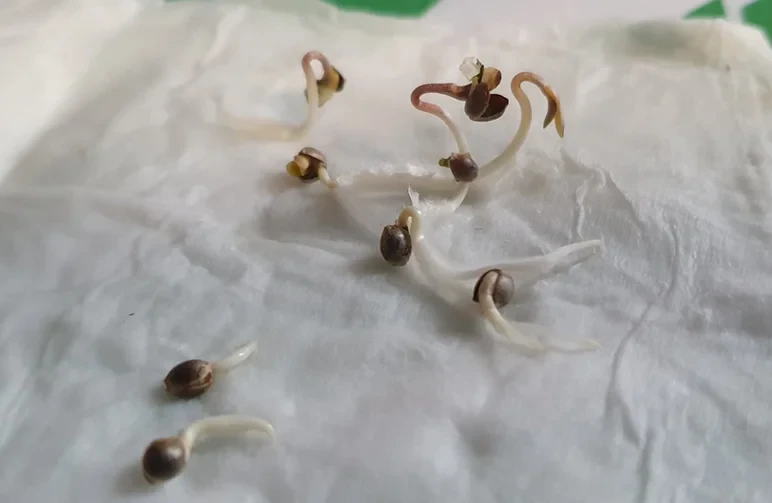
A healthy sprout will have a firm, white to cream-colored taproot. You're looking for a length of about 0.25–0.75 inches (0.5–2 cm) before you move it to its final pot. If you see any roots that are brown, gray, or slimy, those are signs of rot and should be discarded.
The most important rule here is to be gentle. Avoid over-handling the sprouted seed for a full inspection tour; a quick visual check is all you need. Once that taproot is just a few millimeters long, it's time to move it. Autoflowers don't appreciate being messed with for long.
Step 2: The "Final Pot" Method - Planting Your Seedling
Autoflowers don't like being transplanted. Their life cycle is short, so any transplant shock just steals time and potential yield. That's why we drop them directly into their final fabric pot from the very beginning.
Preparing Your Soil and Final Pot
Before you touch the sprouted seed, get its new home ready.
- Fill your fabric pot with your chosen soil or coco mix. Lightly break up any clumps, but don't pack it down hard.
- Pre-moisten the medium by adding plain, pH'd water until it's evenly moist but not soggy. A good test is to squeeze a handful; only a couple of drops should come out.
- Let the pot sit for 15-30 minutes to allow the moisture to distribute evenly and eliminate any dry pockets.
How to Safely Transfer and Plant Your Sprouted Seed
Handle this part like you're dealing with something made of glass. Damaging the taproot now can stall or even kill the plant before it ever sees light.
- Make a small hole in your pre-moistened medium, about 0.4–0.6 inches (1–1.5 cm) deep.
- Gently transfer the seed. With clean hands or tweezers, lift the seed by its shell, never the delicate taproot.
- Place the seed gently into the hole with the taproot pointing down and the shell facing up. Don't shove it; just let it rest in place.
- Cover the seed lightly with soil. Don't compact it, as the seedling needs to push its way to the surface.
- (Optional) Mark the spot with a toothpick or plant label so you know where to expect the sprout.
The First Watering: How Much is Too Much?
Your medium is already pre-moistened, so now it's all about restraint. Use a spray bottle or a small cup to add just enough water to moisten the top few inches directly around where you planted the seed. Do not soak the entire pot again—that's how you create a swamp and drown the seedling.
For the first week, your only job is to keep that surface area lightly moist, not soaked. If it dries out, a light mist is all you need. As soon as the seedling breaks the surface and shows its first set of tiny round leaves (cotyledons), we officially treat it as a baby plant and move into Week 1 of the grow.
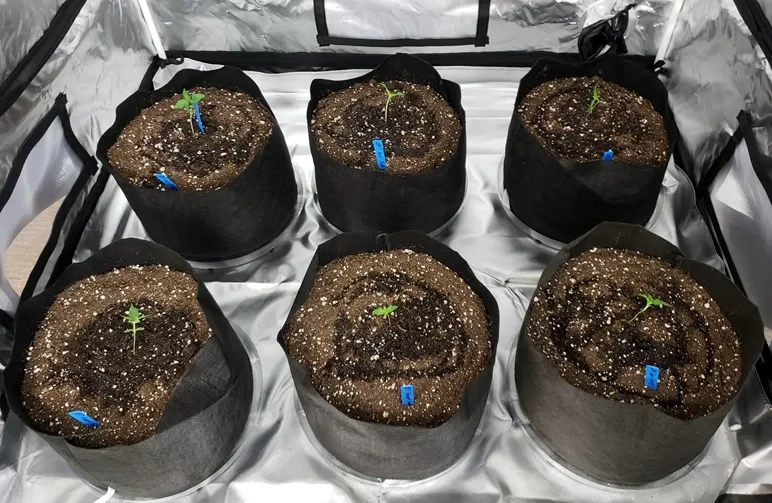
Step 3: The Vegetative Stage (Weeks 1-4)
Now we're into the fun part—watching the plant actually build itself. For autoflowers, these first four weeks are crucial, as they set the foundation for the size, structure, and overall health that will determine your final yield. During this time, the plant will move from a fragile seedling in Week 1 to rapid root and leaf growth in Week 2. By Week 3, it's in full-on veg mode, and by Week 4, many strains will be preparing to transition into pre-flower.
Light Schedule: The 18/6 vs. 20/4 Debate
Autoflowers don't require a change in light schedule to start flowering. We recommend an 18/6 schedule (18 hours on, 6 off) for your first grow; it provides a great balance of strong growth and energy efficiency while giving the plant a healthy rest period. Some growers use a 20/4 schedule to push for slightly more growth, but 18/6 is simple, consistent, and highly effective from seed to harvest.
Setting the Correct Light Distance to Avoid Stretch
Seedlings can't handle the full intensity of your grow light right away. Too close and you'll burn them; too far and they'll stretch into a lanky, weak plant. Always check your light manufacturer's recommendations first, but a good starting point is to hang your LED 24–30 inches above the canopy at 50–60% power.
Pay close attention to your plant's response. If it's stretching with a long, skinny stem, move the light a bit closer or increase the intensity. If you see the leaves "tacoing," bleaching, or curling downwards, the light is too intense or too close, and you should back it off. As the plant gets stronger around Week 3-4, you can gradually lower the light to 18–24 inches and ramp up the power.
Watering Practices: The "Lift the Pot" Method
Overwatering is the number one killer of autoflowers, no contest. The single best rule is to water by weight, not by a calendar schedule. After your initial watering, get a feel for how heavy the pot is. Then, lift it every day. Only when it feels dramatically lighter is it time to water again.
When you do water, pour it in a ring a few inches away from the stem to encourage the roots to spread outwards. In the first couple of weeks, you'll be giving small amounts of water more frequently. By Week 3-4, the roots will have filled out more, and you can begin watering more thoroughly until you see a little runoff.
Introducing Nutrients: Start at 1/4 Strength
If you're using a lightly fertilized soil, you typically won't need to add any liquid nutrients for the first 10-14 days. Once the plant has developed 3-4 sets of leaves (around Week 2-3), it's time to introduce its first feeding.
Always start with a weak dose. Mix your base nutrients at ¼ of the recommended strength and be sure to pH the solution (6.0–7.0 for soil, 5.8–6.2 for coco). After feeding, watch the plant for the next few days. If it looks happy with good color and no burnt leaf tips, you can consider increasing the dose to ½ strength around Week 3-4. Many autoflowers are light feeders and never need more than that.
Ideal Temperature and Humidity for Vegetative Growth
Dialing in your environment is key to promoting fast growth and preventing problems. For the vegetative stage, aim for a temperature of 72–80°F (22–27°C) with the lights on.
Humidity needs will change slightly as the plant grows. For the fragile seedling in Week 1, aim for a higher 60–70% RH. As it moves into Weeks 2–4, you can lower this to 50–60% RH. If your environment is too dry, a small humidifier is a great investment.
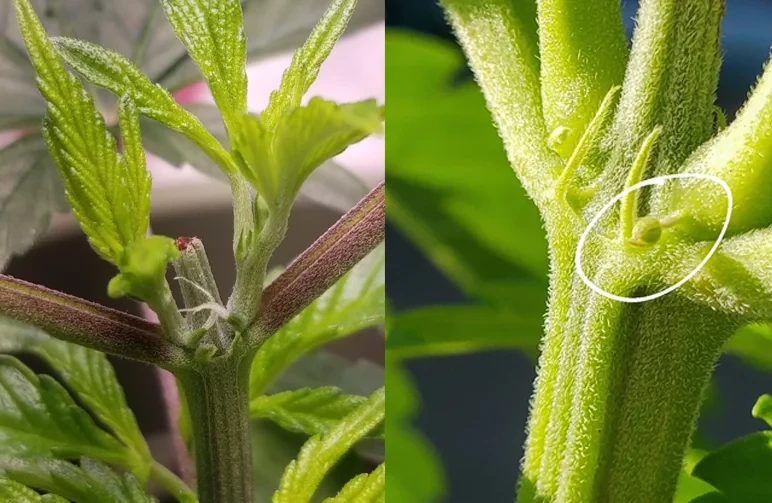
By the end of Week 4, you'll likely spot the first pre-flower pistils at the nodes. This is your cue to shift into the flowering mindset.
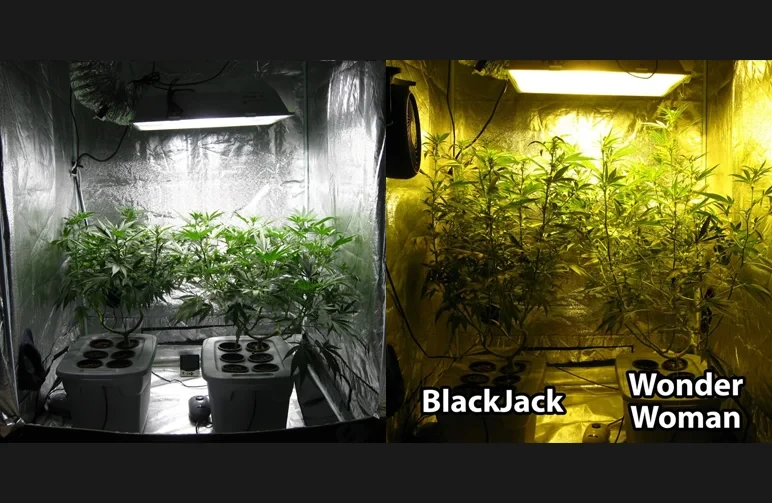
Step 4: The Flowering Stage (Weeks 5-10)
Now we're getting to the good stuff—making buds.
With autoflowers, this process is automatic and typically kicks in around Week 4-5, depending on the strain. The first sign you've entered the pre-flowering stage is the appearance of tiny white hairs (pistils) at the nodes where branches meet the main stem. This is immediately followed by a noticeable growth spurt known as "the stretch."
As soon as you spot these signs, it's time to shift your approach. Stop all new or aggressive training immediately; while gentle adjustments to existing LST ties are fine, any hard bends will only stress a plant that needs to focus its energy on flowering. This is also your cue to begin transitioning your nutrient schedule from a nitrogen-heavy grow formula to a bloom-focused one.
Over the next several weeks, your plant will move from this initial stretch in Week 5 to rapid bud formation in Weeks 6-7, and finally into the bulking and ripening phase in Weeks 8-10 and beyond, which is where you'll see your autoflower buds truly begin to swell and ripen.
Switching to Bloom Nutrients (High Phosphorus and Potassium)
As soon as you see the first white pistils and your plant begins its flowering stretch, it's time to change its diet.
The goal is to gradually shift from a nitrogen-heavy vegetative feed to a bloom formula rich in phosphorus (P) and potassium (K), which are the essential macronutrients for building dense, resinous flowers.
We recommend a gradual transition. For the first week of pre-flower (around Week 5), use a "transition feed" by mixing your nutrients as 50% grow formula and 50% bloom formula, keeping the total strength at about half of the bottle's recommendation.
From Weeks 6-8, as the buds begin to stack and form, you can switch to your full bloom feed, using mostly or entirely the bloom nutrients.
As you move into late flower (Weeks 8-10+), it's beneficial to gradually reduce the nitrogen even further and some growers even slightly lower the overall nutrient strength (EC) to encourage the plant to ripen and fade naturally.
Throughout this entire process, remember to keep your pH in the correct range.
Don't panic and "chase" every yellowing leaf with more food—a natural fade in the final weeks is not only normal but often desirable for a cleaner-tasting final product.
Managing Odor as Buds Develop
By Weeks 6-8, the subtle plant smell will transform into a powerful, room-filling aroma. While it's a great sign of a healthy plant, managing this odor is crucial for a discreet grow.
Your primary line of defense is a quality carbon filter correctly attached to your exhaust fan. Ensure it's not clogged and is appropriately sized for your fan's CFM rating.
The key to making it work effectively is to maintain a slight negative pressure inside your tent, which you can confirm by seeing the tent walls suck inwards just a little. This ensures that all the smelly air is forced out through the filter, rather than leaking out of seams or zippers.
Finally, practice good "tent discipline." Try to avoid opening your tent for long periods, especially at times when you might have visitors or deliveries. If discretion is a top priority, a high-quality carbon filter and fan combo is the single best investment you can make for your peace of mind.
Lowering Humidity to Prevent Bud Rot
As your flowers swell and become dense, trapped moisture becomes your greatest enemy. High humidity in the flowering stage is the primary cause of botrytis, or bud rot, a fast-spreading mold that can ruin an entire harvest in a matter of days.
To defend against this, you must actively manage your grow tent's relative humidity (RH).
During early flowering (Weeks 5–6), aim for 45–55% RH. As you move into mid-to-late flower (Weeks 7–10+), it's crucial to lower this further to 40–50%.
If you can achieve a drier 30–40% RH in the final two weeks before harvest, your plants will be even safer.
Proper airflow is equally important. Ensure you have a gentle oscillating fan moving air both over and under the canopy to prevent stagnant, moist pockets from forming within the dense foliage.
This is also why you should avoid having leaves smashed tightly together; a light, targeted defoliation of these "leaf sandwiches" is acceptable, but be careful not to overdo it on an autoflower.
Trust us, bud rot is soul-crushing. A little humidity control now saves your entire harvest later.
Step 5: Harvest Time - Knowing Exactly When to Chop
This is the moment all your hard work has been leading to. While most autoflowers finish between Week 8 and Week 12 from sprout, it's crucial to understand that the seedbank's timeline is just a guideline.
The single most important rule that separates a good harvest from a great one is this: we always harvest based on the state of the trichomes, not the calendar. For a complete visual guide, our article on when to harvest autoflowers breaks down every detail.
These trichomes are the tiny, mushroom-shaped resin glands covering the buds that contain all the cannabinoids and terpenes. To see them clearly and make the right call, you'll need a simple tool like a 30-60x jeweler's loupe or a cheap USB microscope.
When you inspect your plant, it's vital that you look at the trichomes on the buds themselves, not the surrounding sugar leaves, as the leaves often mature much faster and can give a false reading. To get an accurate assessment of the entire plant, check a few different spots on several buds.
Clear vs. Milky vs. Amber Trichomes: What They Mean for Your High
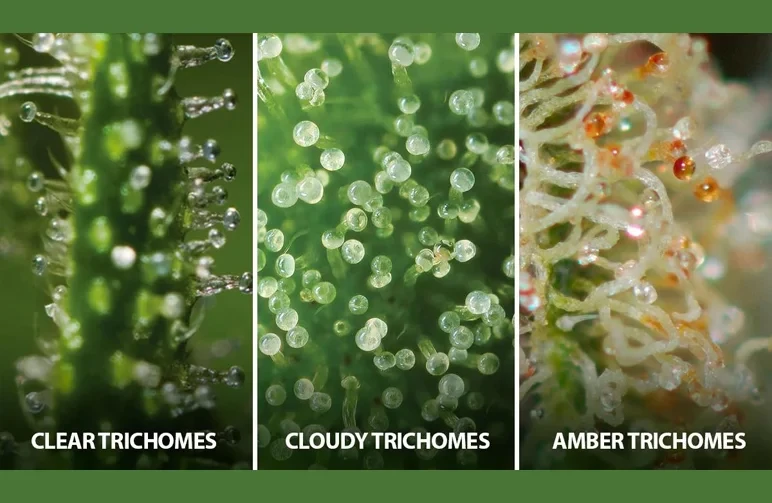
As your autoflower ripens, the trichomes on its buds will shift in color, acting as a direct indicator of cannabinoid maturity and the type of high you can expect.
Initially, the trichomes will be mostly clear, like tiny glass mushrooms. Harvesting at this stage is a mistake; the cannabinoids are underdeveloped, and the resulting high is often described as racy, anxious, and short-lived.
As the plant matures, these trichomes will turn a milky or cloudy white. This is the window for peak THC content, and harvesting now will deliver a strong, energetic, and balanced high. This is our go-to harvest window for most strains.
Finally, if you wait longer, you'll begin to see amber trichomes appear as the THC starts to convert into the more sedative cannabinoid, CBN. Harvesting when you have a mix of milky and amber (from 5% to 20%) will produce a more relaxing, body-focused high with potential for "couch-lock," which is ideal for evening use or pain relief.
Our standard practice is to harvest when 80-90% of the trichomes are cloudy and 5-15% have turned amber, which provides a potent yet well-rounded effect. Remember to ignore the color of the pistil hairs alone; they can be misleading. Always confirm with the trichomes.
The Final Two Weeks: When and How to Flush Your Plant
About 7 to 14 days before your planned harvest, it's time to begin the "flush." This simple process involves stopping all nutrients and watering your plant with plain, pH-adjusted water only. The goal is to encourage the plant to use up any stored nutrients in its leaves and flowers, which can often lead to a smoother, cleaner-tasting final smoke.
If you're growing in soil, a 7-10 day flush is typically sufficient. In coco coir or other soilless mediums, you'll still want to water to a slight runoff to help carry away any built-up mineral salts.
During this final phase, you'll notice a significant yellowing of the fan leaves as the plant cannibalizes stored nitrogen. Don't be alarmed—this is a natural and desirable fade that signals she is putting her last burst of energy into ripening the buds.
Step 6: Drying and Curing - The Most Important Step
You can nail every single week of your autoflower grow and still ruin it if you rush drying and curing.
This part is where a lot of homegrown weed goes from "this smells incredible in the tent" to "why does it taste like lawn clippings?"
The "Slow Dry" Method: Ideal Temperature and Humidity
Once you've chopped your plants and trimmed off the large fan leaves, the goal is a slow, controlled dry to preserve the flavor and potency you worked so hard to build. Rushing this stage is a guaranteed way to end up with hay-smelling buds.
To achieve this, you need to create the ideal environment. Aim for a dark room with a consistent temperature between 60–70°F (15–21°C) and a relative humidity of 50–60%. It's crucial to maintain gentle airflow with a small oscillating fan to prevent mold, but make sure the fan is not blowing directly on the buds, as this can cause them to dry out too quickly.
You have two main options for hanging: you can hang the whole plant, which is the slowest method and excellent for preserving terpenes, or you can hang individual branches after a light trim. Either way, a proper slow dry should take approximately 7 to 14 days. If your buds feel dry in less than five days, your environment is likely too warm or has too little humidity.
The "Snap Test": How to Know When Buds are Ready for Curing
Forget guessing by feel alone; the most reliable indicator that your buds are ready for curing is the classic "snap test."
Select a smaller, twig-like stem from one of your drying buds and try to bend it. If the stem just folds over and stays bent, it's a clear sign that there is still too much moisture inside, and you need to continue drying. However, if the stem offers some resistance and then cleanly snaps with an audible crack, you've hit the sweet spot. At this point, the outside of the buds should feel dry to the touch, but the insides will still retain enough moisture to rehydrate the flower during the curing process.
Once your stems pass this test, it's the perfect time to trim the buds off the branches and move them into their curing jars.
Curing in Glass Jars: The Daily Burping Schedule
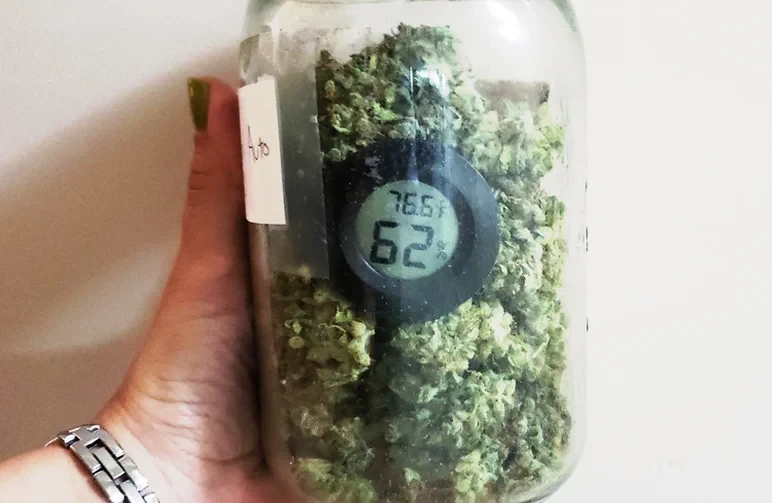
Curing is the slow, patient process that transforms your dry buds from a potentially harsh smoke into a top-shelf product. This is where the chlorophyll breaks down, the harshness smooths out in the throat and lungs, and the true, richer flavor and aroma of your chosen strain fully develops.
Our curing process is a simple schedule. First, jar up your buds in clean, airtight glass mason jars, filling each one about 70-80% full to leave a little room for air to circulate.
For the first week, the buds will release a lot of moisture, so you'll need to "burp" the jars by opening them once or twice a day for 5-10 minutes to exchange the air.
Over the next two to four weeks, you can taper down and burp the jars just once every 2-3 days. You'll notice the initial "grassy" smell will be replaced by the strain's specific terpene profile. After a month, you can move to weekly burps or seal the jars for long-term storage.
While you can absolutely smoke your harvest earlier, many strains hit their absolute peak flavor and smoothness after 4-8 weeks of proper curing. Patience here is what allows a well-grown autoflower to punch way above its weight class.
Training Autoflowers: A Beginner's Guide to LST

With photoperiod plants, we top, supercrop, lollipop… the whole toolbox. With autos? We're more careful.
Because autos have a fixed life cycle, any heavy stress eats directly into your yield. That's why LST (Low Stress Training) is our go-to for beginners.
What is Low Stress Training (LST)?
Low Stress Training, or LST, is a simple but powerful technique designed to break the plant's natural tendency to grow one dominant central cola. Instead of letting the plant focus its energy upwards, you gently bend and tie down its branches to create a flat, even canopy. This spreads the plant out, allowing dozens of lower bud sites to receive the prime, direct light that was previously reserved for the single main top.
The key to successful LST on an autoflower is timing. You'll want to begin around Week 3-4, once the plant has developed at least 4-5 nodes and the main stem is still pliable and easy to manipulate, but before heavy flowering begins.
The basic method is straightforward: start by anchoring a soft plant tie to the edge of your pot. Then, gently bend the main stem over until it's nearly parallel with the soil and secure it in place. Over the next few days, you'll see the side branches turn and grow upwards towards the light, effectively becoming new main tops. As the plant grows, you'll continue to adjust the ties and add new ones to guide the branches outwards, maintaining that flat canopy. Just be sure to use soft, flexible plant ties or rubber-coated garden wire; never use fishing line or thin wire that can cut into the stem as it thickens. For more examples and advanced tips, see our full guide on LST for autoflowers.
How LST Can Increase Your Yield
The goal of LST is to break the plant's natural tendency to grow one dominant central cola and instead create a wide, flat canopy where every bud site gets direct access to high-quality light. By gently bending and tying down the main stem and side branches, you bring dozens of lower bud sites up into the optimal light zone, effectively turning what would have been one main cola into 6 to 10 solid, well-developed tops.
This not only reduces shading between branches but also dramatically improves airflow through the entire plant, lowering the risk of mold. On an autoflower, even a simple LST routine can boost your final yield significantly compared to a completely untrained plant. And because it's a low-stress technique, the recovery time is minimal—the plant just keeps cruising without missing a beat.
A Warning About High-Stress Training (HST) and Topping
While you might see expert growers topping, FIMing, or supercropping their autoflowers, we strongly advise against these high-stress training (HST) techniques for your first few grows. The reason is simple: autoflowers run on a fixed schedule and have no time to recover from mistakes.
Techniques like topping or mainlining involve intentionally damaging the plant to alter its growth. While this can work wonders on photoperiod plants that have a long, flexible vegetative stage for recovery, an autoflower does not. If you mistime the technique or stress the plant too much, it won't have weeks to bounce back; it will simply stunt, resulting in a short, underperforming plant with disappointing yields.
For your first run, our recommendation is unwavering: stick to LST only. The most you should consider is a light, targeted defoliation to remove a few large fan leaves that are directly blocking key bud sites from light.
Once you have a couple of successful harvests under your belt and a better feel for how these plants grow, you can then start experimenting with more aggressive techniques if you're curious.
Top 5 Beginner Mistakes to Avoid
Before we wrap this week-by-week journey, let's save you from the classic landmines. We watch new growers hit these same five issues over and over.
Mistake #1: Overwatering

If there is one mistake that has killed more autoflowers than all others combined, it's this. New growers, driven by a desire to nurture, end up drowning their plants with kindness. The roots need oxygen as much as they need water, and a constantly saturated medium is a recipe for disaster.
You'll know you're overwatering if you see droopy leaves that look heavy, fat, and swollen—a stark contrast to the thin, lifeless droop of a thirsty plant. This is often accompanied by stunted growth, pale or yellowing lower leaves, and the tell-tale sign of fungus gnats happily breeding in the constantly damp topsoil.
The fix is to abandon a calendar-based schedule and learn your plant's rhythm. Use the "lift-the-pot" method religiously: get a feel for how heavy the pot is when fully watered, and do not water again until it feels significantly lighter. Ensure you're using a medium and pots with excellent drainage, like fabric pots. In the early weeks, it's especially critical to water less volume but more strategically in a small ring around the seedling, rather than soaking the entire pot.
Remember, a tiny seedling in a large pot has a very small root system. Be patient and give the roots a chance to breathe.
Mistake #2: Overfeeding (Nutrient Burn)
It's a common rookie impulse: more food must equal bigger buds. In reality, overfeeding is one of the fastest ways to stress an autoflower and stall its growth. You'll know you've gone too far when you see the classic signs of nutrient burn: crispy, brown leaf tips that look like they've been singed, or dark, waxy leaves that claw downwards.
The solution is to let the plant lead the way, not the feeding chart on the bottle. Always start by feeding at ¼ to ½ of the recommended strength. Only increase the dose if the plant is telling you it's hungry—look for a lightening of its overall green color or a slight slowdown in growth, with no signs of burnt tips.
Remember, with high-quality genetics like our autoflowers at WeedSeedsExpress, the plant is bred to thrive. It wants to grow. You just need to provide what it needs, not drown it in food.
Mistake #3: Ignoring pH Levels
Of all the beginner mistakes, this is the most insidious. We call pH the "silent killer" because it can make a perfectly fed plant starve to death.
Here's why it's so critical: if the pH of your water and nutrient solution is outside the correct range, your plant's roots are chemically unable to absorb the food you're giving them. This leads to confusing problems like weird deficiency patterns—such as yellowing between the leaf veins or rusty spots—even when you're feeding heavily.
To avoid this, you must test and adjust the pH of your water every single time you feed. The target ranges are non-negotiable: for soil, aim for 6.0–7.0, and for coco coir, a more precise 5.8–6.2.
Our process is simple but mandatory: we mix our nutrients first, then measure the pH, and finally adjust it with pH up or down solution before it ever touches the plant. A basic digital pH pen and some calibration solution is not optional equipment; it's worth its weight in gold.
Mistake #4: Transplanting Your Autoflower
While photoperiod growers often live by a transplanting schedule—moving from solo cups to larger pots—for autoflowers, this is one of the most common ways to unknowingly stunt your final yield.
Autoflowers operate on a fixed, non-negotiable timeline. Any stress, especially the significant root shock that comes from transplanting, causes a noticeable stall in growth. A photoperiod plant has weeks to recover in its vegetative stage. An autoflower does not. That one week of recovery is a week of lost growth you can never get back, which directly impacts the size and density of your final harvest.
The solution is simple and foolproof: start your plant directly in its final 2–5 gallon fabric pot. Whether you're using the paper towel method or planting the seed directly, it goes into the one pot it will ever call home.
Your future self—and your final yield—will thank you.
Mistake #5: Harvesting Too Early
We get it. The buds look fantastic, they smell insane, and you're itching to finally smoke your own harvest. But this is the final test of your patience, and chopping too early is the most common way to sabotage an otherwise perfect grow.
Don't be fooled by buds that just look ready. If you put a loupe to them and the trichomes are still mostly clear like glass, or if the plant is still aggressively pushing out fresh white pistils, she's not done cooking. Harvesting now means you are leaving a significant amount of potency, flavor, and final weight on the table.
True peak maturity has two key signs. First, be patient and wait for the trichomes to turn mostly cloudy or milky, with a small percentage (5-15%) of amber for a more relaxing effect. Second, watch for the production of new white pistils to slow down dramatically as the plant focuses all its energy on ripening the existing flowers.
An extra 7–10 days often turns "pretty good" weed into "hot damn, that's strong."
What to Expect: The Autoflower Growth Stages
Your autoflower will move through several distinct stages in its rapid 8-12 week lifecycle. While every plant is different, understanding this general timeline is key to knowing what to do and when.
- Weeks 1-3 (Seedling & Early Veg): The focus is on building a strong root system. Growth above the soil will seem slow at first, then accelerate rapidly.
- Weeks 4-6 (Vegetative & Pre-Flower): The plant enters a phase of explosive growth, building its frame. You'll spot the first white pistils, signaling the transition to flowering.
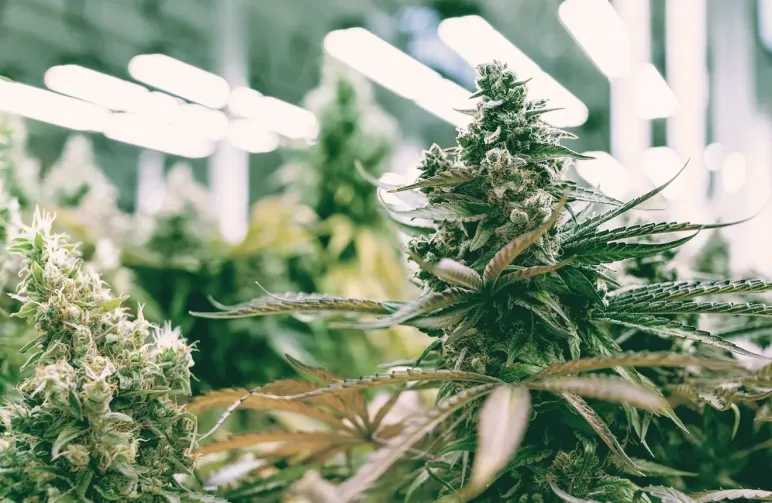
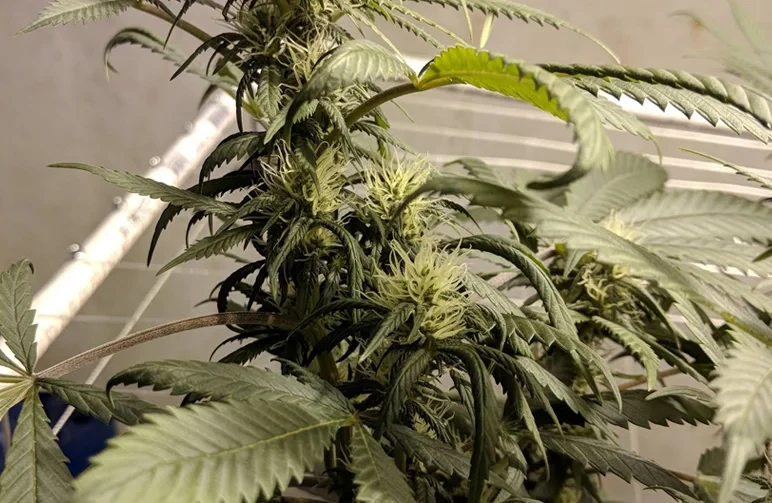
- Weeks 7-10+ (Flowering & Ripening): All energy shifts to bud production. The flowers will swell, become dense, and develop a thick coating of resinous trichomes.
Want to see exactly what this looks like?
Reading about it is one thing, but comparing your plant to real photos is the best way to know you're on track. For a detailed gallery of every stage, see our Autoflower Week-by-Week Visual Timeline. It's the perfect companion to this guide.
Becoming a Better Grower: The Power of a Grow Journal
The single best habit you can build, starting with this first run, is to document your progress. A simple journal is what separates a lucky harvest from a repeatable, improvable skill.
Each week, take a photo of your plant from the same angle and jot down the critical data: the strength of your last feed, the pH of your water, the temperature and humidity in your tent, and any issues you noticed. This simple log is a goldmine for your next run. You'll be able to look back and compare notes, asking powerful questions like, "At Week 4 last time, the plants were bigger—what changed?" or "This phenotype seems to be a 12-weeker, unlike the last one that finished in 10."
If you ever feel lost mid-grow, this guide will be here for you. You can come back, line your plants up with our descriptions, and confidently adjust your light height, watering frequency, or feeding strength.
Autoflowers are fast, forgiving, and incredibly rewarding when you respect their internal clock. Set up your space right, follow these stages, and avoid the classic rookie mistakes. By the time you're cracking open those perfectly cured jars, you won't just have a stash of top-shelf cannabis—you'll have the knowledge to do it again, even better.
When you're ready to start, grab some reliable autoflower seeds from our collection, set up your tent, and grow along with us. You'll be surprised how quickly you go from absolute beginner to the friend everyone texts for grow advice.
Frequently Asked Questions About Growing Autoflowers Week By Week
What do I need to start growing autoflowers week by week at home?
To grow autoflowers week by week you need a small grow tent or light‑tight space, a quality full‑spectrum LED, 2–5 gallon fabric pots, a light, airy soil or coco, basic grow and bloom nutrients, a pH pen, and proper ventilation with an exhaust fan and carbon filter.
What is the best light schedule for autoflowers from seed to harvest?
For most beginners, an 18/6 schedule (18 hours on, 6 off) from seed to harvest works best. It gives strong growth, lets the plant rest, and keeps power costs reasonable. More advanced growers sometimes use 20/4 to push growth slightly harder, but 18/6 is simple and reliable.
How should I water and feed autoflowers during the early weeks?
In Weeks 1–2, keep the top few inches of your medium lightly moist, not soaked, and use the “lift the pot” method to avoid overwatering. In lightly fertilized soil, start nutrients around Week 2–3 at ¼ strength, increasing to about ½ strength by Week 3–4 only if the plant looks hungry.
When should I start low stress training (LST) on autoflowers?
Begin LST around Week 3–4, when the main stem is flexible and the plant has at least 4–5 nodes. Gently bend the main stem sideways and tie it to the pot edge, then gradually spread branches. Avoid topping or heavy defoliation on your first autoflower grow to prevent stunting.
How do I know when to harvest my autoflowers for the best effect?
Instead of relying on weeks alone, check trichomes with a 30–60x loupe. Harvest when most trichomes are cloudy with about 5–15% amber. This usually falls around Week 8–12 from sprout, depending on genetics, and gives potent, flavorful buds with a balanced or slightly relaxing effect.
How much can a single autoflower plant yield with a proper week‑by‑week grow?
Yield depends on genetics, environment, and grower skill, but with good light, proper watering, gentle LST, and following a solid how to grow autoflowers week by week plan, many home growers see 1–4 ounces (28–113 g) per plant. Dialed‑in setups with strong LEDs and big pots can produce more.


