You did the hard part, now don't fumble the finish. Harvesting, trimming, drying, and curing cannabis is where good grows become great and great grows become legendary.
We've ruined a few jars and nailed a whole lot more since 1999, testing phenos, logging trichome data, and chasing terps in our Amsterdam labs. This guide distills what actually works, no fluff, no myths we haven't field-tested.
We'll show you how to read trichomes like a pro, make clean cuts, keep terpenes intact with a slow dry, and lock in that creamy, loud finish with a proper cure.
Whether you're pulling your first autoflower or a full tent of frost-bitten sativas, this is the step-by-step we use. Let's finish strong.
Key Takeaways
- Harvest at Peak Potency: Use the trichome method as your primary guide, aiming for mostly cloudy trichomes with 10–20% amber for a balanced, high-THC result.
- Prepare for Success: Work with clean tools in a controlled environment to protect terpenes and prevent contamination from the moment you cut.
- Choose Your Trim Method: Decide between wet or dry trimming based on your climate and schedule to optimize the drying process and final bud quality.
- Master the Slow Dry: Dial in the 60/60 rule (60°F / 60% RH) in a dark space with gentle airflow to preserve cannabinoids and terpenes.
- Cure with Patience: Use glass jars and monitor humidity closely, burping regularly to develop complex flavors, increase smoothness, and enhance potency.
- Avoid Common Pitfalls: Monitor your environment to prevent drying too fast (hay smell) or mold growth, ensuring a top-shelf final product.
Part 1: Knowing EXACTLY When to Harvest Your Cannabis
The Trichome Method: The Gold Standard for Peak Potency
We live by the loupe. Trichomes, the resin glands on your buds, are the most accurate indicators of maturity. They shift from clear to cloudy to amber as cannabinoids develop.
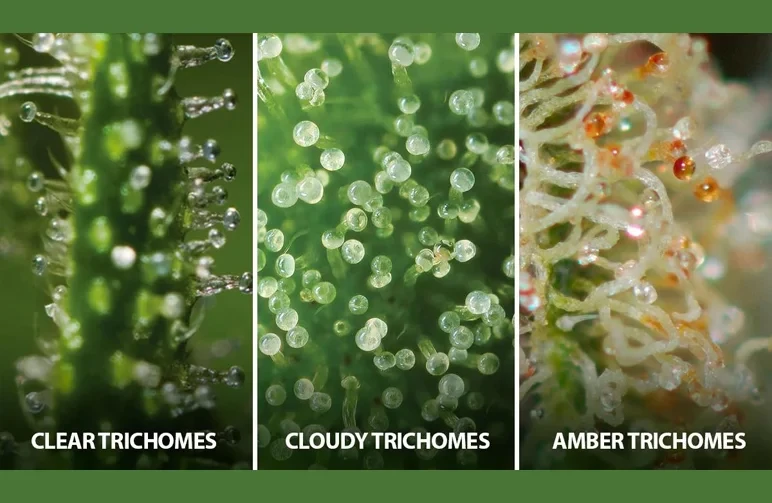
- Clear Trichomes: Not ready. The plant is still producing cannabinoids. Harvesting now results in a weak aroma and low potency.
- Cloudy/Milky Trichomes: This is the peak THC window. Harvesting when most trichomes are cloudy delivers an energetic, uplifting, and potent effect.
- Amber Trichomes: THC is beginning to degrade into the more sedative cannabinoid, CBN. Harvesting with 30%+ amber trichomes will result in a heavier, "couch-lock," nighttime vibe.
Our Prime Window: We shoot for 70–90% cloudy with 10–20% amber. This provides the maximum THC content with a well-rounded, balanced effect.
Check multiple buds across the plant, as top colas often mature faster than lower ones.
The Pistil Method: A Good Indicator, But Less Precise
Pistils (those hair-like stigmas) darken from white to orange/red/brown and curl inward as flowers mature. When ~70–90% have darkened, you're generally in the peak THC zone.
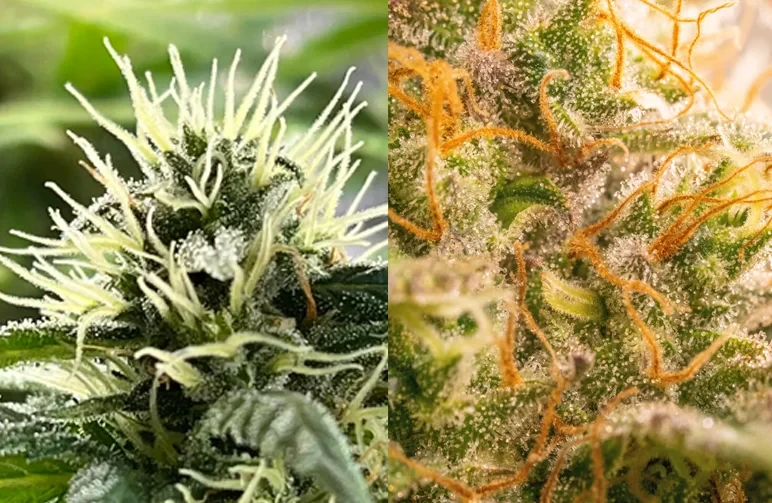
This is a decent visual cue from a distance, but pistil color can be influenced by genetics, heat, or even physical contact.
Use pistils as a nudge to start looking closer, not as the final verdict. Always confirm with trichome color under magnification before you commit the chop.
Essential Tools for Inspection (Don't Guess)
Don't eyeball it from three feet away. Get up close and personal. All you need is a 30–60x jeweler's loupe or a small digital microscope that can connect to your phone.
A headlamp can also help angle light without creating glare. We like to photograph trichomes and compare them across several days—it's the best way to train your eye.
Part 2: Preparing for Harvest and Making the Cut
The Great Debate: To Flush or Not to Flush?
We've tested flush vs. no-flush side by side. For growers using salt-based nutrients in soil/coco, a 7–14 day pre-harvest flush with plain, pH-balanced water can lead to a smoother smoke and helps the plant fade naturally.
In hydro, 3–5 days with full reservoir swaps is plenty. If you're growing in organic living soil, we usually don't flush; just taper off inputs. As for 48-72 hour darkness periods?
The jury is still out. If you try it, just be sure to keep your temperature and humidity stable.
Your Pre-Harvest Checklist: Tools & Supplies
Get your space staged the day before—harvest day gets busy fast.
- Sharp, Clean Pruning Shears (one large pair for branches, one small for trimming)
- Isopropyl Alcohol and a rag for cleaning tools
- Nitrile Gloves to keep resin off your hands and your hands off the buds
- Harvest Trays or Bins
- Hangers or Lines for your drying space
- Labels and a Marker (Strain, Harvest Date)
- A Controlled Drying Room (Dark, cool, with a fan and hygrometer)
- Curing Supplies: Glass jars, 58–62% humidity packs, and mini-hygrometers.
Step-by-Step: How to Chop Down Your Plant
Time it right: Harvest at the beginning of the dark cycle or early morning. Terpenes are at their peak when the plant is rested.
Consider a staged harvest: If top colas are ready but lower ones are lagging, remove the ripe colas first. Let the lower buds mature for another 3–7 days.
Make clean cuts: Cut branches individually to make them easier to handle. Avoid squeezing or manhandling the buds. Always handle them by their stems.
Control the environment: Keep the harvest room cool, dim, and around 60% RH if possible. Bright light and heat will begin to degrade your terpenes immediately.
Part 3: A Guide to Trimming Your Cannabis Buds
Wet Trimming vs. Dry Trimming: Which is Right for You?
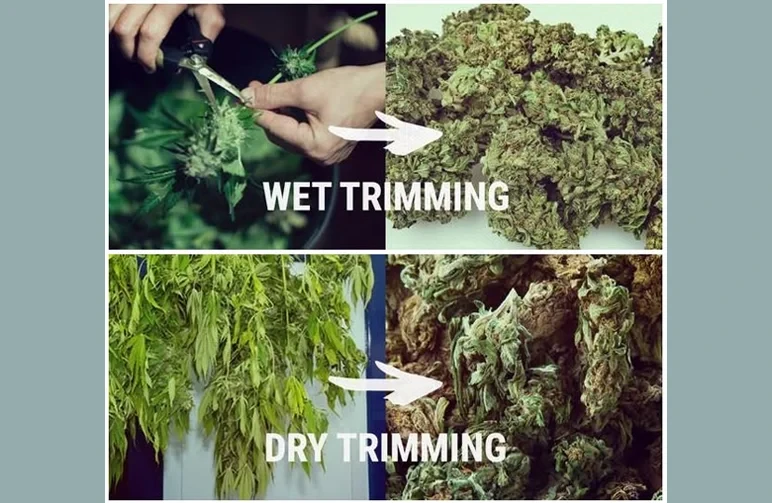
| Feature | Wet Trimming | Dry Trimming |
|---|---|---|
| Pros | • Easier & faster to do. • Reduces mold risk in humid climates. • Gets the sticky work over with at once. | • Slower dry preserves more terpenes. • Results in denser, tighter buds. • Less sticky mess during the trim session. |
| Cons | • Buds can dry too quickly, causing a "hay" smell. • Terpenes can evaporate faster. | • More difficult, as leaves curl inward. • Can trap moisture if airflow is poor. |
| Best For | Growers in high-humidity environments or those looking for an easier, faster process. | Growers in low-humidity environments who are focused on maximizing flavor and bag appeal. |
The Trimming Process: A Step-by-Step Walkthrough
- Stage 1 (The Fan Leaf Removal): Immediately after chopping, remove all large fan leaves that don't have visible trichomes. You can do this by hand or with shears.
- Choose Your Path: Decide if you will fully trim now (wet trim) or hang the branches to dry first (dry trim).
- Wet Trim Path: Place trimmed branches on your drying lines.
- Dry Trim Path: Hang branches with sugar leaves intact. Once dry (10-14 days), proceed to trim the sugar leaves off before curing.
- Technique: Hold the branch by the stem. Rotate the bud and use the tips of your scissors to snip the sugar leaves flush with the bud's surface. Don't gouge the calyxes.
- Workflow: Use two trays: one for "A-grade buds" and one for "trim/larf." Swap out or clean your scissors with alcohol frequently as they get sticky.
Pro Tip: What to Do With Your Cannabis Trim
Don't toss it! There's gold in that green. Freeze your sugary trim immediately for making bubble hash or dry ice kief. You can also decarb it for edibles, cannabutter, or infusions.
We press our sifted kief into rosin at low temps (180–200°F) for incredibly flavorful dabs.
Click here for our full guide to wet vs. dry trimming.
Part 4: The Slow Dry: Perfecting Your Drying Environment
The 60/60 Rule: Creating the Ideal Drying Room
This is the whole ballgame. A slow, controlled dry is what preserves terpenes and degrades chlorophyll for a smooth, flavorful smoke.
Aim for 60°F (15 °C–16 °C) and 60% Relative Humidity in total darkness. Use a small oscillating fan pointed at a wall (never directly at the flowers) to provide gentle air circulation and prevent mold.
If your climate is too dry, use a humidifier; if it's too humid, use a dehumidifier.
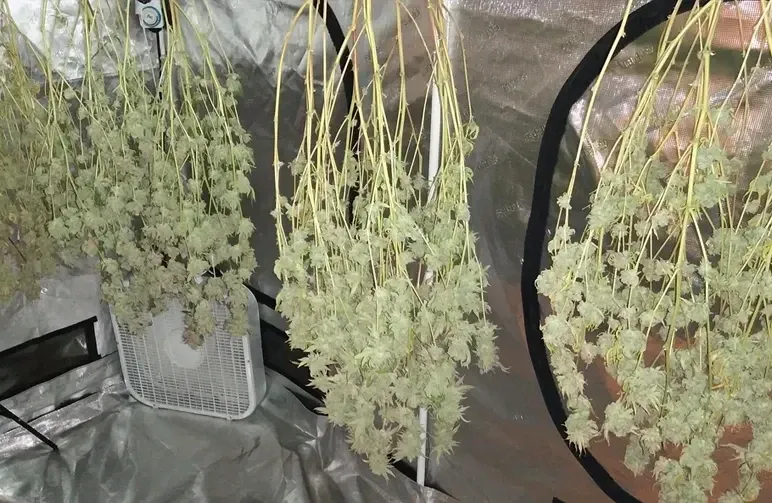
How to Hang Your Buds for Optimal Airflow
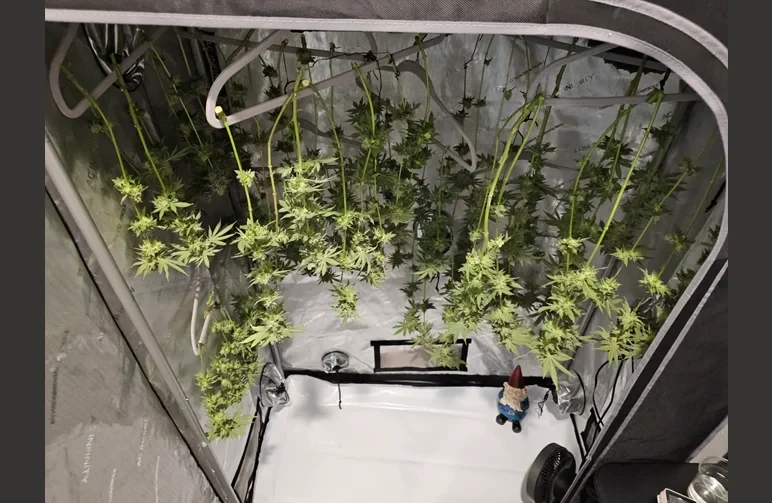
Hang branches so they are not touching each other. This ensures even drying and prevents mold hotspots. Use clips, coated wire, or hangers.
If you must use a drying rack, use food-safe mesh screens and gently rotate the buds once a day to prevent flat spots. Handle by stems only—trichomes are fragile and will break off with contact.
How Long Does Drying Take? (The "Snap Test")
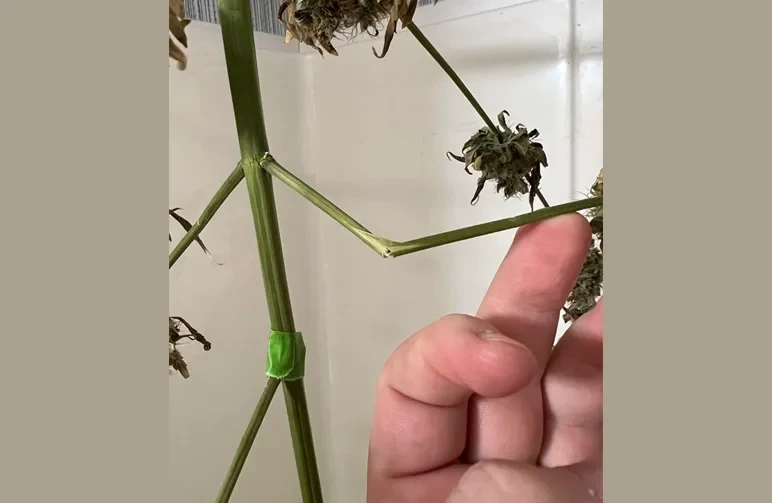
We target a slow 10–14 day dry. Your environment will dictate the exact time. The best indicator of readiness is the "snap test." Bend a mid-sized stem.
If it snaps with a clean crack, it's ready for curing. If it just bends or feels flimsy, give it more time.
Part 5: Curing for Perfection: Unlocking Flavor and Potency
Why Curing is the Most Important (and Most Skipped) Step
Curing is the final, magical step where your buds transform. During this process, moisture from the center of the bud slowly rehydrates the entire flower, chlorophyll breaks down, and volatile terpenes stabilize.
Skipping it locks in a grassy smell and harsh smoke. A proper cure brightens flavor, boosts perceived potency, and allows the strain's true genetic character to shine.
The Jar Method: A Step-by-Step Curing Guide
- Gently place your trimmed, dried buds into clean, airtight glass jars.
- Fill jars to about 70–80% full, leaving room for the buds to breathe.
- Store the jars in a cool, dark place (60–70°F).
- Label every jar with the strain and harvest date. Future you will thank you.
"Burping" Your Jars: The Key to a Perfect Cure
Burping releases excess moisture and replenishes oxygen.
Week 1: Open each jar for 10–15 minutes, once or twice daily.
Weeks 2-4: Burp every 2-3 days as the moisture level stabilizes.
After 1 Month: Burping once a week is sufficient.
A proper cure takes a minimum of two weeks, but flavors often continue to develop for two months or more.
Using a Mini-Hygrometer for Precision Curing
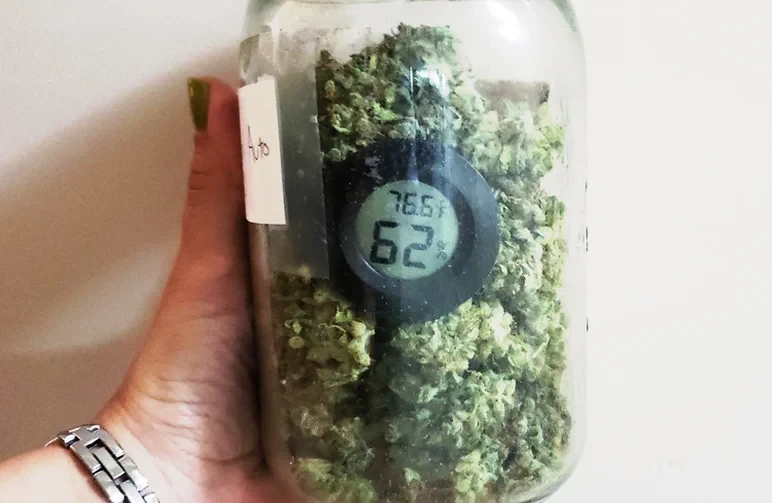
This is the ultimate pro move. Pop a cheap mini-hygrometer into a few representative jars. The sweet spot for curing is 58–62% RH.
If RH is > 65%: Your buds are too wet. Leave the lid off for a few hours to let them dry a bit more before resealing.
If RH is < 55%: Your buds are too dry. Curing will stall. Add a two-way humidity pack (like a Boveda or Integra) to slowly rehydrate them.
Common Harvest & Curing Questions (FAQ)
Why does my cannabis smell like hay or grass?
This is almost always caused by drying too fast. High temperatures and aggressive airflow bake off terpenes and trap chlorophyll. The fix is prevention: slow your next dry down using the 60/60 rule.
If it already smells grassy, a patient cure (2-6 weeks) in a jar with a 62% humidity pack can sometimes rescue the aroma.
What should I do if I find mold on my buds?
Throw it out. Do not smoke or process moldy cannabis, as it can be harmful. Isolate and discard the affected buds and sanitize any tools or jars they touched.
To prevent it, ensure your drying room has good air exchange and that buds are not touching each other.
Can I dry my buds too fast? What happens if I do?
Absolutely, and it's the most common mistake. Quick-dried buds are brittle on the outside, often still damp inside, and taste harsh.
You'll lose the complex terpene profile that defines a strain's flavor and aroma. The lesson is simple: patience wins.
How do I store my cured cannabis for long-term preservation?
Cool, dark, and airtight. Continue to store in glass jars with 58–62% humidity packs in a location with stable temperatures (around 60–68°F). Heat and UV light are the biggest enemies of potency.
Follow our checklist for the best ways to store cured buds for long-term freshness and potency.
Conclusion: Enjoying the Fruits of Your Labor
Harvest day isn't the finish line; it's the start of the finale. The patience you practice in these final weeks is what creates an unforgettable product.
Read your trichomes, make clean cuts, embrace the slow dry at 60/60, and cure with intent. Do that, and even a humble plant can produce top-shelf results. We've seen it thousands of times in our rooms, and you will too.
When you're ready to run it back and apply what you've learned, start with legit genetics.
Shop our hand-selected feminized and autoflower seeds at Weedseedsexpress for a smoother grow from day one. Now go roll one. You've earned it.


