We've all cooked a cola or two. You dial up that shiny new LED, plants pray for a day, and then, bam, top leaves bleach, edges crisp, and the room feels like a desert at noon.
Cannabis light burn and heat stress are the silent yield-killers we see most in grow consults. The good news? Both are fixable and preventable with a few precise moves.
In this guide, we'll show you exactly how to diagnose the problem, stabilize your environment, and lock in a resilient setup.
If you're not sure whether light or heat is the culprit, or if you suspect another issue, our comprehensive cannabis troubleshooting guide can help you identify any plant problem.
Our goal is to arm you with the knowledge to not only fix these issues but to build an environment where they never happen in the first place.
Whether you're running a 2x4 with an autoflower or a 10-light flower room, these symptoms and solutions will keep your canopy happy and stacking.
Key Takeaways
- Cannabis light burn results from excessive light intensity, causing top leaves to bleach and crisp. It is preventable by adjusting light distance and intensity according to the plant's growth stage.
- Heat stress in cannabis plants is caused by high temperatures and poor airflow, leading to wilting, leaf curling, and nutrient uptake issues, requiring immediate cooling and better ventilation.
- Differentiating between light burn and heat stress is crucial for effective treatment, as light burn appears on upper leaves with uniform yellowing, while heat stress causes distorted, burnt edges across the plant.
- To fix light burn, raise or dim the light to appropriate PPFD levels, center the canopy properly, and adjust the photoperiod if necessary to reduce stress and protect potency.
- To combat heat stress, maintain optimal canopy temperatures (72–82°F during lights-on), improve airflow with fans and exhaust, and control humidity using Vapor Pressure Deficit (VPD) guidelines.
- Long-term prevention involves mapping light intensity, matching CO2 levels to photon flux, optimizing airflow design first, using cooler lighting technology, and automating environmental controls for a resilient grow environment.
Understanding the Core Problem: What are Light Burn and Heat Stress?
Defining Cannabis Light Burn: When Good Light Goes Bad
Light burn happens when plants get blasted with more photons than they can process, usually from LEDs or HPS hung too close or run too hot.
Once PPFD (photosynthetic photon flux density) climbs beyond what the plant can metabolize (and what your CO2 levels can support), chlorophyll breaks down.
That's why the tops fade from lime to yellow to stark white, aka light bleaching. It's not heat per se: it's intensity. Think of it as overexposure: great camera, bad settings.
Defining Cannabis Heat Stress: More Than Just a Hot Day
Heat stress is about temperature and airflow. When canopy temps drift above the optimal range, especially with low humidity and sluggish circulation, photosynthesis stalls, stomata clamp, and leaves wilt or curl.
You'll see scorched margins, droopy petioles, and plants that look thirsty even when the medium is wet. Excess heat also messes with nutrient uptake and terpene retention (goodbye aroma… sad face).
Why It's Crucial to Differentiate Between the Two
Light burn and heat stress can overlap, but they're not the same beast. Light burn shows up where the photons hit hardest (tops, closest to the fixture) with uniform yellowing/bleaching.
Heat stress presents as tacoed leaves, burnt edges, and wilting across the plant. Misdiagnose it and you'll chase your tail; raising lights won't fix a hot, stagnant room, and adding fans won't cure pure photon overload.
Are Your Plants in Distress? Identifying the Telltale Symptoms
Visual Cues of Light Burn
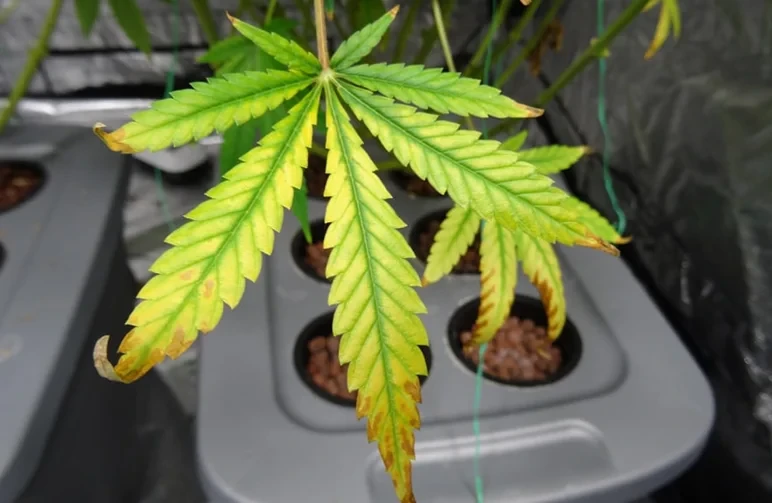
Image Credit: GrowWeedEasy.com
Look up—problems usually start at the top, directly under the light.
Yellowing or Whitening on Upper Leaves: The most classic sign is chlorophyll breakdown on leaves closest to the light.
Bud Bleaching: Calyces turn a stark, lifeless white, losing their flavour and potency.
Interveinal Yellowing: You may see leaf tissue turn pale while the veins remain green.
Crispy, Papery Tops: The affected leaves become brittle and may develop brown flecks.
Stunted Vertical Growth: Tops that were stretching suddenly stall out with tight internodes.
Expert Tip: The Early Warning Sign
Look for a subtle shift from lush green to a pale, lime green colour directly under the most intense part of your light fixture (usually dead center).
If you catch it here, you can correct the issue before any real damage is done.
Recognizing the Signs of Heat Stress
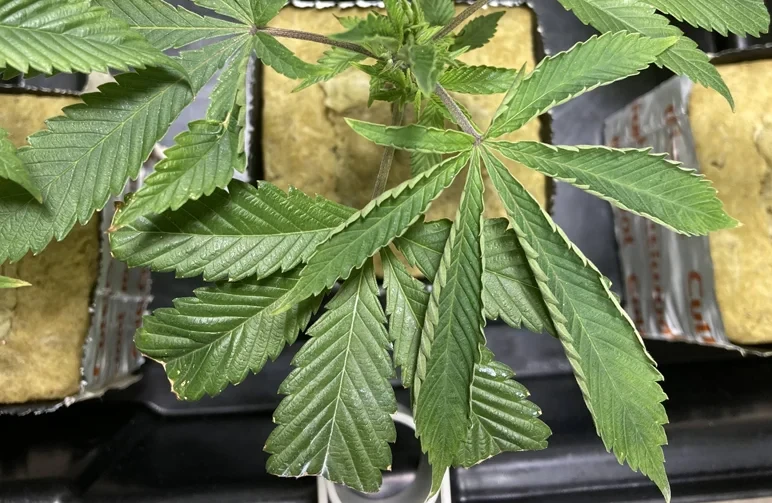
Image Credit: u/DonFKennedy via Reddit
Heat stress reads like a dehydration drama, even when you're watering perfectly.
Pronounced Upward "Tacoing" of Leaves: The edges of the leaves curl up aggressively, trying to conserve moisture.
Yellow/Brown Burn on Tips and Edges: Unlike the uniform bleaching of light burn, heat stress often scorches the serrated edges of the leaves first.
Wilting or Drooping: The entire plant may look thirsty and limp, even if the medium is moist.
Canopy Feels Hot to the Hand: Plants will transpire rapidly to cool down, but eventually, this process stalls, and the canopy will feel noticeably warm.
Light Burn vs. Heat Stress: A Side-by-Side Comparison
| Characteristic | Light Burn | Heat Stress |
|---|---|---|
| Location | Upper leaves & colas nearest the light source. | Can affect the whole plant, but tips and edges often show first. |
| Yellowing | Uniform bleaching from the inside-out on top leaves. | Concentrated browning/yellowing at the tips and margins. |
| Leaf Curling | Mild upward curling as a secondary symptom. | Pronounced upward "tacoing" is a primary symptom. |
| Primary Cause | Excessive light intensity (high PPFD). | High temperature combined with poor airflow/low humidity. |
| Texture | Dry, crispy, and bleached in appearance. | Wilted and limp, with dried-out, burnt edges. |
Pinpointing the Cause: What's Harming Your Cannabis Plants?
Common Causes of Light Burn
Fixture Hung Too Close: The #1 culprit, especially with powerful modern bar LEDs.
Excessive PPFD: Pushing over 1000 µmol/m²/s without supplemental CO2 overwhelms the plant.
Intensity Cranked Too Early: Turning a new light to 100% in early veg before the plant is ready.
The "Closer = Better" Myth: It's not about proximity; it's about delivering the correct PPFD for the plant's stage of growth.
Common Causes of Heat Stress
Inadequate Air Exchange: Your exhaust fan is too weak to remove hot, stale air effectively.
Poor Air Circulation: Weak or poorly aimed fans create stagnant hot spots in the canopy.
High Ambient Temperatures: The room your tent is in is too hot, or a greenhouse has no shade control.
Heat Load from Lights: Older HPS lights generate significant heat that requires aggressive extraction.
The Action Plan: Immediate Solutions to Save Your Plants
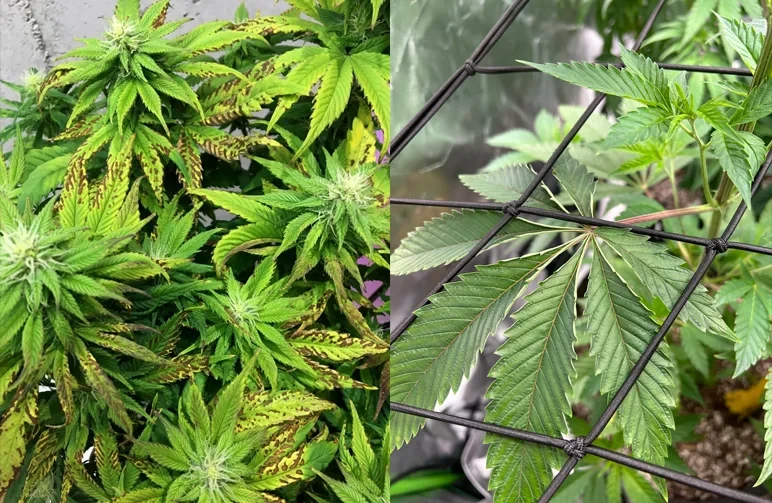
How to Fix Cannabis Light Burn: A 4-Step Emergency Protocol
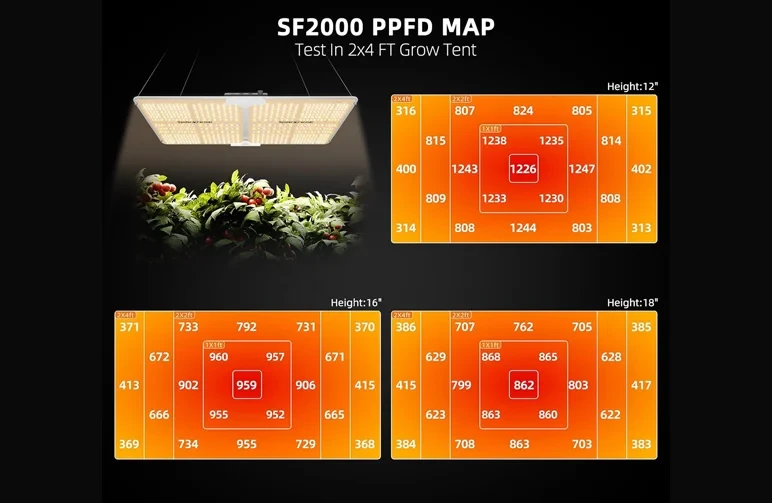
Image Credit: Spider-Farmer.com
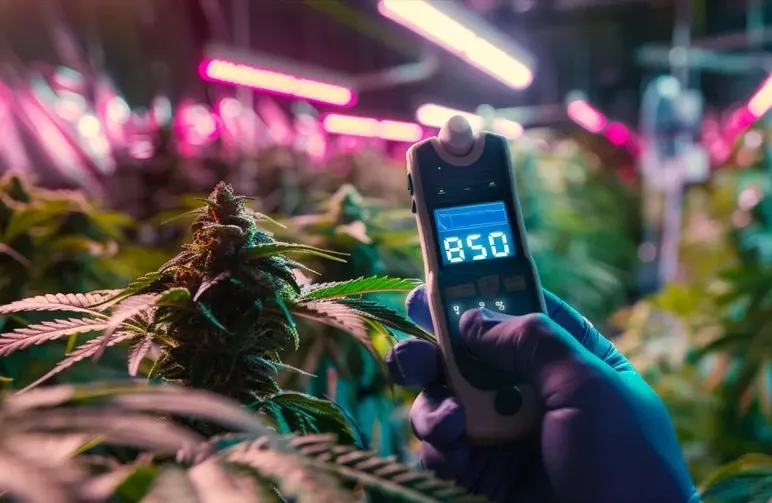
- Immediately Increase Light Distance or Dim Intensity. This is your first and most critical move. Raise your fixture by 6-12 inches or reduce the dimmer setting by 10-20%.
- Measure and Adjust PPFD. Use a meter (or the manufacturer's PAR map) to target the correct intensity for your plant's stage:
- Seedlings/Clones: 200–300 µmol/m²/s
- Vegetative Stage: 300–600 µmol/m²/s
- Flowering Stage: 600–900 µmol/m²/s (Only exceed 900 if supplementing CO2).
- Use the "Hand Test." Place your hand at canopy level for 30 seconds. If it's uncomfortably hot for your skin, it's definitely too intense for your plants.
- Prune Only What's Necessary. Remove leaves that are completely white or crispy to improve airflow. Do not remove leaves that are only partially pale; they can still photosynthesize.
How to Alleviate Cannabis Heat Stress: A 5-Step Cooling Plan
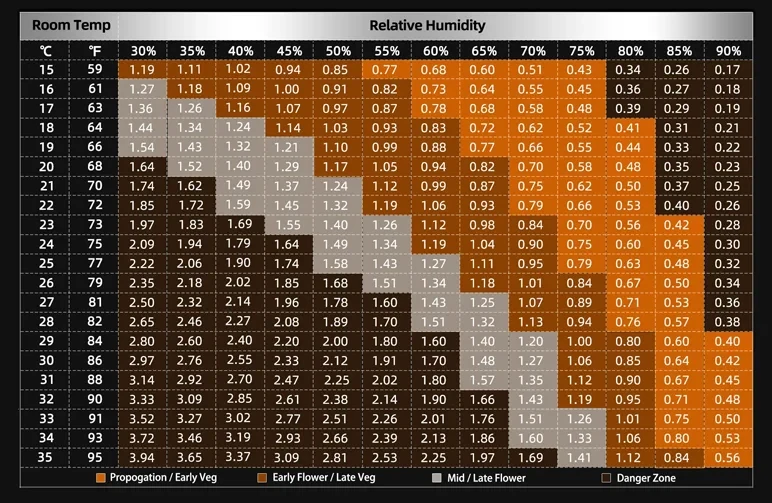
Image Credit: Spider-Farmer.com
- Drop Canopy Temps to the Safe Zone. Immediately aim for 72–82°F (22 °C–28 °C) during lights-on. Use fans, exhaust, and if necessary, a portable AC.
- Boost Air Circulation. Ensure you have at least one oscillating fan gently blowing air across the canopy (not directly at it) for every 2x4 ft of space.
- Verify Air Exchange. Check that your exhaust fan is creating "negative pressure" (the tent walls suck in slightly when sealed). This confirms hot air is being actively removed.
- Adjust Humidity Using a VPD Chart. Don't just lower humidity; align it with your temperature to optimize plant transpiration. [Internal Link: Your Guide to Vapor Pressure Deficit (VPD)]
- Run Lights at Night. If your climate has high daytime temps, switch your light cycle to run during the cooler nighttime hours.
Can Damaged Leaves and Buds Recover?
Leaves that are bleached or crispy won't regain their green colour. Keep them if they still have some green tissue, but remove fully necrotic (dead) fans.
Bleached buds are a permanent loss in terms of potency and flavour; the goal is to prevent further damage. The plant will produce healthy new growth once conditions are stabilized, so focus on the future, not the past damage.
Proactive Measures: Long-Term Prevention Strategies
Creating the Optimal Environment to Prevent Light Burn
Map Your Light: Use a PPFD meter or a PAR map from the manufacturer to dial in the perfect hanging height and dimmer setting for each stage of growth.
Ramp Up Intensity Gradually: Increase your light's dimmer by 10–15% each week during veg, watching the plant's response closely.
Keep an Even Canopy: Use training techniques like LST, topping, or a ScrOG net to ensure no single cola grows too close to the light. Learn how with our Guide to Low-Stress Training (LST).
Match CO2 to Photons: For most growers, ambient CO2 (400-800 ppm) comfortably supports up to ~900 PPFD. Don't push light intensity higher unless you are prepared to supplement CO2.
Building a Resilient Grow to Avoid Heat Stress
Design Airflow First, Lights Second: Size your exhaust fan to exchange the total air volume of your room or tent 1-2 times per minute.
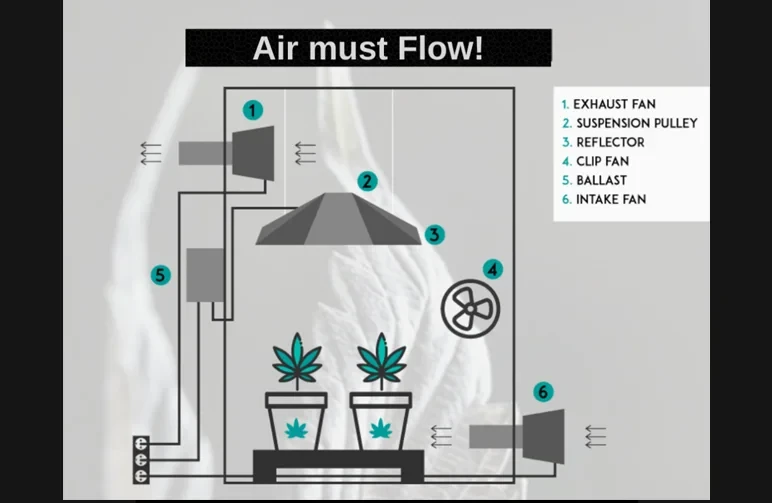
Image Credit: BigPlantScience.co.th
Pick Cooler Tech: Modern full-spectrum LEDs run significantly cooler than equivalent HPS lights. If you must run HPS, use air-cooled hoods.
Automate Your Controls: Use smart controllers for your fans and lights that automatically adjust based on temperature and humidity sensors. This provides stability that manual adjustments can't match.
For Outdoor Growers: Plan to use 20-40% shade cloth during the hottest parts of the day. Mulch the soil to keep the root zone cool.
Your Path to a Resilient Canopy
Mastering your grow environment is a journey, not a destination. Light burn and heat stress are not failures; they are data points teaching you what your plants need.
By learning to read the symptoms, understanding the difference between intensity and temperature, and implementing the proactive strategies we've covered, you shift from a reactive grower to a predictive one.
You build a resilient system where your plants don't just survive—they thrive. Keep these principles in mind, and you'll spend less time troubleshooting and more time admiring a vibrant, healthy canopy.
Frequently Asked Questions (FAQ)
Can light burn happen with LED lights?
Absolutely. In fact, most of the "burn" we see now is intensity-related damage from powerful LEDs, not the radiant heat associated with old HPS lights.
Always follow the manufacturer's PAR map and start with your dimmer set lower than you think you need.
Can heat stress occur during the night cycle?
It's less common but possible, especially in poorly insulated spaces where heat builds up during the day and doesn't dissipate at night. If nighttime temps stay high, plants can't rest and recover. Improving ventilation is key.
Will using CO2 help with light and heat stress?
CO2 directly helps plants handle higher light intensity by boosting their photosynthetic capacity. It does not help them tolerate high temperatures.
Your environmental controls for temperature and airflow must be on point first. Think of CO2 as a supercharger, not a radiator.
What's the ideal temperature and humidity for a cannabis grow room?
A great general range is 72–82°F (22 °C–28 °C) with 40–60% relative humidity during lights-on. However, for optimal results, you should tailor these numbers to the specific stage of growth using a VPD chart.
Seedlings like it warmer and more humid, while late-flower plants prefer cooler, drier conditions to protect terpenes and prevent mould.


