If you've ever stared at a bottle of plant food and wondered, "Will this fry my autos?", this Guide To Autoflower Nutrients is for you. Autos move fast.
That speed is awesome for quick harvests, but it also means your feeding has to be clean, gentle, and timed right.
In this guide, we'll strip away the forum noise and give you a simple, stage-by-stage plan that protects yields, keeps your leaves green, and gets you to sticky, top-shelf buds without chemistry class trauma.
We'll explain every acronym the moment it shows up and give you concrete numbers you can take straight to the grow room. Let's feed your girls right.
Key Takeaways
- Autoflower nutrients should start light and shift fast—ease off nitrogen as pistils show in weeks 3–5 to prioritize flower development.
- Use the stage-based feed map: 100–200 PPM seedlings, 600–800 PPM veg, 900–1100 PPM stretch (begin bloom shift), 1000–1200 PPM full flower (roughly 1-3-2 N-P-K), then taper to 200–400 PPM and flush.
- Lock in pH for uptake: soil 6.3–6.7 and coco/hydro 5.8–6.2; if runoff PPM exceeds input, reduce strength or flush to avoid salt buildup and nutrient lockout.
- Match nutrients to medium: in soil, water less often and feed lightly; in coco, provide small, frequent feeds with 10–20% runoff, always include Cal-Mag (keep Ca:Mg near 2:1), and consider early silica.
- Diagnose and act fast: back off 25–50% at the first sign of tip burn, correct pH before chasing deficiencies, and plan a 3–7 day taper plus flush for cleaner, better-tasting harvests.
Why Autoflowers Have Unique Nutrient Needs
Autoflowers flip to flower on their own, no 12/12 light change needed. That automatic transition is tied to a shorter lifecycle (usually 9–11 weeks for many strains), which compresses veg, stretch, and bloom into a tight window.
This rapid timeline is a key factor in how to grow autoflowers successfully, as it leaves very little room for error.
Translation: you don't get much recovery time from mistakes.
Why that matters for nutrients:
Timing is everything. Autos often start showing pistils (the first white hairs) around week 3–5. If you're still hammering nitrogen (the leafy-growth nutrient) when they decide to bloom, you'll grow extra foliage instead of stacking flowers.
Lower overall demand. Most autos prefer lighter feeding than photoperiods. Push too hard, and you'll see nutrient burn or nutrient lockout (when the plant can't absorb food even when it's present) fast.
Smaller root zones. Autos are usually in smaller pots and don't like transplant shock. Smaller roots + quick lifecycle = more sensitive to strong mixes.
Rule of thumb we've proven across runs: start light, make micro-adjustments, and watch the plant, not the calendar.
The Building Blocks: What Nutrients Do Autoflowers Crave?
Think of genetics as the engine and nutrients as the fuel. Great fuel won't turn a moped into a race car, but bad fuel will ruin anything. Autoflowers crave the same essentials as photos, just in gentler, better-timed doses.
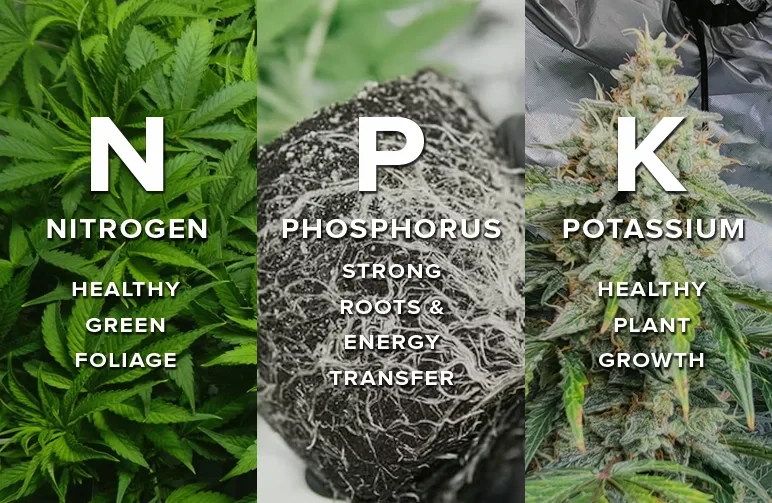
Macronutrients: The Big Three (N-P-K)
Nitrogen (N): Drives green growth—leaves, stems, chlorophyll, and proteins. Crucial early on for building the plant's "solar panels." Too much late in flower = leafy buds and slower ripening.
Phosphorus (P): Key for energy transfer and flower formation. As buds set, P helps pack on weight and resin.
Potassium (K): Overall health booster. Supports water regulation, disease resistance, and dense, strong stems. K also helps the plant move and use other nutrients.
Secondary Nutrients: The Unsung Heroes
Calcium (Ca): Builds sturdy cell walls and new growth tips. Prevents "crispy" new leaves and blossom-end rot–type issues.
Magnesium (Mg): Central to chlorophyll. Without Mg, leaves pale between the veins (interveinal chlorosis).
Sulfur (S): Helps with enzymes and amino acids. Low S can dull aroma and slow growth.
Pro tip: Keep roughly a 2:1 calcium-to-magnesium balance. Many growers add a Cal-Mag supplement (a calcium-magnesium blend) when using reverse osmosis (RO) water or coco coir.
Micronutrients: Small but Mighty
Micros are needed in tiny amounts but do big jobs: Iron (Fe), Manganese (Mn), Zinc (Zn), Boron (B), Copper (Cu), and Molybdenum (Mo). They handle special metabolic tasks like enzyme production and growth signals.
Good news: most reputable cannabis nutrient lines include a full micro package. If you're using RO water, consider adding a silica supplement early in veg for sturdier stems.
The Ultimate Autoflower Feeding Schedule: Week-by-Week Guide
Every strain is a little different, but this baseline will keep beginners safe and yields respectable. We'll use two measurement terms:
PPM: Parts Per Million, how concentrated your nutrient solution is. Think: strength of your "tea."
EC: Electrical Conductivity, another way to measure nutrient strength. If your meter shows EC (mS/cm), 1.2 EC is roughly 600 PPM on the 500 scale.
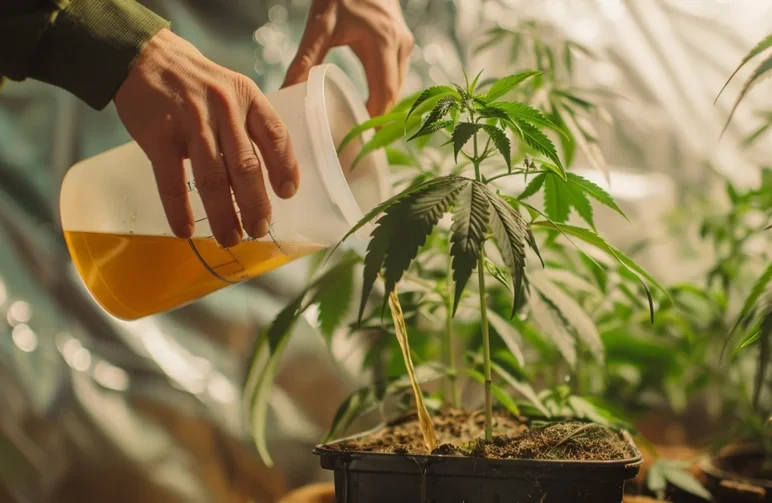
Always mix nutrients into water, stir well, then measure and adjust pH. If your plant looks dark, clawed, or tips are burnt, back off by 25–50%.
Autoflower Feeding Schedule at a Glance
| Stage | Week | Target PPM (500 scale) | Target EC (mS/cm) | Key Focus & Notes |
|---|---|---|---|---|
| Seedling | 1-2 | 100-200 | 0.2-0.4 | pH'd water only for most soils. Light dose of Cal-Mag in coco. |
| Vegetative | 3-4 | 600-800 | 1.2-1.6 | Nitrogen-rich formula to build structure. |
| Pre-Flower | 5-6 | 900-1100 | 1.8-2.2 | Transition to bloom nutes. Reduce N, increase P & K. |
| Full Flower | 7-9 | 1000-1200 | 2.0-2.4 | High P & K for bud density. Watch for tip burn. |
| Ripen/Flush | 10-11+ | 200-400 -> 0 | 0.4-0.8 -> 0 | Taper, then plain pH'd water for a cleaner taste. |
Stage 1: Seedling (Week 1–2)
- What you'll see: Cotyledons (the first round leaves), then tiny true leaves. Roots are establishing.
- Feed: 100–200 PPM (EC ~0.2–0.4). Many soils need only pH'd water this week. In coco/RO, add a very light seedling dose + Cal-Mag.
- Frequency: Once per week in soil; in coco, very light feed every other day to keep media slightly moist, not soaked.
- pH target: Soil 6.2–6.5; Coco/hydro 5.7–5.9.
Stage 2: Vegetative Growth (Week 3–4)
- What you'll see: Rapid leaf growth, side branches forming. Some autos may show pre-flowers by late week 3.
- Feed: 600–800 PPM (EC ~1.2–1.6) with a slightly higher N than P/K. Add Cal-Mag if using RO or coco.
- Frequency: Soil 1× per week; Coco 1× daily light feed or 2–3× lighter feeds depending on pot size and dryback.
- pH target: Soil 6.3–6.6; Coco/hydro 5.8–6.0.
Stage 3: Pre-Flowering & Stretch (Week 5–6)
- What you'll see: White pistils, vertical stretch, internodes widening. Bud sites set.
- Feed: 900–1100 PPM (EC ~1.8–2.2). Begin shifting toward bloom nutrients: ease N down a touch, bump P and K.
- Frequency: Soil 1× per week (watch runoff salts); Coco 1–2× per day depending on dryback.
- pH target: Soil 6.4–6.6; Coco/hydro 5.8–6.1.
Stage 4: Full Flower (Week 7–9)
- What you'll see: Buds swelling, terpene aroma increasing. Leaves should remain healthy green-to-lime.
- Feed: 1000–1200 PPM (EC ~2.0–2.4). A bloom ratio around 1-3-2 (N-P-K) works well. Keep N modest: let P/K do heavy lifting.
- Frequency: Soil ~1× per week; Coco 1–3× daily light feeds to 10–20% runoff to prevent salt buildup.
- pH target: Soil 6.4–6.7; Coco/hydro 5.9–6.2.
Stage 5: Ripening & Flushing (Week 10–11+)
- What you'll see: Pistils darken, trichomes turn cloudy, some amber. Fan leaves may fade—this is normal.
- Feed: Taper down to 200–400 PPM (EC ~0.4–0.8) for 3–7 days, then plain pH'd water until runoff PPM drops and flavours clean up.
- Frequency: Same as prior stage but lighter strength. Don't drown the medium.
- pH target: Soil 6.4–6.7; Coco/hydro 5.9–6.2.
Note: Some autos finish earlier or later. Watch trichomes with a jeweler's loupe; harvest when mostly cloudy with 5–20% amber based on preference.
How to Feed Your Autoflowers: Best Practices
Choosing Your Nutrients: Organic vs. Synthetic
| Feature | Organic Nutrients | Synthetic Nutrients |
|---|---|---|
| Speed | Slow-release, slow to fix issues | Fast-acting, immediate results |
| Ease of Use | Harder to overfeed, less precise | Easy to burn, requires PPM/EC monitoring |
| flavour | Often richer, more complex terpene profile | Can be harsh if not flushed properly |
| Best For | Amended soil, "living soil" growers | Coco coir, hydroponics, precise control |
Whatever you choose, stick to a single line for your first runs. Mixing brands can double up certain elements and cause issues.
For organic growers using soil, "top-dressing" with dry amendments like worm castings and bat guano every few weeks is another great, slow-release method.
Adjusting for Your Grow Medium: Soil vs. Coco Coir
Soil: Has nutrients built in (especially "hot" soils). Start lighter, sometimes just pH'd water for the first 1–2 weeks. Water less often: let the top inch dry before watering again.
Coco Coir: Inert (no real nutrients). Treat as hydroponic in a pot; feed light nutrients almost every irrigation once seedlings establish. Always include Cal-Mag and aim for 10–20% runoff to prevent salt accumulation.
The Golden Rules: pH and PPM/EC
pH: Keep it in the plant's comfort zone for nutrient uptake.
- Soil: 6.0–7.0 (sweet spot 6.3–6.7)
- Coco/hydro: 5.5–6.5 (sweet spot 5.8–6.2)
PPM/EC: Start at 1/8–1/2 of the bottle's recommendation. Increase only when the plant looks hungry (lighter green, steady growth) and runoff PPM is lower than what you pour in.
Runoff basics: If input is 900 PPM and runoff is 1400 PPM, salts are building up. Feed lighter or flush with pH'd water until runoff drops closer to input.
Troubleshooting Common Nutrient Problems
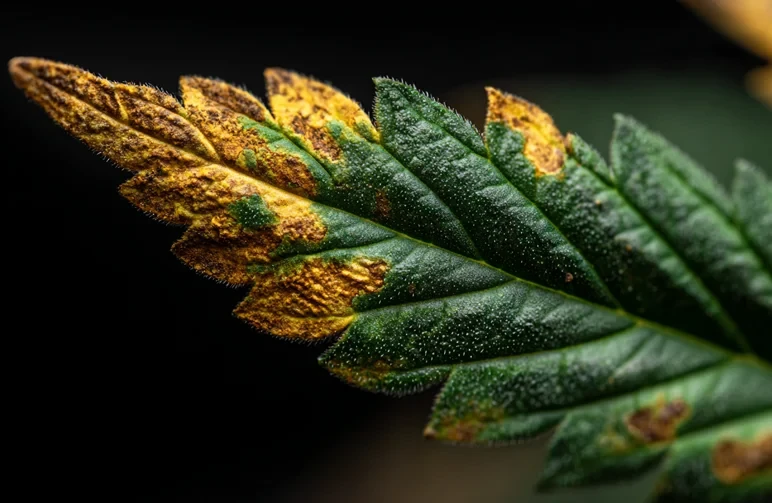
Identifying & Fixing Nutrient Burn
What it looks like: Crispy, bronzed leaf tips ("tip burn"), dark overly-green leaves, and leaves clawing downward.
Why it happens: Solution is too strong or you're feeding too often.
Fix: Back nutrient strength down 25–50%. In coco, give a gentle flush with pH'd water. In soil, water-only for a cycle, then reintroduce nutrients at a reduced dose.
Diagnosing Nutrient Deficiencies
Always confirm pH is in range before adding more food. 80% of "deficiencies" in beginner grows are actually pH or watering issues.
Nitrogen Deficiency: Older, lower leaves fade from green to pale yellow uniformly. Fix: Slightly increase N in veg or early flower.

Magnesium Deficiency: Yellowing appears between the green veins on mid-to-lower leaves. Fix: Add Cal-Mag or an Epsom salt solution, and check pH.
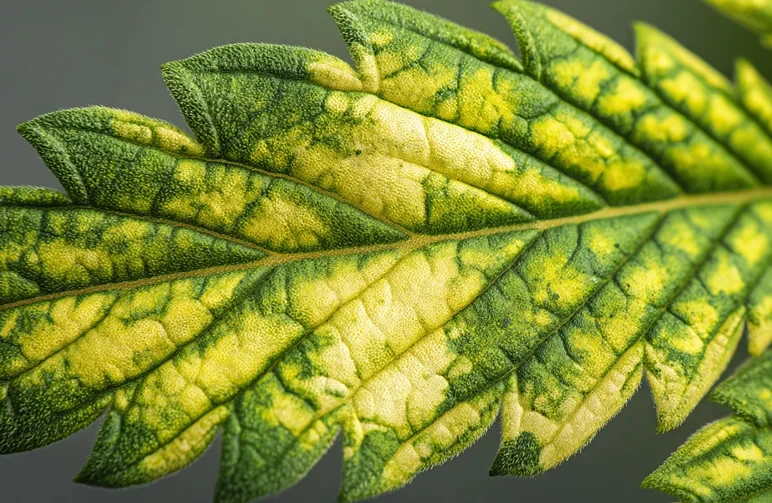
Calcium Deficiency: New growth is twisted and shows rusty brown spots. Common with RO water. Fix: Add Cal-Mag and ensure pH is correct.

Understanding Nutrient Lockout
What it is: The plant can't absorb nutrients even when they're present, usually from incorrect pH or salt buildup.
Signs: Multiple deficiency-like symptoms at once, escalating quickly. Runoff PPM is often much higher than input.
Fix: Reset. Flush the medium with pH'd water until runoff PPM drops near your input. Then resume a lighter, balanced feed.
Autoflower Nutrients FAQ
Can you grow autoflowers without nutrients?
Sometimes, if your soil is pre-amended ("super soil"), the plant can cruise on water-only for weeks. But most beginners using bagged soil or coco will need supplemental nutrients by week 2–3.
We recommend having a simple 2–3 part nutrient line on hand.
What are the best nutrient brands for autoflowers?
A few widely used, beginner-friendly lines include Fox Farm, Advanced Nutrients, BioBizz, General Hydroponics, and CANNA. Pick one full line, follow their light feeding chart, and adjust based on plant feedback. With autos, less is more.
How often should I water and feed my autoflowers?
Soil: Water when the top inch is dry and the pot feels light, usually every 2–4 days. Feed once weekly at the stage-appropriate PPM.
Coco: Light feeds almost every irrigation (once to multiple times per day depending on pot size and environment). Aim for 10–20% runoff.
Do I need to flush my autoflowers?
Yes, we recommend a gentle taper followed by a flush before harvest. Reduce nutrients for 3–7 days (down to ~200–400 PPM), then run plain, pH'd water. You'll get a cleaner burn and better flavour.
Conclusion: Feed Your Girls Right for a Bountiful Harvest
Autos reward precision and punish heavy hands. Start light, stay in the pH range, and bump nutrients only when the plant asks.
If you nail the week-by-week flow—modest N early, rising P/K through bloom, a clean taper at the end—you'll pull sticky, terp-rich flowers on your very first run. Ready to pair the right fuel with the right engine?
Choose reliable genetics first.
We've tested and curated autoflower seeds that respond beautifully to this exact playbook—fresh stock, honest specs, and a germination guarantee at WeedSeedsExpress.
Plant smart, feed smarter, and enjoy that first jar. You've got this.


