Autoflowers aren't the scrappy underdogs they were a decade ago. Modern autos can stack serious colas in 10–12 weeks when we respect their clock and give them the right foundation.
In this guide, we share our best tips for bigger autoflower buds—clear, step-by-step, and beginner-safe. We'll explain the "why" behind each move, so you can stop doom-scrolling forums and start growing dense, frosty tops with confidence.
Key Takeaways
- Foundation First: For bigger autoflower buds, choose XL-yield genetics. Plant seeds straight into their final 3–5 gallon fabric pots. Use an airy coco/perlite or light soil mix for rapid root growth.
- Light is Weight: Run 18–20 hours of quality LED light daily. Target ~500–700 PPFD early and up to ~900 PPFD in late flower.
Use gentle Low-Stress Training (LST) to create a flat, even canopy for maximum light exposure. - Watering & Feeding: Water only when pots feel light. Keep your feed pH locked in at 5.8–6.0 (coco) or 6.2–6.8 (soil) to prevent nutrient lockout.
Feed lightly at first, switching to bloom nutrients in early flower and tapering nitrogen late for denser buds. - Dialed Environment: Lock in your environment: 75–80°F (24 °C–27 °C) with lights on, staged humidity (60% early, 45-50% late), and strong airflow. A stable environment is key to boosting resin and avoiding mould.
- Respect the Clock: Skip transplants and aggressive pruning. Make small, incremental changes. Remember that with autoflowers, a strong start is everything.
Beginner's Glossary: Quick Definitions
New to growing? Here are a few key terms we use in this guide.
- PPFD (Photosynthetic Photon Flux Density): Simply put, this is the amount of usable light your plant is actually receiving. It's the most accurate measure of light intensity.
- EC (Electrical Conductivity): A measure of the nutrient and salt strength in your water. It helps you avoid over or underfeeding your plants.
- pH (Potential Hydrogen): A scale measuring how acidic or alkaline your water/soil is. Correct pH is non-negotiable, as it allows your plant's roots to absorb nutrients.
- LST (Low-Stress Training): A gentle technique of bending and tying down branches to create a wider, flatter plant that absorbs more light.
The Modern Autoflower and Its Potential
Today's autoflowers are legitimate yielders. With proper care, most finish as compact plants (about 50 cm–100 cm / 20–40 inches) yet can crank out chunky, resinous flowers—and fast.
The trick? Build strong roots early, keep your light and environment dialed in, and use training that respects their fixed timeline.
Do that, and even your first or second grow can produce top-shelf buds at home. If you're just starting out, our complete guide on how to grow autoflowers covers every essential step, from seed to harvest.
No botany degree required.
The Foundation: Pre-Growth Preparations for Maximum Bud Size
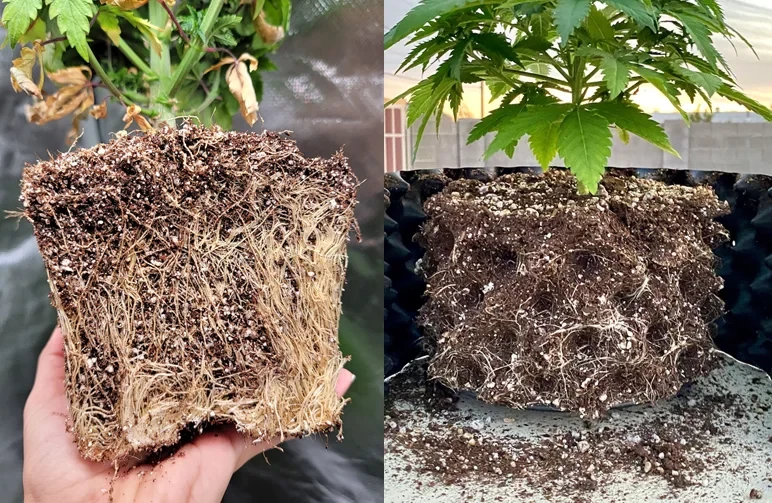
Images courtesy of Nebula Haze via GrowWeedEasy.com (left) and Porcupots.com (right).
1. Genetics are Paramount
Genetics are the engine; nutrients are the fuel. You can pour race fuel into a minivan, but it won't become a Ferrari. Bigger buds start with high-yielding autoflower genetics bred to branch, stack, and finish strong.
Look for breeder notes that mention "high yield," "XL," or "large colas." At WeedSeedsExpress, our entire autoflower collection is hand-picked to combine vigor with potency and flavour.
Starting with great genetics ensures your potential is high from day one.
How to Choose Quickly:
- Yield Notes: Look for "heavy," "XL," or realistic grams-per-plant estimates (80 grams per plant–200 grams per plantindoors is a good range for modern autos).
- Structure: Medium-to-tall autos tend to support more bud sites than very short "dwarf" strains.
- Experience Tags: Choose strains labeled "Easy" or "Beginner-friendly" if you're on your first or second grow.
2. The "Final Home" Potting Method
Transplants can stunt autoflowers. Why? Because autos flip to flowering based on age, not light cycles. Any shock during the crucial weeks 2–4 steals time from vegetative growth, which means fewer branches and smaller buds.
The solution is simple: start your seed in its final container. No up-potting, ever. For most indoor grows, 12–20 liters (3–5 gallons) is the sweet spot. It's big enough for a healthy root mass without wasting medium or space.
Pro Tip: Use fabric pots or air pots. They "air prune" roots by exposing them to air at the edge of the pot. This prevents root circling and promotes a dense, highly efficient root ball that can fuel massive bud growth.
3. Bigger Pots for a Bigger Root System
More roots = more uptake = more fuel for buds. It's that simple.
If you have the space and light to support it, stepping up to a 15–25 liter (4–7 gallon) pot can boost your plant's final size and yield.
Just don't go comically huge. An oversized pot can hold too much water, staying wet for too long, which can suffocate roots and slow growth. Match your pot volume to your light power and tent size. For example, a quality 300W LED can comfortably support one or two autos in 5-gallon pots.
4. The Ideal Growing Medium
Roots love oxygen. An airy, well-draining medium helps roots breathe and slurp up nutrients efficiently.
- Coco Coir: Often mixed with 25–30% perlite, coco is superb for autos. It holds a perfect balance of water and oxygen, promoting explosive growth.
- Soil: If using soil, aim for a light, fluffy mix. Avoid heavy, dense potting soils. You can improve any soil by adding extra perlite to increase aeration.
Quick Mix Ideas:
- 70% Coco / 30% Perlite: For fast growth and precise pH/nutrient control.
- 70% Light Soil / 30% Perlite: A more forgiving option with a water-every-few-days cadence.

The 70/30 Blueprint: A high-detail view of a professional-grade coco and perlite mix. The white perlite rocks act as "oxygen lungs" within the fibrous coco, ensuring that even when the medium is fully saturated, the roots can still breathe. This airy structure is the secret to the rapid growth rates seen in modern autoflowers.
Image courtesy of HydroCrunch.com
The Growth Phase: Nurturing Your Autoflowers for Explosive Development
Mastering the Light Cycle
Autoflowers don't need a 12/12 light cycle to bloom. For maximum growth, we recommend running your lights 18–20 hours per day, from seed to harvest.
More light hours means more photosynthesis, which creates more energy for building buds. If your electricity rates are manageable, go for a 20/4 schedule. If you need more of a balance, 18/6 works beautifully.
The key metric is the intensity at your plant's canopy:
- For LED lights, target 500–700 PPFD in early flower.
- You can increase this up to ~800–900 PPFD in late flower, but only if your temperature, humidity, and feeding are perfectly stable.
If you don't have a light meter, simply follow the manufacturer's height and dimmer recommendations. Watch for signs of light stress, like leaves curling upwards ("tacoing") or bleaching.
Perfecting Your Watering Technique
Overwatering is the #1 silent killer of autoflower buds. Roots need oxygen to thrive, and a constantly soggy medium will suffocate them.
How to Water Correctly:
- The Hand Test: Don't water on a schedule. Instead, lift the pot. Water only when it feels noticeably lighter.
- Check the Soil: The top 1-2 inches of soil (or top inch of coco) should feel dry to the touch.
- Water Slowly: Pour water slowly around the base of the plant until you see a small amount of runoff (10-20% is ideal for coco). This ensures the entire root zone is saturated.
Warning: Use room-temperature water (68–72°F / 20 °C–22 °C). Ice-cold water can shock the roots and stall growth.
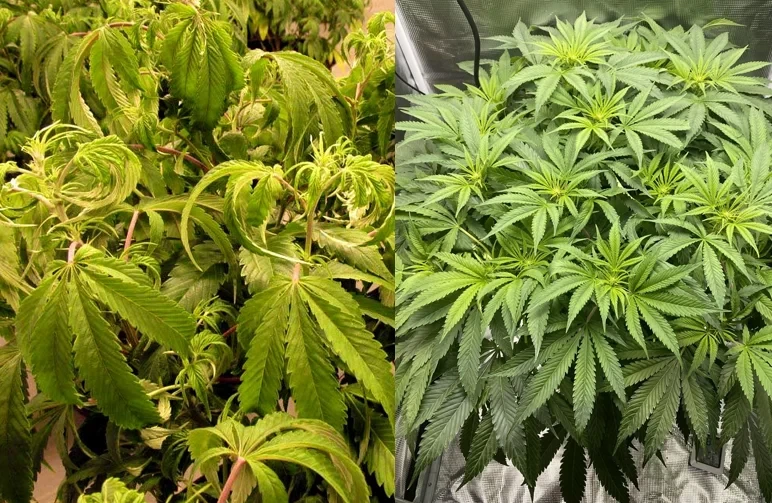
Images courtesy of PistolPete80 via 420magazine.com (right) and Nebula Haze via GrowWeedEasy.com (left).
A Strategic Nutrient Schedule
Autos have a short vegetative window and can't recover well from nutrient burn. The strategy is to start gentle and build up slowly.
- Weeks 1–2: Use only root stimulants and a mild dose of Calcium/Magnesium (Cal-Mag). Calcium is critical for fast cell growth.
- Weeks 2–4 (Preflower): Introduce a light "grow" nutrient rich in Nitrogen (N) at about 50% of the recommended strength. Watch your leaf colour—you want healthy green, not dark, shiny, or clawing leaves.
- Early Flower: As buds form, switch to a "bloom" formula with more Phosphorus (P) and Potassium (K). Keep Nitrogen at a moderate level.
- Mid–Late Flower: Gradually taper off the Nitrogen while maintaining Potassium to build density and resin. If you see burnt leaf tips, back off your feeding by 10–20%.
Maintaining the Perfect Environment
Your environment is an invisible yield booster. Keeping it stable allows the plant to focus all its energy on growth.
Temperature: Aim for 75–80°F (24 °C–27 °C) when lights are on and a slight drop to 68–72°F (20 °C–20 °C) when lights are off.
Humidity (RH): Start high and gradually decrease.
- Early Growth: 60–65% RH
- Mid Flower: 50–55% RH
- Late Flower: 45–50% RH (crucial for reducing mould risk)
Airflow: Use one oscillating fan below the canopy and one above. You want to see a gentle flutter in the leaves, not a wind tunnel.
Advanced Techniques for Next-Level Buds
Low-Stress Training (LST) for an Even Canopy
LST is our go-to training technique for autoflowers. It involves gently bending and tying branches to spread the plant horizontally. This allows light to hit more bud sites equally.
Start around week 3–4, when the plant has 5–6 nodes and its stems are still flexible. Anchor the main stem in one direction, then gently pull the side branches outward and down over a few days.
Why it Works: LST creates a flat, even canopy. This results in many medium-to-large colas instead of one giant main cola and a bunch of small, fluffy "larf" buds on the bottom. More tops = more weight.
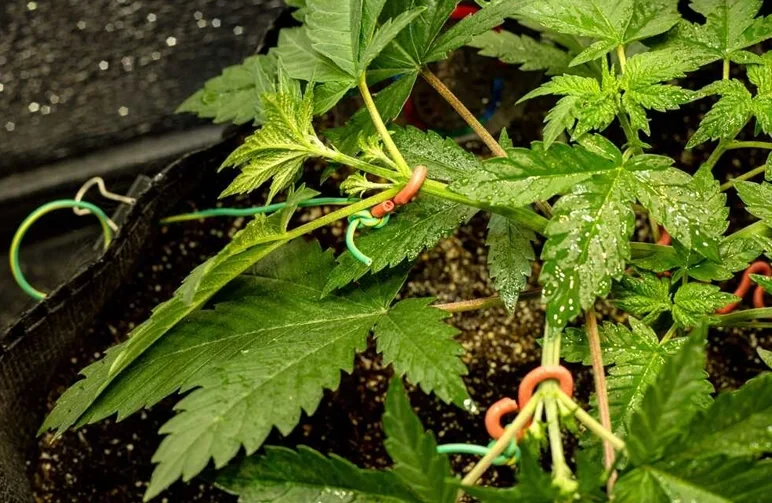
Image courtesy of HowToGrowMarijuana.com
The Power of pH Balance
We mentioned it before, but it's so important it deserves its own section. If your pH is wrong, your plants can't eat.
Even with perfect nutrients in your water, an incorrect pH will "lock out" certain minerals, making them chemically unavailable to the roots. If you see random yellowing or rust spots despite proper feeding, check your pH first.
Target pH Ranges:
- Coco / Hydroponics: 5.8–6.0
- Soil: 6.2–6.8
Invest in a simple digital pH pen and calibrate it monthly. It's the best tool for preventing yield-killing deficiencies.
Implementing the Sea of Green (SOG) Method
Sea of Green (SOG) means growing more small plants instead of a few large ones. For autoflowers, it's a highly efficient way to pull consistent harvests.
- Pot Size: Smaller pots, around 6.5–8.5 liters (1.7–2.2 gallons).
- Plant Count: As many as your space allows (e.g., 4–6 plants in a 2x4 ft tent).
- The Goal: Grow single, strong central colas with minimal training for a very fast turnaround.
SOG is perfect for autos because it plays to their strengths: a compact size and a rapid, predictable flowering schedule.
The Ultimate Autoflower Week-by-Week Checklist
Use this as a general guide. Always observe your plant and adjust as needed.
| Week | Key Goals & Actions | Light | Environment | Feeding & Watering |
|---|---|---|---|---|
| 1 | Germinate & establish seedling | 18/6 | 75-80°F, 65% RH | Water sparingly, Root Stimulants only |
| 2-3 | Strong vegetative growth | 18/6 | 75-80°F, 60% RH | Introduce light Grow nutes (25-50%) |
| 4 | Begin LST, watch for preflowers | 18/6 | 75-80°F, 60% RH | Continue Grow nutes, water when pot is light |
| 5-6 | "The Stretch", bud sites form | 18/6 | 75-78°F, 55% RH | Transition to Bloom nutrients |
| 7-8 | Buds fattening, resin production | 18/6 | 75-78°F, 50% RH | Full strength Bloom nutes, watch for burn |
| 9-10 | Buds ripening, density increases | 18/6 | 72-78°F, 45-50% RH | Taper Nitrogen, focus on P/K. Prepare to flush. |
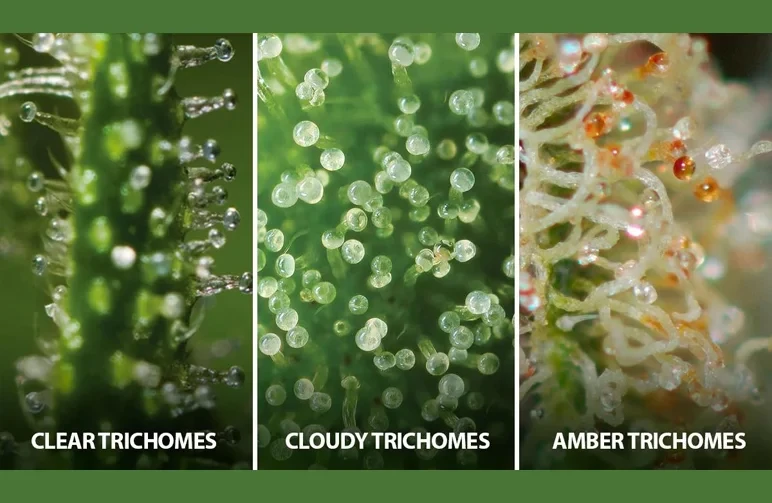
| 11+ | Final flush & harvest window | 18/6 | 70-75°F, 45% RH | Flush with pH'd water. Check trichomes daily. |
Troubleshooting: What Shrinks Buds & How to Fix It
Problem: Transplant Shock.
- Fix:Don't do it. Start seeds in their final pots to avoid stalling growth during the critical early weeks.
Problem: Low Light. Fluffy, airy buds are a classic sign of insufficient light.
- Fix: For a 2x4 ft tent, ensure you have a quality 300-350W LED (true watts). Keep it at the recommended height (usually 12-18 inches) and watch the leaves.
Problem: Overwatering. Constantly wet pots starve roots of oxygen.
- Fix:Let the pot lighten up completely between waterings.
Problem: pH Drift. You see weird deficiencies even though you're feeding correctly.
- Fix: Your pH is almost certainly out of range. Recalibrate your pH pen and check your nutrient mix every time.
Problem: Overfeeding. Dark, clawing leaves with burnt tips.
- Fix: Autos don't need a heavy pour. Dial back your feed by 20-25% and use plain water for the next cycle.
Conclusion: Patience and Precision for a Bountiful Harvest
Bigger autoflower buds come from doing the simple things right, early, and consistently.
It all boils down to this: strong genetics, final pots, airy medium, steady light, and a locked-in pH. Layer on a stable environment and some gentle LST, and you will watch your colas thicken week by week.
With autoflowers, every decision needs to respect the clock. But when you build that momentum early, they reward you with a fast and frosty harvest.
If you're starting fresh, pick proven high-yielding autoflower seeds and give them a dialed-in home from day one. You have the knowledge—now it's time to turn these tips into jars of dense, top-shelf bud.


