If you've been doom-scrolling forums about the perfect time to harvest autoflowers, breathe. We've all been there, staring at buds, wondering if one more week will turn "meh" into "monster."
Here's the no-bro-science answer: harvest when trichomes are mostly cloudy (with a sprinkle of amber) and about 70–90% of pistils have darkened and curled in.
In this guide, we'll show you exactly how to see that window with your own eyes. We'll cover the five key visual signs, the tools you actually need, and what to do in the final two weeks so you don't miss the sweet spot.
Key Takeaways
- The Perfect Time: Harvest when trichomes are ~70–90% cloudy with 5–15% amber and 70–90% of pistils are darkened.
- The #1 Method: Inspect trichomes on calyces (not sugar leaves) using a 30–60x loupe. This is the only way to be certain.
- Supporting Cues: Use pistil color, leaf fade, bud density, and slowing growth as confirming signs, but let trichomes make the final call.
- Final Weeks: In the last 1–2 weeks, drop humidity to 45–50%, consider an optional flush and 24-48 hours of darkness, and prepare your drying space.
- Timing Shapes Effects: Mostly cloudy trichomes deliver an energetic high; more amber creates a sleepier, body-heavy effect. Stagger the chop to learn your preference.
Understanding the Autoflower Harvest Timeline (Seed to Chop)
Autoflowers run on their own clock. Unlike photoperiod plants, they flip themselves to flower automatically. That speed is a huge advantage, but it means your decisions need to be sharp.
Breeder timelines are estimates, not gospel. Treat the calendar as a rough map, but navigate by instruments—the visual signs on your plant.
Here’s a typical timeline to help you anticipate the changes:
| Stage | Weeks (Approx.) | Temp Target | RH Target | Key Signs |
|---|---|---|---|---|
| Seedling | 1-3 | 75–80°F (75.2 °F-80.6 °F) | 60–70% | First true leaves appear, rapid root growth. |
| Pre-Flower | 3-5 | 70–77°F (69.8 °F-77 °F) | 50–60% | First white pistils show at nodes. |
| Full Flower | 5-9+ | 70–77°F (69.8 °F-77 °F) | 40–50% | Buds stack, aroma intensifies, resin appears. |
| Harvest | 8-12 | 60-65°F (60.8 °F-64.4 °F) | 55-60% (Dry) | Cloudy/Amber trichomes, darkened pistils. |
Step 1: Inspect Trichomes (The Most Accurate Method)
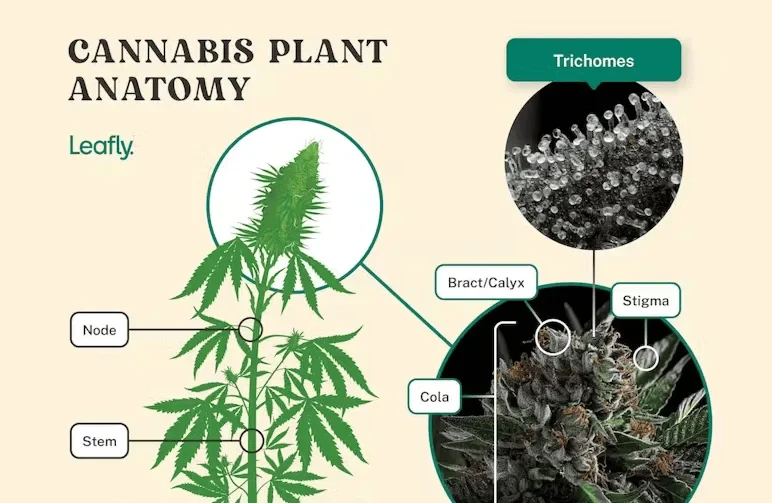
Trichomes are the tiny, mushroom-shaped resin glands covering your buds. They look like frost, but up close they tell a story of ripeness through color. This is your built-in harvest meter.
The Tools You Actually Need
You cannot eyeball this. A 30–60x jeweler's loupe or a small digital microscope is non-negotiable. The cheap ones work fine—steadiness matters more than price.
A 30x loupe is good for a quick check, but a 60x makes it much easier to distinguish cloudy from clear. A digital scope that clips to your phone is a game-changer, allowing you to take pictures to compare day-by-day progress.
Where to Look (This is Crucial)
Inspect trichomes on the actual buds (calyces), not the little sugar leaves growing out of them. Sugar leaves mature faster and can show amber days or weeks early, fooling you into a premature harvest.
What the Colors Mean
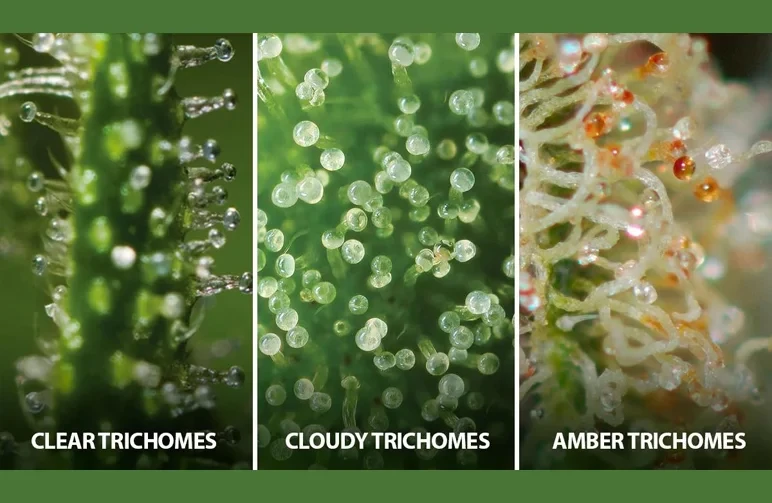
Your goal is to track the shift from clear to cloudy to amber.
- Mostly Clear: Too early. THC hasn't peaked. The aroma will be grassy and the effects weak or edgy.
- Mostly Cloudy/Milky: Peak THC. This delivers the strongest, most potent, and most psychoactive effects for most strains.
- Increasing Amber: THC is oxidizing into CBN, a cannabinoid known for its sedative, body-heavy effects.
Our Go-To Target
Harvest at roughly 70–90% cloudy with a smattering of amber (5–15%) for a potent, balanced high. If you want a racier, more energetic buzz, cut with fewer amber heads.
If you want heavier night-time vibes, let more amber form (up to 30-40%).
Step 2: Check Pistil Color (The Easy Supporting Cue)
Pistils are the "hairs" you first saw in pre-flower. They start white and straight, then darken (orange, brown, red) and curl inward as the flower matures.
Pistils are a quick visual cue. When about 50% have darkened, you're in the home stretch. By 70–90% darkened and curled, you're very likely in the harvest window.
But pistils can lie. High heat, intense light, or even just touching the buds can make pistils brown early. That's why we use pistils as a supporting sign and trichomes as the final decision-maker.
Step 3, 4, & 5: Look for These Confirming Signs
Stack your signals. If your trichomes and pistils look ready, these three final cues will give you 100% confidence.
- Natural Fade on Fan Leaves: As the plant finishes, it cannibalizes stored nutrients from its older leaves. A natural, gradual yellowing of lower and mid fan leaves is a strong sign of maturity.
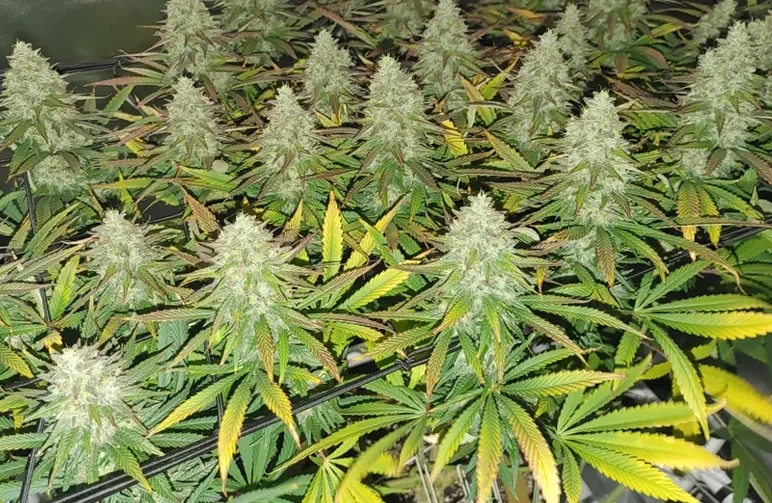
Yellowing isn't always bad news. As seen in this canopy by Reddit user krypter123456, the 'fade' mimics the changing leaves of autumn. Notice how the fan leaves are turning yellow and purple as the plant drains its nutrient reserves, yet the buds remain thick, green, and healthy. This is the look of a finished plant. - Buds Feel Dense and Swollen: Calyces should be plump and the buds should feel firm and solid when gently squeezed. Airy, fluffy buds usually need more time to fill out.
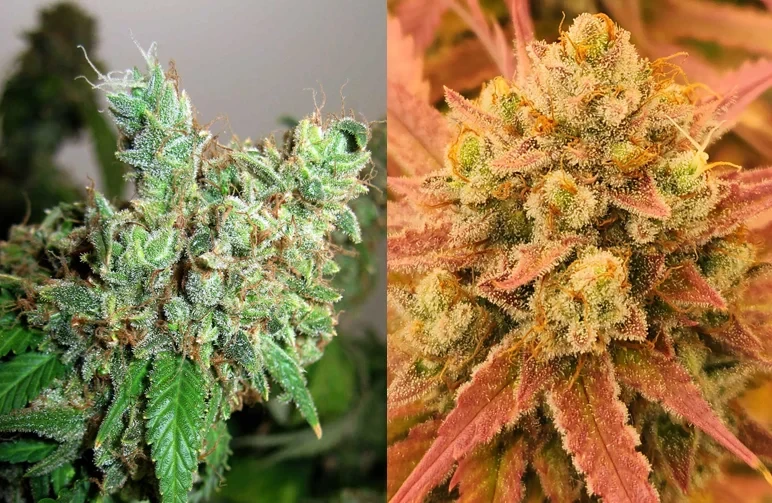
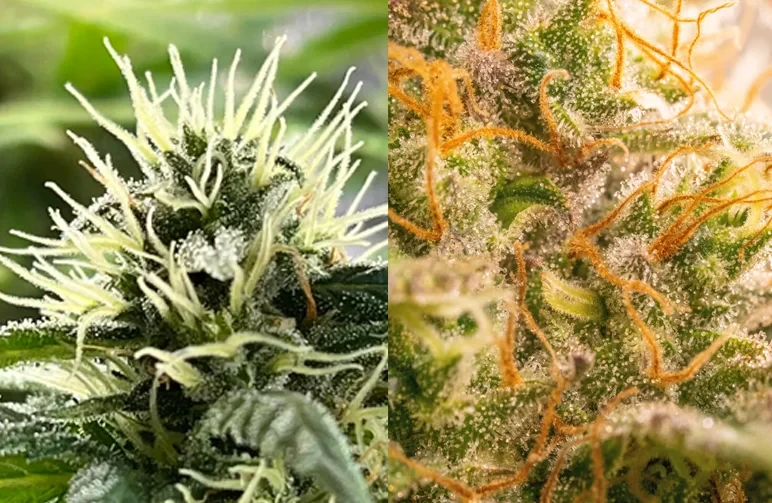
Don't confuse stress with success. On the left (Sirius Fourside, GrowWeedEasy.com), the bud is 'foxtailing'—producing airy, finger-like spires, often due to heat stress. These new growths keep throwing white pistils, fooling you into waiting forever. On the right (Reddit user Hot-Sign-8227), we see true maturity: the bud is dense, chunky, and the calyces are swollen tight like packed grapes. - Growth Has Stopped: The frantic "stacking" of new buds has tapered off. You're not seeing a fresh explosion of new white pistils every day. If the plant has stopped building, it's focusing on ripening.
The Pre-Harvest Checklist: What to Do 1-2 Weeks Before Chopping
Small tweaks now protect terpenes and ensure a smooth finish.
- Track Trichomes Daily: Once you see mostly cloudy trichomes, check every day. The shift to amber can happen fast.
- Optional Flush: "Flushing" means giving plain, pH-balanced water for the final 7–10 days. This can help produce a smoother smoke.
- Drop Humidity, Boost Airflow: Target 45–50% RH. Good airflow prevents bud rot.
- Consider 24–48 Hours of Darkness: An optional trick. Some growers see a final spike in resin production by giving the plant 48 hours of total darkness right before the chop.
- Prepare Your Drying Space: Your dry is just as important as your grow. Have a dark space ready that can hold 60–65°F (60.8 °F-64.4 °F) and 55–60% RH with gentle airflow.
The Physical Harvest: How to Chop Your Plant
You've nailed the timing. Don't fumble at the goal line.
Get Your Tools:
You'll need sharp, clean pruning shears (one large pair for branches, one small pair for trimming), isopropyl alcohol to keep them clean, and disposable gloves to keep your hands resin-free.
Choose Your Method:
- Whole Plant Hang: The easiest way. Cut the plant at the base of the main stalk and hang the entire thing upside down in your drying space. This promotes a slow, even dry.
- Branch by Branch: If your plant is massive or your drying space is small, cut individual branches and hang them separately.
Wet Trim vs. Dry Trim:
- Wet Trim: You remove the large fan leaves and smaller sugar leaves right after chopping, before drying. It's easier and can help in humid environments.
- Dry Trim: You remove only the large fan leaves and then hang the plant to dry. You trim the sugar leaves after it's dry. This method is preferred by many for preserving terpenes and achieving a slower dry.
Harvesting Early vs. Late: What Happens if You Miss the Window?
Think of it like an avocado. Too early, it's hard and bland. Too late, it's mushy and sleepy. The middle? That's the sweet spot.
- Harvesting Too Early (mostly clear trichomes): Results in lower potency, smaller buds, and a muted aroma. The high can feel short or jittery.
- Harvesting Late (lots of amber trichomes): The effects become heavier and more sedative as THC converts to CBN. This can be a choice, not a mistake, for those seeking sleep aid or pain relief.
If you're unsure, split the difference: Chop the top half of the plant at "mostly cloudy," and let the lower buds go for another 4–5 days to develop more amber. This is the best way to learn your personal preference.
Frequently Asked Questions (FAQ)
What is the perfect time to harvest autoflowers?
Aim to harvest when trichomes are about 70–90% cloudy with 5–15% amber, and roughly 70–90% of pistils have darkened. This window delivers peak THC and balanced effects. Always use a loupe to confirm.
How long do autos take from seed to harvest?
Most finish in 8–12 weeks from germination. However, always trust the visual signs on your plant (trichomes and pistils) over any calendar date from a breeder.
For a detailed breakdown of what to expect during those weeks, read our Autoflower Growing Guide.
Can I rely only on pistils to decide when to harvest?
No. Pistils can brown early from heat or light stress. Use them to know when you're getting close, but use trichome color to make the final decision.
My leaves are turning yellow. Did I ruin my plant?
Not necessarily. A gradual yellowing of fan leaves in late flower is a normal fade and a sign of maturity. As long as the buds look healthy and trichomes are ripening, you're on track.
Should I harvest at the end of the dark cycle?
Harvesting right before the lights turn on can help preserve volatile terpenes that may degrade under intense light and heat. The optional 24-48 hour dark period is an extension of this idea.
Do I need to harvest the whole plant at once?
No. Staggered harvesting is a great strategy. Top colas often mature faster than lower ones. You can chop the ripe tops first and give the lowers a few extra days to finish.
Conclusion
The perfect time to harvest autoflowers isn't a date on a calendar—it's a look. When your loupe shows mostly cloudy trichomes with a dusting of amber, and 70–90% of pistils have darkened, you're in the pocket.
Use the calendar as a guide, but let your eyes make the final call. Patience in the final two weeks is the difference between a good harvest and a great one. You've got this.


