You're cruising through veg, leaves praying to the light, when, bam, tiny white freckles show up. A day later there's a shimmer of webbing and your stomach drops. If you grow long enough, you'll meet spider mites.
The good news? We've beaten them in our own rooms (more than once), and in this guide we'll show you exactly how to identify and get rid of spider mites on cannabis without nuking your crop or your terp profile.
We'll move quick, keep it practical, and help you prevent round two.
Watch the plant, not the panic button.
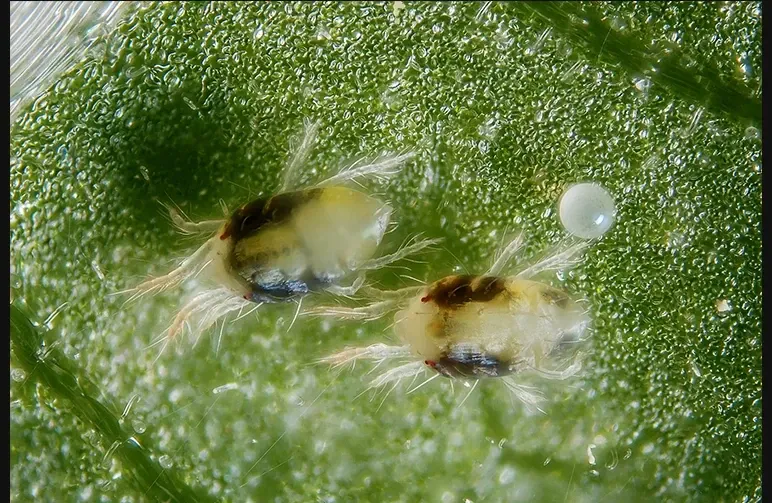
Featured Image: Adult spider mites and egg by Gilles San Martin, CC BY-SA 2.0 via Flickr.
Key Takeaways
- Scout Early: Check under leaves twice a week for stippling (tiny dots), eggs, and mites using a 10x–60x loupe. Early detection is everything.
- Disrupt Their Environment: Break their rapid life cycle by dropping temps to ~65–75°F, raising relative humidity (RH) to 50–60% in veg, and maximizing canopy airflow.
- Act Fast & Clean: Isolate infected plants, prune the worst leaves, wash the entire plant (especially undersides), and sanitize your grow space immediately.
- Fight Smart: Use a rotation of organic sprays (neem, insecticidal soap, essential oils) in veg. Rely on predatory mites as your primary weapon, especially in flower.
- Prevent a Rebound: The best fight is the one you avoid. Maintain a strict Integrated Pest Management (IPM) routine: weekly scouting, a clean room, proper environmental control, and quarantining all new plants.
What Are Spider Mites and Why Are They a Threat?
Spider mites, most commonly the two-spotted spider mite (Tetranychus urticae), aren't insects; they're microscopic arachnids. They use piercing mouthparts to puncture individual plant cells and suck out the chlorophyll and sap.
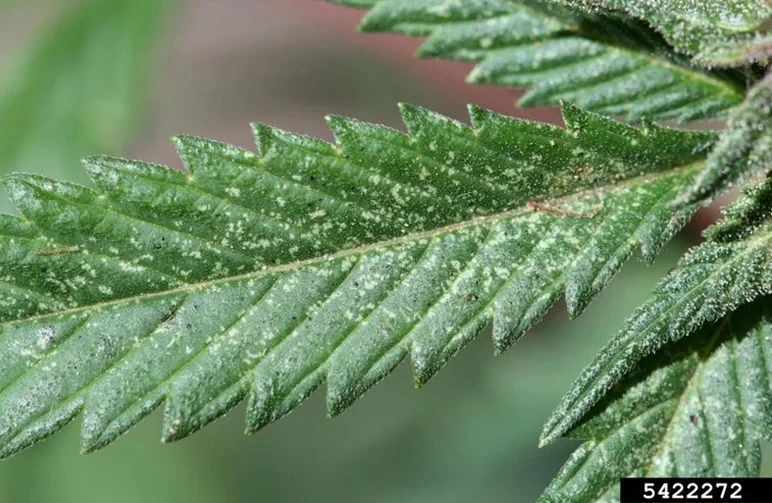
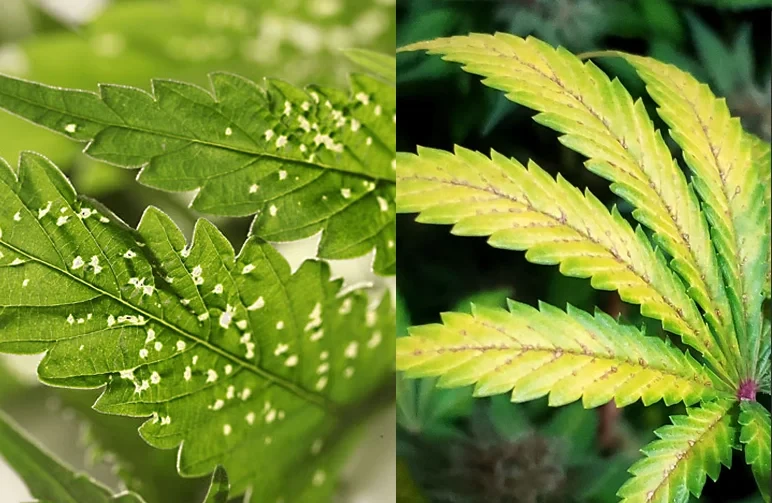
This damage shows up as stippling (those telltale yellow/white specks), which hinders photosynthesis, tanks plant vigor, and ultimately crushes your yield and potency.
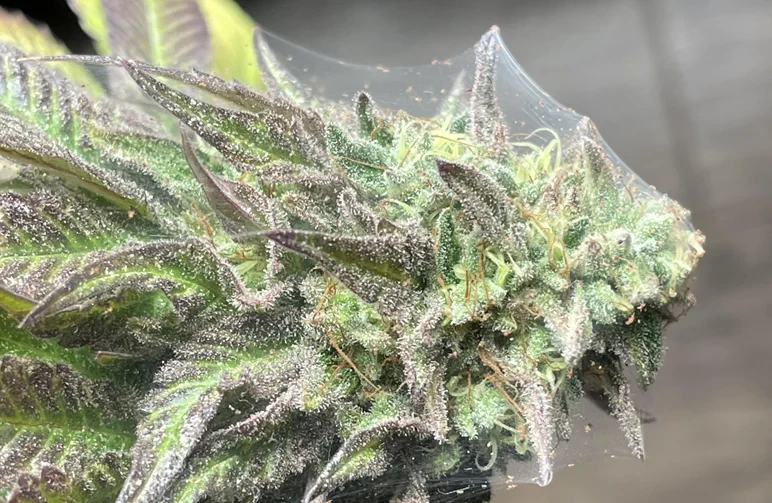
A full-blown infestation can cover your buds in a disgusting web, rendering them unusable.
Understanding the Enemy: The Spider Mite Life Cycle
Knowledge is power. In warm, dry conditions, their life cycle is terrifyingly fast.
- Egg: Tiny, clear, spherical eggs are laid on the underside of leaves.
- Larva: They hatch in as little as 2-3 days into six-legged larvae.
- Nymph: They molt through two eight-legged nymph stages, feeding the entire time.
- Adult: They become breeding adults.
Under ideal conditions for them (75–85°F with low humidity), this entire cycle can complete in 5 to 7 days. Miss them for a weekend, and you can return to a population explosion.
How Spider Mites Damage Cannabis Plants
The damage progresses in stages:
- Stippling: Individual pale dots appear on leaves as cells are killed.
- Bronzing & Yellowing: As damage accumulates, the dots merge, and leaves take on a bronze or yellow, sickly appearance.
- Webbing: In an established colony, fine silk webbing appears between leaves and on buds as a protective home and a superhighway for them to travel.
- Defoliation: The plant, unable to sustain itself, will drop the heavily damaged leaves.
Favorable Conditions: What Attracts Spider Mites
Your perfect veg room can be a 5-star resort for mites. They thrive in:
- Warm Temps: Above 70°F speeds their metabolism; 75–85°F is their party zone.
- Low Humidity: Below 50% RH makes it easier for them to thrive and build webs.
- Stagnant Air: Poor airflow and dense, overcrowded canopies create protected pockets for them to breed.
- Poor Hygiene: Dust and debris give them places to hide, and they can easily hitch a ride into your grow on dirty tools, clothes, or new clones.
Early Detection is Key: How to Identify Spider Mites
Catching mites early is the difference between a light spa-day cleanup and an emergency room visit for your garden.
We scout twice weekly in veg and daily in late flower. It’s that important.
The First Telltale Signs: Tiny Specks and Stippling
Look for those tiny white or yellow pinpricks on the upper surfaces of fan leaves. It often starts on lower, more protected parts of the plant.
If you suspect a leaf, wipe its underside with a clean white tissue; a rusty or greenish smear is a sign of squashed mites.
Visual Inspection: What to Look For
Always flip the leaves over. Mites, their eggs, and their webs will almost always be on the leaf underside, where they are protected from environmental stress.
Using a Magnifying Glass for Confirmation
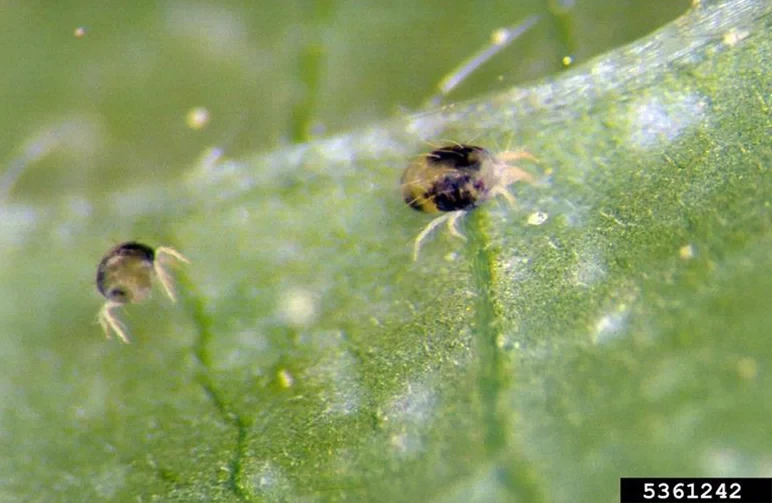
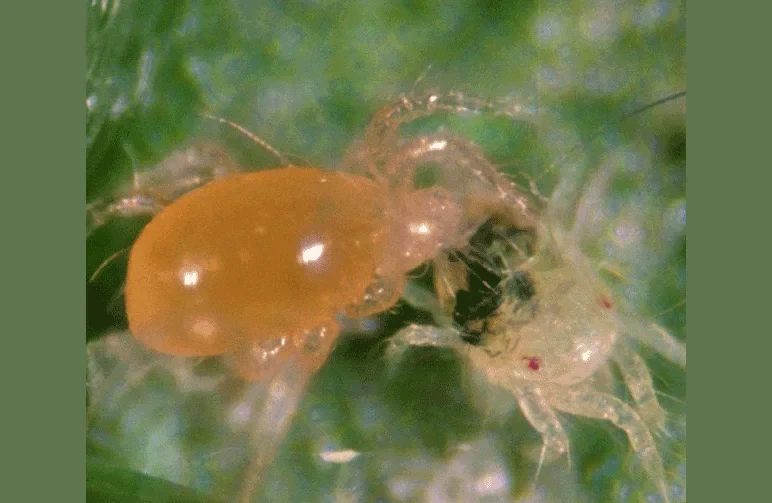
A 10x–60x jeweler’s loupe or a USB microscope is a non-negotiable tool for any serious grower. You’re looking for slow-moving dots—pale, yellow, or reddish bodies, often with two dark spots on their sides.
You will also see the perfectly round, clear eggs.
Spotting Spider Mite Webbing
This is a sign of an established infestation. Look for fine, silky strands stretching from a leaf petiole to the stem or between the serrations of a leaf.
If you see webbing directly on your buds, you need to act immediately with flower-safe methods.
Differentiating Mite Damage from Nutrient Deficiencies
This is a common rookie mistake.
- Spider Mites: Damage is irregular stippling or specks. You will find physical evidence (mites, eggs, webs) on the leaf underside with a loupe.
- Nutrient Issues: Damage is typically more uniform, like overall yellowing, interveinal chlorosis, or burnt edges. There are no bugs.
If you suspect a nutrient issue or want to explore other potential plant problems, our comprehensive Cannabis Troubleshooting Guide is the perfect place to start."
How to Get Rid of Spider Mites: A Step-by-Step Plan
Don't panic and douse your plants in poison. Follow this two-step framework for controlled, effective elimination.
Step 1: Containment and Physical Removal
Isolate: If possible, move infected plants to a separate quarantine area.
Turn Off Fans: Turn off all oscillating and intake/exhaust fans before you start working to prevent blowing mites and eggs around the room.
Prune: Remove the most heavily damaged leaves, especially those with visible webbing. Put them directly into a trash bag and seal it. Sanitize your snips with alcohol between each plant.
Wash: Gently wash your plants. Use a pump sprayer with plain, tepid water set to a fine mist. Start from the bottom of the plant and work your way up, making sure to hit every leaf underside. Support branches as you go to avoid damage.
Sanitize: After the plant is clean, wipe down your entire grow tent, trays, and poles with a 70% alcohol or a mild bleach solution. Cleanliness is a form of treatment.
Step 2: Choosing Your Treatment Method
Now that you've physically reduced their numbers, it's time to break their life cycle. We recommend rotating between methods to prevent resistance.
Spider Mite Treatment Options at a Glance
| Method | Best For | Pros | Cons | Flower-Safe? |
|---|---|---|---|---|
| Neem Oil/Azadirachtin | Veg, Early Flower | Organic, affects feeding/molting | Lingering aroma, can burn | Use with extreme caution early; avoid after week 2-3 of flower |
| Insecticidal Soap | Veg, Early Flower | Kills on contact, minimal residue | Can stress sensitive plants | Yes, early only. Avoid spraying directly on dense colas. |
| Predatory Mites | Veg & Flower | Highly effective, no residue, seeks out prey | Need specific environment (RH), takes time | YES - The #1 choice for mid-to-late flower infestations. |
| Essential Oil Sprays | Veg, Early Flower | Repellent, contact killer | Can burn leaves, potency varies | Risky. Use products specifically labeled safe for bloom, test spot first. |
| Chemical Miticides | Veg ONLY (Last Resort) | Fast knockdown | High risk of residue, resistance, legal issues | ABSOLUTELY NOT. NEVER ON BUDS. |
Organic and Natural Solutions
These are our go-to tools. They are safer for you, your plants, and the final product.
Neem Oil & Azadirachtin
Cold-pressed neem oil (and its active component, azadirachtin) is a growth regulator, not a hard poison. It messes with their ability to feed and molt. Mix per the label, spray at lights-off, and coat every surface, especially undersides.
Repeat every 3-4 days to break the egg cycle.
Insecticidal Soaps
These are potassium salts of fatty acids that dissolve the mites' outer shell on contact. They are highly effective but have no residual effect, so they must be applied thoroughly and repeatedly every 2-3 days during an outbreak.
Essential Oils (Rosemary, Peppermint, etc.)
Commercial blends containing oils like rosemary, peppermint, and clove can be effective contact killers and repellents. Use a pre-formulated, cannabis-safe product to ensure proper emulsification and avoid burning your plants.
Always test on a single leaf first.
Introducing Beneficial Predators: Nature’s Defense
This is the most effective and elegant solution, especially for dense canopies or flowering plants.
- Ladybugs: Good for light clean-up duty, but they tend to fly away.
- Phytoseiulus persimilis (Predatory Mites): These are the special forces. They are aggressive hunters of two-spotted spider mites and reproduce faster than their prey in the right conditions (60-70% RH).
- Green Lacewings: The larvae are voracious generalist predators, excellent for dealing with multiple pest issues at once.
Treating Spider Mites During the Flowering Stage
This is a tightrope walk. You're protecting trichomes and flavour while evicting a pest. Anything you spray can end up in your final product.
Your strategy must shift to be gentle and targeted.
Treating Mites in Flower: Quick Do's & Don'ts
- DO: Release predatory mites like Phytoseiulus persimilis. This is your best and safest weapon.
- DO: Gently rinse plants with plain, pH-balanced water to physically knock mites off.
- DO: Increase air circulation around the buds to create a less hospitable environment.
- DON'T: Spray neem oil or any oil-based product after the first few weeks of flower. It will ruin the taste.
- DON'T: Use any chemical miticides, ever.
- DON'T: Hesitate to prune heavily webbed lower buds to save the rest of the plant and your lungs.
If buds are heavily contaminated with webbing, the hard truth is you may need to cull them. It's not worth the risk to your health or the rest of your crop.
Prevention: Your Best Defense

The best way to beat spider mites is to never let them get established.
Create a Hostile Environment
Optimize Temp & Humidity: Aim for 65–75°F and 50–60% RH in veg. This slightly higher humidity slows mite reproduction.
Keep Air Moving: Use intake/exhaust fans and oscillating fans to ensure there are no dead air zones in your canopy.
Maintain a Clean Grow Room
Sanitation Protocols: Wipe down all surfaces weekly. Keep the floor free of dead leaves and debris. Sanitize tools.
Quarantine New Plants:This is the #1 way mites enter a clean room. Isolate any new clones or plants for at least two weeks.
Inspect them thoroughly with a loupe and give them a preventative spray before introducing them to your main garden.
Proactive Integrated Pest Management (IPM)
IPM isn't a reaction; it's a routine.
- Scout with a loupe weekly, no matter what.
- Use light preventative sprays (like neem in veg) on a rotating basis.
- Consider releasing preventative predators on high-value runs.
- Keep plants healthy and stress-free. A plant that is already weakened by overwatering or underwatering is a much easier target for spider mites. A vigorous plant is a resistant plant.
Frequently Asked Questions (FAQ)
Can spider mites live in soil?
Not really. They are leaf-dwelling pests that feed on foliage. While some may fall into the soil, it's not their habitat or food source. Focus your fight on the plant itself.
How long does it take to get rid of spider mites?
For a moderate infestation, expect a 1-3 week battle of consistent treatment to fully break their life cycle. Don't stop after you see them disappear; continue for at least one more treatment cycle to kill any new hatchlings.
Are the buds safe to consume after a spider mite infestation?
If you caught it early and only used flower-safe methods (like predatory mites and water rinses) with no heavy webbing on the final buds, they should be safe. If colas were covered in webs or you used unapproved sprays, do not risk it.
Will spider mites come back after treatment?
They absolutely can if you let your guard down. A few missed eggs can restart the whole nightmare.
This is why consistent prevention—sanitation, environmental control, and weekly scouting—is the only way to win for good. Make IPM a habit, not a panic move.


